Essential Aspects of Removing a Bathtub Faucet: A Step-by-Step Guide
Replacing a bathtub faucet can enhance your bathroom's aesthetics and functionality. While it may seem like a daunting task, with the right tools and a step-by-step approach, you can complete the job efficiently. This guide will provide you with the essential aspects of removing a bathtub faucet, ensuring a successful and hassle-free process.
1. Gather Necessary Tools:
Before embarking on the removal process, gather the necessary tools:
- Adjustable wrench or basin wrench
- Plumber's putty knife
- Bucket or bowl
- Flashlight (optional)
2. Shut Off Water Supply and Disconnect Water Lines:
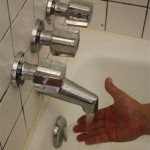
To prevent water damage, turn off the water supply to your bathtub. Locate the shut-off valves under the sink or in a nearby utility closet and turn them clockwise to close. Disconnect the water supply lines by loosening the nuts connecting them to the faucet using an adjustable wrench.
3. Remove Access Panel or Escutcheon Plate:
Depending on your faucet type, there will be an access panel or escutcheon plate covering the base of the faucet. Use a screwdriver to remove the screws and detach the panel or plate, revealing the nuts holding the faucet in place.
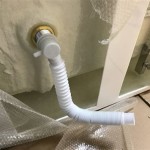
4. Disconnect Drain Assembly:
If applicable, disconnect the drain assembly. Locate the nut securing the drain assembly to the bottom of the faucet and loosen it using an adjustable wrench. Carefully pull the drain assembly away from the faucet.
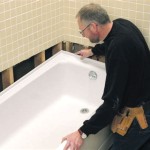
5. Remove Faucet Nuts and Lift Out Faucet:
Use an adjustable wrench or basin wrench to loosen and remove the nuts securing the faucet to the bathtub. Be cautious not to overtighten or damage the nuts. Once the nuts are removed, carefully lift the faucet straight up to detach it from the bathtub.
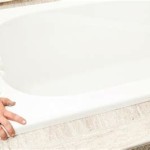
6. Clean Surfaces and Apply Plumber's Putty:
Use a plumber's putty knife to clean the bathtub surface where the new faucet will be installed. Remove any old putty or debris. Apply a bead of plumber's putty around the base of the new faucet to create a watertight seal.
7. Reinstall Faucet, Nuts, and Water Lines:
Align the new faucet with the holes in the bathtub and lower it into place. Tighten the nuts securely using an adjustable wrench or basin wrench. Reconnect the water supply lines to the faucet and tighten the nuts.
8. Reattach Drain Assembly, Access Panel, and Turn on Water:
If applicable, reattach the drain assembly and tighten the nut. Replace the access panel or escutcheon plate and secure it with screws. Turn on the water supply and check for leaks. If any leaks occur, tighten the nuts or connections further.
Additional Tips:
- Use a flashlight to illuminate hard-to-reach areas beneath the sink.
- If the nuts are corroded or difficult to remove, apply penetrating oil to loosen them.
- Always use caution when working with plumbing fixtures and avoid overtightening.
- For complex faucet replacements or potential water damage, it's advisable to consult a professional plumber.

How To Fix A Leaking Bathtub Faucet Diy Family Handyman

How To Fix A Leaking Bathtub Faucet Diy Family Handyman

How To Change A Bathtub Faucet 14 Steps With Pictures Wikihow

3 Ways To Remove A Tub Faucet Wikihow

Husky Tub Drain Removal Tool 410 075 0111 The Home Depot

Replacing A Tub Spout An Easy Repair Job Theworldlink Com

Welpettie Replacement Cartridge With Puller Retainer Clip Tub Shower Repair Kit One Handle Posi Temp Faucet Bathtub Valve Parts And Removal Tool Brass Plastics Com

How To Replace A Bathtub Spout Diy Family Handyman

Welpettie Replacement Cartridge With Puller Retainer Clip Tub Shower Repair Kit One Handle Posi Temp Faucet Bathtub Valve Parts And Removal Tool Brass Plastics Com

3 Ways To Remove A Tub Faucet Wikihow
Related Posts