Rough-In Plumbing for Bathtub Drain in Slab: A Comprehensive Guide
Introduction: When it comes to bathroom renovations or new construction, rough-in plumbing plays a critical role in ensuring the proper functioning of fixtures like bathtubs. In situations where the bathtub will be installed on a concrete slab, specific considerations and procedures are necessary for the drain line. This article delves into the details of rough-in plumbing for bathtub drains in slab, providing valuable insights for contractors, plumbers, and DIY enthusiasts alike. 1. Understanding the Purpose of Rough-In Plumbing: The primary purpose of rough-in plumbing is to establish the necessary infrastructure for water supply and drainage before the final installation of fixtures such as bathtubs, sinks, and toilets. It involves installing pipes, drains, valves, and vents to ensure that water can flow freely in and out of the fixtures. Proper rough-in plumbing ensures that the fixtures function optimally and helps prevent future plumbing problems. 2. Planning and Preparations: Before initiating the rough-in plumbing process, careful planning is essential. This includes determining the exact location of the bathtub, taking measurements, and creating a layout plan. It's crucial to verify local building codes and regulations to ensure compliance. Additionally, ensure that the concrete slab is smooth, level, and free of any imperfections that may hinder the installation process. 3. Roughing-In the Bathtub Drain Line: 3.1. Drainpipe Selection: When selecting the drainpipe for the bathtub drain, consider the size and type of bathtub. Typically, 2-inch diameter PVC pipes are suitable for most residential bathtubs. Ensure that the pipe is rigid and durable to withstand the weight of the water and potential movement of the bathtub. 3.2. Installing the Drain Pipe: a) Cut the PVC pipe to the desired length, ensuring a slight downward slope of 1/4 inch per foot to facilitate proper drainage. b) Connect the drainpipe to the bathtub drain outlet using a slip joint or coupling. Ensure the connection is secure and watertight. c) Extend the drainpipe through the concrete slab, leaving enough length for connecting to the main drain line later during the finishing stage. d) Secure the drainpipe to the concrete slab using pipe hangers or straps to prevent movement. 3.3. Installing the Overflow Drain: The overflow drain is a safety feature that prevents water from overflowing the bathtub. It's usually located near the top of the bathtub and connects to the main drainpipe. Follow these steps to install the overflow drain: a) Cut the overflow pipe to the required length. b) Connect one end of the overflow pipe to the overflow outlet on the bathtub using a slip joint or coupling. c) Connect the other end of the overflow pipe to the main drainpipe using a Y-fitting or a dedicated overflow drain kit. d) Secure the overflow pipe to the concrete slab using pipe hangers or straps. 4. Testing the Drain Line: Once the rough-in plumbing for the bathtub drain is complete, perform a leak test to ensure everything is functioning properly. Plug the drain and fill the bathtub with water. Check for any leaks at the drainpipe connections and the overflow drain. If leaks are detected, tighten the connections or use plumber's putty to seal the gaps. 5. Finishing Touches and Final Installation: After the rough-in plumbing is completed and tested, the final installation of the bathtub can proceed. This typically involves connecting the drainpipe to the main drain line, installing the bathtub, and securing it in place. Follow the manufacturer's instructions for the specific bathtub model to ensure proper installation. Conclusion: Rough-in plumbing for bathtub drains in slab requires careful planning, precise measurements, and adherence to local building codes. By following the steps outlined in this article, contractors, plumbers, and DIY enthusiasts can ensure that the bathtub drain is properly installed and functioning optimally. Remember to prioritize safety, use high-quality materials, and test the drain line thoroughly before finalizing the installation. With proper rough-in plumbing, you can create a functional and aesthetically pleasing bathroom space that withstands the test of time.
Plumbing Rough In Slab Diagrams Diagram Shower Drain Under Sink

Plumbing Rough In For Slab Inspections Internachi Forum

Plumbing In A Concrete Slab

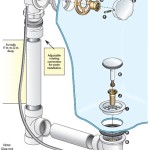
Understanding Bath Traps

Plumbing In A Concrete Slab

I Am Installing A Fiberglass Tub Shower On Concrete Slab In Garage Along With Lavy And Toilet The Same Wall

Plumbing Rough In For Slab Inspections Internachi Forum

Under Slab Plumbing Rough In Bakwas Enterprises

Rough In Plumbing Before Concrete Slab Pole Barn House Ep 4

Slab Under Plumbing Solutions Llc