Remove Bathtub Caulk: A Step-by-Step Guide
Caulk is a critical element in bathrooms, sealing gaps between the bathtub and surrounding surfaces to prevent water damage. However, over time, it can become discolored, cracked, or damaged, necessitating removal and replacement. Removing bathtub caulk may seem daunting, but it's a straightforward process with the right tools and techniques.
Step 1: Gather Necessary Tools
Before starting, gather a utility knife, razor blade scraper, caulk remover, rubbing alcohol, cotton balls or swabs, and a damp cloth.
Step 2: Score the Old Caulk
Carefully use the utility knife to score the old caulk along the edges where it meets the bathtub and surrounding surfaces. Avoid cutting into the bathtub or tile.
Step 3: Apply Caulk Remover
Apply caulk remover to the scored areas and let it sit for a few minutes as per the manufacturer's instructions. This will soften the caulk, making it easier to remove.
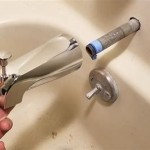
Step 4: Scrape Away the Caulk
Use the razor blade scraper to gently scrape away the softened caulk. Hold the scraper at a low angle and scrape towards you, avoiding damage to the surrounding surfaces.
Step 5: Clean the Surface
Once the old caulk is removed, dip cotton balls or swabs in rubbing alcohol and wipe the area thoroughly to remove any remaining caulk residue. Use a damp cloth to wipe away the rubbing alcohol.
Step 6: Apply New Caulk
Apply new caulk to the cleaned area using a caulk gun. Smooth the caulk with your finger or a caulk finishing tool for a professional finish. Allow the caulk to cure as per the manufacturer's instructions before using the bathtub.
Tips for Success
- Use a sharp utility knife and razor blade scraper to prevent ragged edges.
- Don't apply excessive pressure when scraping to avoid damaging the bathtub or tile.
- Use a non-acidic caulk remover to prevent damage to the surrounding surfaces.
- Thoroughly clean the area before applying new caulk to ensure a strong bond.
- Allow ample time for the caulk to cure before using the bathtub to prevent water damage.
Conclusion
By following these steps, you can effectively remove bathtub caulk and ensure a watertight seal for your bathroom. Remember to use the appropriate tools and techniques to avoid damage and achieve a professional-looking result.

The Best Tricks How To Remove Caulk

How To Remove And Replace Caulk In A Bathtub Ifixit Repair Guide

Caulk Remover How To Remove Old Diy Bathroom

How To Caulk A Shower Or Tub True Value

Prevent Water Damage Replace The Old Caulk Around Your Tub

Remove Old Caulk And Install Trim Strips Like A Pro Instatrim

Here S How Remove And Replace Mildewed Bathroom Caulk

Removing Hardened Caulk Fine Homebuilding

How To Remove Old Caulk Dap Global

How To Remove And Replace Caulk In A Bathtub Ifixit Repair Guide