Step-by-Step Guide: How to Tile a Bathtub
### 1. Preparation - Acquire the materials: tiles, thin-set mortar, tile adhesive, sealer, and any other necessary tools. - Remove the bathtub fixtures, drains, and plumbing components. - Clean the bathtub surface with a suitable cleaning agent and let it dry thoroughly. ### 2. Applying the Mortar - Apply a layer of thin-set mortar onto the bathtub surface using a trowel. - Ensure the mortar is evenly spread and follows the manufacturer's instructions for application. ### 3. Initial Layer of Tiles - Begin laying the tiles onto the mortar starting with the first row. - Ensure each tile is level and firmly pressed into the mortar. ### 4. Cutting Tiles and Laying the Second Row - Where necessary, use a tile saw or nippers to cut tiles to fit specific areas, such as around faucets or corners. - Continue laying the tiles following the same process as the initial layer. ### 5. Applying Tile Adhesives - Once the bathtub surface is covered with the first layer of tiles, apply tile adhesive according to manufacturer's instructions. - This adhesive will help secure the tiles and hold them in place. ### 6. Installing the Second Layer of Tiles - Lay the second layer of tiles onto the adhesive. - Once again, ensure proper leveling and press each tile firmly into place. ### 7. Cutting and Final Installation - Make any necessary cuts to accommodate areas like corners or faucets. - Complete the installation of the second layer of tiles until the entire bathtub is covered. ### 8. Sealant Application - Apply a layer of sealer to the bathtub surface using a brush. - Pay attention to the areas around fixtures and corners, which are prone to water penetration. ### 9. Installing Fixtures - Once the sealer is dry, reinstall the bathtub fixtures, drain fittings, and plumbing components. - Ensure they are securely fastened and have no leaks. ### 10. Completing the Look - Clean the bathtub with a suitable detergent or cleaner to remove any excess mortar residues or any remaining adhesive. - Allow the bathtub to dry thoroughly, and then enjoy your newly-installed tiles!Additional Tips
- Always refer to the manufacturer's instructions for proper application and use of materials. - Wear safety gloves and goggles when working with mortar and other chemicals. - Double-check the leveling of tiles frequently using a level or laser level. - Take breaks as needed to prevent fatigue and maintain attention to detail.
How To Tile A Bathtub Surround The Handyman S Daughter

How To Tile A Bathtub Surround The Handyman S Daughter
.jpg?strip=all "Installing The Ceramic Tile Tub Surround My Old House Ibuildit Ca")
Installing The Ceramic Tile Tub Surround My Old House Ibuildit Ca

Tile Installation Backer Board Around A Bathtub Family Handyman
.jpg?strip=all "Installing The Ceramic Tile Tub Surround My Old House Ibuildit Ca")
Installing The Ceramic Tile Tub Surround My Old House Ibuildit Ca

Budget Bathroom Makeover With A Wow Factor Flawless Chaos

How To Tile A Bathtub Surround The Handyman S Daughter

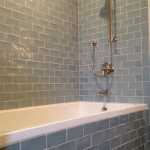
How To Tile A Bathtub For Stylish Practical Finish

Diy Tips For Tiling A Tub Surround Twofeetfirst

Can Tile Be Installed Over A Plastic Tub Surround Hunker