Moen Bathtub Faucet Replacement Parts: A Guide to Common Components
Over time, even the most robust bathtub faucets can experience wear and tear. Whether it's a leaky cartridge, a broken handle, or a malfunctioning diverter, identifying and replacing the correct Moen bathtub faucet replacement parts is crucial for restoring proper functionality and preventing further damage. This article provides a comprehensive guide to common components and their replacement processes.
Understanding Moen Bathtub Faucet Components
Moen bathtub faucets typically consist of several key components, each playing a vital role in the system's operation. These components include:
- Cartridge: The cartridge is the heart of the faucet, controlling water flow and temperature. It houses a ceramic disc that seals against a corresponding seat to regulate water flow.
- Handle: The handle allows users to adjust water temperature and flow. It can be single-lever, two-handle, or a combination thereof.
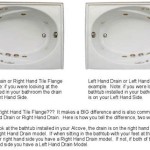
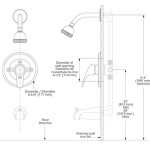
- Spout: The spout directs the water stream towards the bathtub. It can be fixed or swiveling, depending on the faucet model.
- Diverter: The diverter controls water flow between the spout and the showerhead, allowing users to switch between filling the tub and showering.
- Escutcheon: The escutcheon is the decorative plate that covers the faucet's mounting holes. It's often made of metal, plastic, or a combination thereof.
- O-rings and Washers: These small rubber or plastic rings provide watertight seals within the faucet mechanism. They wear out over time and may need replacement.
Common Moen Bathtub Faucet Replacement Parts
Several replacement parts for Moen bathtub faucets are commonly required due to wear or breakage. These parts include:
Cartridges
Cartridges are the most frequently replaced component. Signs of a worn-out cartridge include leaking, erratic temperature control, or difficulty adjusting water flow. Moen cartridges are typically specific to model numbers and may require a slight variation in installation procedures. It's crucial to identify the correct cartridge model number for your faucet before purchasing a replacement.
Handles
Handles can become loose, broken, or worn out over time. Replacing a handle is a simple process, typically involving unscrewing the old handle and attaching the new one. Ensure the new handle is compatible with your faucet model and has the correct size and finish.
O-rings and Washers
Leaking faucets can often be attributed to worn-out O-rings and washers. These small components prevent water from escaping the faucet. They can be replaced by removing the faucet's cartridge and installing new O-rings and washers in their designated locations.
Diverters
Diverter problems can manifest as a lack of water flow to the showerhead or a constant leak from the spout. Replacing a diverter involves unscrewing the old one and installing a new one. Ensure the new diverter is compatible with your faucet model and has the correct size and finish.
Steps for Replacing Moen Bathtub Faucet Parts
Replacing Moen bathtub faucet parts typically involves a straightforward process. However, it's crucial to follow specific steps to avoid damage and ensure proper installation. The following outline provides a general guide:
- Turn Off the Water Supply: Always turn off the water supply to the faucet before attempting any repairs. This can be done by closing the shut-off valve beneath the sink or tub.
- Remove the Faucet Handle: Unscrew the handle from the faucet stem using a screwdriver or wrench (depending on the handle type).
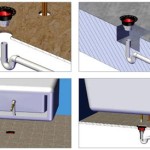
- Disconnect the Spout: Depending on the faucet model, the spout may be secured with nuts or screws. Remove the spout and set it aside.
- Remove the Cartridge: Remove the old cartridge by unscrewing it using the appropriate tool (usually a cartridge wrench).
- Install the New Cartridge: Screw in the new cartridge, ensuring it is fully seated and tightened securely.
- Reasemble the Faucet: Reinstall the spout, handle, and any other removed components.
- Turn On the Water Supply: Carefully turn the water supply back on and check for leaks. Tighten any loose connections if necessary.
Remember that specific installation procedures can vary depending on the model and type of Moen bathtub faucet. Always consult the manufacturer's installation instructions for detailed guidance.

Moen 82495brb Tub And Shower Faucet Ereplacementparts Com

Moen L82383 Tub And Shower Faucet Ereplacementparts Com

Moen L82691 Tub And Shower Faucet Ereplacementparts Com

Moen L3175 Tub And Shower Faucet Ereplacementparts Com

Moen T4570 Bathroom Faucet Ereplacementparts Com

Moen 82910 Tub And Shower Faucet Ereplacementparts Com

Moen T2449cp Tub And Shower Faucet Ereplacementparts Com

Moen T3124cp Tub And Shower Faucet Ereplacementparts Com

Moen 2 Handle Replacement Cartridge 1224 The Home Depot

Master Plumber Repair Kit For Moen Tub Shower Faucet Rona