How To Touch Up Bathtub Paint
A bathtub's finish, while designed for durability, is still susceptible to wear and tear over time. Scratches, chips, and general fading can detract from the overall appearance of the bathroom and, if left unattended, can lead to more significant problems such as rust or water damage. Touching up bathtub paint is a viable and cost-effective alternative to a full bathtub refinishing or replacement. This article details the process of effectively touching up bathtub paint, ensuring a long-lasting and aesthetically pleasing result.
Before initiating any repairs, it is crucial to understand the type of material the bathtub is made of. Common materials include porcelain, cast iron, acrylic, and fiberglass. Each material requires specific preparation and repair techniques for optimal adhesion and durability of the touch-up paint. Identifying the bathtub material is typically achieved by visual inspection or consulting the manufacturer's specifications if available.
Porcelain bathtubs are characterized by a hard, glossy surface, often found in older homes. Cast iron bathtubs, identifiable by their substantial weight, are typically coated with porcelain enamel. Acrylic bathtubs are lightweight, warm to the touch, and prone to scratches. Fiberglass bathtubs are similarly lightweight but typically have a gel coat finish that is less durable than acrylic. Correctly identifying the bathtub material is paramount as it dictates the type of repair kit and paint required for a successful touch-up.
Key Point 1: Preparation is Paramount
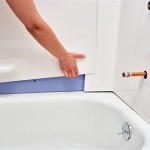
Thorough preparation is the most critical step in touching up bathtub paint. A poorly prepared surface guarantees a substandard result, leading to premature paint failure and a continued unsatisfactory appearance. The preparation process involves cleaning, sanding, and etching the damaged area to create a suitable surface for the new paint to bond.
The initial step in the preparation process is a thorough cleaning of the bathtub surface. This eliminates dirt, grime, soap scum, and any other contaminants that could hinder paint adhesion. A non-abrasive cleaner, specifically designed for bathroom surfaces, should be employed. Avoid harsh chemicals, such as bleach, which can damage certain bathtub materials or interfere with the paint's bonding process. Apply the cleaner liberally to the affected area and surrounding surfaces, scrubbing gently with a non-scratch sponge or cloth. Rinse thoroughly with clean water to remove all traces of the cleaner.
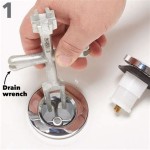
Once the bathtub surface is clean and dry, inspect the damaged area for loose paint chips or debris. These must be carefully removed to create a smooth and even surface for the touch-up paint. A sharp utility knife or a small scraper can be used to gently remove loose material. Exercise caution when handling sharp tools to avoid further damage to the bathtub surface or personal injury.
After removing loose debris, the next step involves sanding the damaged area and the surrounding surface. Sanding creates a slightly rough texture, improving the adhesion of the touch-up paint. Use a fine-grit sandpaper, typically between 220 and 400 grit, depending on the severity of the damage. Gently sand the edges of the damaged area to feather them into the surrounding surface. This creates a smooth transition and prevents the touch-up paint from appearing as a distinct patch.
For deeper scratches or chips, it may be necessary to use a slightly courser-grit sandpaper, such as 180 grit, followed by fine-grit sandpaper to smooth the surface. Apply even pressure while sanding, and avoid sanding excessively, as this can damage the surrounding paint. After sanding, thoroughly remove any sanding dust with a tack cloth or a damp cloth. Ensure the surface is completely clean and dry before proceeding to the etching stage.
Etching is a crucial step, particularly for porcelain or enamel surfaces, as it further enhances paint adhesion. Etching involves applying a mild acid solution to the sanded area, creating microscopic pores on the surface. These pores provide a mechanical bond for the touch-up paint, significantly improving its durability. Most bathtub touch-up kits include an etching solution. Carefully follow the manufacturer's instructions when applying the etching solution. Typically, the solution is applied with a brush or sponge, left to sit for a specified period, and then thoroughly rinsed with clean water.
After etching and rinsing, thoroughly dry the prepared area with a clean, lint-free cloth. Inspect the surface carefully to ensure it is free of any remaining dust, debris, or moisture. The prepared area should be slightly rough to the touch, indicating that the etching process has been successful. Only proceed to the painting stage once the surface is completely clean, dry, and properly etched.
Key Point 2: Selecting and Applying the Touch-Up Paint
Choosing the correct touch-up paint is critical for achieving a seamless and durable repair. The paint must be specifically formulated for bathtub surfaces and compatible with the bathtub material. Most bathtub touch-up kits contain epoxy-based paints or specialized acrylic paints designed for wet environments. These paints are typically resistant to water, chemicals, and abrasion, ensuring a long-lasting repair.
Bathtub touch-up kits are readily available at most hardware stores and home improvement centers. These kits typically include the touch-up paint, a hardener (if required), an etching solution, sandpaper, and application tools. Carefully read the product labels and choose a kit that is specifically designed for the type of bathtub material being repaired. Pay close attention to the color of the paint, and select a color that closely matches the existing bathtub finish. Some kits offer color matching services to ensure a perfect match.
Before applying the touch-up paint, thoroughly mix the paint according to the manufacturer's instructions. Some paints require the addition of a hardener to initiate the curing process. Ensure the paint is thoroughly mixed to achieve a uniform consistency. Avoid over-mixing, as this can introduce air bubbles into the paint, which can affect the final finish.
Apply the touch-up paint in thin, even layers, using a fine-tipped brush or a small sponge applicator. Avoid applying too much paint at once, as this can lead to drips, runs, and uneven coverage. Allow each layer of paint to dry completely before applying the next layer. This typically takes several hours, depending on the type of paint and the ambient temperature. Refer to the manufacturer's instructions for specific drying times.
For deep scratches or chips, it may be necessary to apply multiple layers of paint to achieve a smooth and even surface. After each layer has dried, lightly sand the surface with fine-grit sandpaper to remove any imperfections. Remove any sanding dust with a tack cloth before applying the next layer of paint. Continue this process until the repaired area is flush with the surrounding surface.
When applying the final layer of paint, pay close attention to the edges of the repaired area. Feather the edges of the paint into the surrounding surface to create a seamless transition. Avoid creating a hard edge, as this will make the repair more noticeable. Allow the final layer of paint to dry completely according to the manufacturer's instructions.
Once the paint is completely dry, inspect the repaired area for any remaining imperfections. If necessary, lightly sand the surface with ultra-fine-grit sandpaper to smooth out any imperfections. Apply a final coat of clear sealant or epoxy coating to protect the repaired area and enhance its durability. This final coat will also help to match the sheen of the existing bathtub finish.
Key Point 3: Curing and Post-Application Care
After applying the touch-up paint and any sealant or topcoat, the curing process is essential for achieving a durable and long-lasting repair. Curing refers to the chemical process by which the paint hardens and reaches its full strength. The curing time varies depending on the type of paint and environmental conditions, but it typically takes several days.
During the curing period, it is crucial to avoid using the bathtub or exposing the repaired area to water or chemicals. This allows the paint to fully harden and bond to the bathtub surface. Placing a sign on the bathroom door can serve as a reminder to avoid using the bathtub during the curing process.
Maintaining consistent temperature and humidity levels can facilitate the curing process. Extreme temperatures or high humidity can negatively affect the curing process, leading to a weaker and less durable repair. Ideally, the temperature should be between 60°F and 80°F, and the humidity should be moderate.
Once the curing period is complete, the bathtub can be used as normal. However, it is essential to avoid using abrasive cleaners or harsh chemicals on the repaired area. These can damage the paint and shorten the lifespan of the repair. Instead, use a mild, non-abrasive cleaner specifically designed for bathroom surfaces.
To prolong the life of the touch-up paint, consider applying a sealant or wax to the repaired area every few months. This will help to protect the paint from water damage, chemicals, and abrasion. Regular maintenance and proper cleaning will ensure that the touch-up paint lasts for years to come.
Regular inspection of the repaired area can help identify any signs of wear or damage early on. Addressing minor issues promptly can prevent more significant problems from developing. If the touch-up paint begins to chip or peel, it may be necessary to repeat the touch-up process.
While touching up bathtub paint is a cost-effective solution for minor damage, it is essential to recognize its limitations. For extensive damage, such as severe cracks or rust, a full bathtub refinishing or replacement may be necessary. Consulting with a professional bathtub refinishing company can help determine the best course of action.
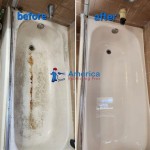
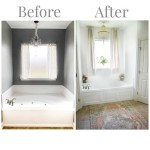
By following these detailed steps and taking the necessary precautions, one can effectively touch up bathtub paint and restore the appearance of their bathroom. Proper preparation, careful paint selection, and diligent execution are the keys to a successful and long-lasting repair. Regular maintenance and appropriate cleaning practices will further extend the lifespan of the touch-up paint and preserve the beauty of the bathtub.

Super Simple How To Paint A Bathtub

How To Paint A Tub With Rustoleum What Not Do

Super Simple How To Paint A Bathtub

How To Fix A Chip In Bathtub With Rustoleum Tub And Tile Touch Up Paint

Diy Bathtub Repair

Tub Tile And Shower Repair Kit Color Match Fiberglass White Almond Black Bone Bisque Biscuit Grey Cream Off Beige Odorless Bathtub Paint Porcelain Com

How To Refinish An Old Clawfoot Bath Tub

How To Fix A Chipped Bathtub In Just Few Easy Steps

How To Repair Bath Enamel Metro Plumb

Refinishing Our Off White Bathtub Homehq