DIY Bathtub Lid Cover: A Comprehensive Guide
A bathtub lid cover serves multiple purposes, ranging from improving bathroom aesthetics to enhancing energy efficiency and safety. It can transform a standard bathtub into a more integrated and functional part of the bathroom space. Constructing a DIY bathtub lid cover provides an opportunity to personalize the bathroom while saving on potential professional installation costs. This article provides a detailed guide on creating a custom bathtub lid cover, covering aspects from planning and material selection to construction and finishing.
Planning and Design Considerations
The initial phase of creating a DIY bathtub lid cover involves meticulous planning. The design should complement the existing bathroom décor and address the specific needs of the homeowner. Key considerations include the size and shape of the bathtub, the desired functionality of the lid cover, and the materials that will be used.
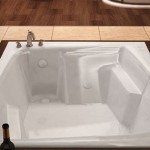
First, accurate measurements of the bathtub are critical. The length, width, and any curves or irregularities must be precisely recorded. These measurements will serve as the foundation for the lid's dimensions. It is advisable to add a slight overhang, typically around 1/2 to 1 inch, to ensure the lid cover rests securely on the bathtub ledge without falling inside. This overhang also creates a visually appealing finished edge.
Next, consider the functionality. Will the lid cover primarily serve as a decorative element? Or will it need to support weight, providing additional surface space for storage or seating? If weight-bearing capacity is required, the design must incorporate appropriate structural support. This might involve using thicker materials, adding internal bracing, or employing a reinforced frame. The design should also consider the ease of lifting and removing the lid. Depending on the size and weight, designing the cover in multiple sections or incorporating handles can prove beneficial.
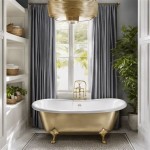
The aesthetic of the lid cover should harmonize with the overall bathroom design. This includes considering the style (modern, traditional, rustic), the color palette, and the materials used in other bathroom fixtures. The lid cover can either blend seamlessly with the existing design or serve as a statement piece. Materials like wood, tile, and composite materials offer a wide range of options to achieve the desired aesthetic.
Material Selection and Tools
The choice of materials significantly impacts the aesthetics, durability, and functionality of the bathtub lid cover. Selecting appropriate materials requires careful consideration of factors such as moisture resistance, weight, cost, and ease of workability. Common materials include wood, tile, composite materials, and waterproof fabrics.
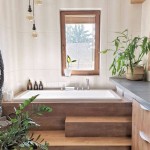
Wood is a popular choice due to its aesthetic appeal and versatility. However, not all woods are suitable for humid bathroom environments. Moisture-resistant options like cedar, redwood, or teak are preferred. These woods naturally resist rot and decay. If using other wood types, it is essential to apply a waterproof sealant to protect the material from moisture damage.
Tile offers excellent water resistance and a wide range of design possibilities. Tile can be used to create intricate patterns and integrate seamlessly with existing bathroom tiling. However, tile adds significant weight to the lid cover, requiring a robust frame and potentially multi-sectional design for manageability. The type of tile adhesive and grout used must also be waterproof and mold-resistant.
Composite materials, such as PVC board or marine plywood, offer a balance of water resistance, workability, and cost-effectiveness. These materials are less prone to warping and cracking than natural wood and can be easily cut and shaped. They also provide a smooth surface for painting or applying other finishes.
Waterproof fabrics, stretched over a frame, can create a softer, more textured look. This option is typically less durable and suitable primarily for decorative purposes. The frame must be constructed from a water-resistant material, and the fabric should be treated with a waterproof coating.
In addition to the primary building materials, the project requires a range of tools. Essential tools include:
- Measuring tape and ruler
- Pencil or marker
- Saw (circular saw, jigsaw, or hand saw, depending on the material)
- Drill with various drill bits
- Screwdriver
- Sander
- Clamps
- Level
- Safety glasses and dust mask
- Waterproof sealant or paint
Construction and Assembly Process
The construction phase involves cutting the materials to the specified dimensions, assembling the frame and supporting structure, and applying the chosen finish. Accuracy and attention to detail are critical throughout the process to ensure a structurally sound and aesthetically pleasing lid cover.
First, cut the chosen material to the dimensions determined during the planning phase. Ensure precise cuts using a saw appropriate for the material. For wood or composite materials, a circular saw or jigsaw is typically used. For tile, a wet saw is required to prevent chipping. If the design incorporates multiple sections, cut the materials for each section separately.
Next, assemble the frame. The frame provides structural support for the lid cover. For wood or composite materials, the frame can be constructed using screws, nails, or wood glue. Ensure the corners are square and the frame is level. If the design requires additional support, add internal bracing. This is especially important for lid covers that will support weight.
For tile lid covers, the frame must be particularly robust to handle the added weight. A reinforced frame constructed from wood or metal is recommended. The tile can then be adhered to the frame using a waterproof tile adhesive. Ensure the tiles are evenly spaced and aligned. Apply grout to fill the spaces between the tiles and wipe away any excess.
If using waterproof fabric, stretch the fabric tightly over the frame and secure it using staples or tacks. Ensure the fabric is smooth and free of wrinkles. Trim any excess fabric along the edges.
Once the frame is assembled, apply the chosen finish. For wood, this may involve sanding the surface smooth and applying a waterproof sealant or paint. Multiple coats of sealant or paint may be necessary to provide adequate protection against moisture. For composite materials, painting is typically sufficient. For tile, ensure the grout is thoroughly sealed to prevent water penetration.
Finally, attach any desired hardware, such as handles or hinges. Handles make it easier to lift and remove the lid cover. Hinges allow the lid cover to be partially opened for access to the bathtub. Ensure the hardware is securely attached using appropriate screws or bolts.
Finishing Touches and Maintenance
The final stage involves adding finishing touches to enhance the appearance and functionality of the bathtub lid cover. It is important to also consider regular maintenance to prolong the life and maintain the appearance of the lid cover.
Consider adding decorative elements to personalize the lid cover. This could include adding trim, molding, or decorative hardware. Painting or staining the lid cover in a color that complements the bathroom décor can also enhance its aesthetic appeal. For tile lid covers, consider adding decorative tiles or creating intricate patterns.
Apply a final coat of waterproof sealant to protect the lid cover from moisture damage. Pay particular attention to edges and seams, where water is most likely to penetrate. Allow the sealant to dry completely before using the lid cover.
Regular maintenance is essential to prolong the life of the bathtub lid cover. Wipe down the lid cover regularly with a damp cloth to remove dirt and grime. Avoid using harsh chemicals or abrasive cleaners, as these can damage the finish. For wood lid covers, periodically reapply the waterproof sealant to maintain its protective properties. For tile lid covers, check the grout regularly for cracks and repair as needed. If any mold or mildew appears, clean it with a mold and mildew remover.
By following these steps, a customized and functional bathtub lid cover can be created that enhances the bathroom space while providing practical benefits. The DIY approach allows for personalization and cost savings, resulting in a unique and valuable addition to the home.

How To Make A Beautiful Removable Bathtub Cover

How To Make A Beautiful Removable Bathtub Cover

Make A Diy Bathtub Cover And Avoid Cleaning Your Bath Better Homes Gardens

Diy Bathtub Cover For Garden Tub

Stylish Bathtub Cover And Bamboo Bathroom Decor

How To Make A Beautiful Removable Bathtub Cover

Mum Praised For Kmart Using Unusual Item Fantastic Idea

Diy Outdoor Bath Tub Cover

How To Make A Beautiful Removable Bathtub Cover

Unused Bathtub
Related Posts