How to Spray Paint a Bathtub
Spray painting a bathtub can be a cost-effective and efficient way to refresh its look. However, it requires careful preparation and execution to achieve a durable and aesthetically pleasing finish. This article outlines the steps involved in spray painting a bathtub, emphasizing essential safety precautions and techniques.
Preparation
Thorough preparation is crucial for a successful spray paint job. The following steps ensure a smooth and long-lasting finish:
- Clear the Area: Remove all items from the bathroom, including towels, toiletries, and any other objects that might be affected by the paint fumes. Cover the floor with drop cloths to protect it from overspray.
- Protect Yourself: Wear appropriate safety gear, including a respirator mask, gloves, and eye protection. It is also recommended to wear old clothes that you do not mind getting paint on.
- Clean the Bathtub: Thoroughly clean the bathtub using a strong cleaner, such as a degreaser or bathroom cleaner. This removes any residue, dirt, or soap scum that could interfere with the paint adhesion. Rinse the tub thoroughly and allow it to dry completely.
- Sand and Prime: Sand the bathtub surface with fine-grit sandpaper to create a rough texture that promotes paint adhesion. This step is particularly important for older bathtubs with a glossy finish. After sanding, thoroughly clean the bathtub again to remove any dust. Apply a bonding primer, specifically designed for bathroom surfaces, to create a smooth and uniform base for the final paint.
- Mask the Surrounding Area: Protect the surrounding area from overspray by carefully masking off the walls, floor, and any other surfaces using painter's tape and plastic sheeting.
Spray Painting Techniques
Once the bathtub is prepared, follow these steps for successful spray painting:
- Shake the Spray Can: Thoroughly shake the spray paint can for at least one minute to mix the paint evenly. This ensures a consistent color and finish.
- Test the Spray: Before applying the paint to the bathtub, test the spray on a scrap piece of cardboard. This allows you to adjust the spray pattern and distance for optimal coverage.
- Thin Coats: Apply the paint in thin, even coats, working in sections of approximately two feet at a time. Allow each coat to dry completely before applying the next. This helps prevent drips and ensures proper drying.
- Overlapping Passes: Lightly overlap each pass by about half an inch to ensure smooth and consistent coverage. Avoid heavy coats, as they may cause dripping or uneven application.
- Dry Time: Once the final coat is applied, allow the paint to dry thoroughly according to the manufacturer's instructions. This typically takes 24-48 hours for complete curing.
Additional Tips
Here are some additional tips to enhance the spray painting process:
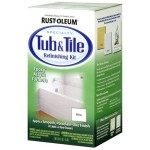
- Choose the Right Paint: Use a high-quality, durable epoxy paint designed for bathroom surfaces. These paints are specifically formulated to resist moisture, wear, and tear. Choose a color that complements your bathroom decor.
- Ventilation: Ensure adequate ventilation during the spray painting process. Open windows and doors to allow fresh air to circulate and remove paint fumes. You may also use a fan to improve air circulation.
- Clean Up: Immediately after completing the spray painting, clean the spray equipment and dispose of used materials properly. Remove the masking tape and plastic sheeting and clean any spills or drips.

To Spray Or Not A Bathtub That Is The Caldwell Project

Diy Spray Paint Tub A Girl And Kiwi

To Spray Or Not A Bathtub That Is The Caldwell Project

Best Way To Refinish Your Tub Magic

How To Spray Paint Bathroom Fixtures Faucet Makeover On A Budget Ep 2

Super Simple How To Paint A Bathtub

How To Spray Paint Shower Fixtures Easy Diy Method Bless Er House

How To Spray Paint Shower Fixtures Easy Diy Method Bless Er House

The Best Way To Spray Paint A Faucet Average But Inspired

How To Reglaze A Bathtub 4 Reglazing Spray Pattern With Capspray Hvlp Maxum Ii
Related Posts