How to Remove a Metal Stopper from a Bathtub
Bathtub stoppers, while essential for retaining water during bathing, can become problematic when they malfunction, clog, or simply need replacement. Metal bathtub stoppers, particularly those found in older homes, can present a unique challenge during removal due to corrosion, mineral buildup, or intricate mechanical designs. Understanding the different types of metal stoppers and the appropriate techniques for their removal is crucial for avoiding damage to the bathtub and plumbing.
Before attempting any removal process, it is imperative to gather the necessary tools and protective gear. These typically include: a flathead screwdriver, a Phillips head screwdriver (if screws are present), pliers (preferably slip-joint or needle-nose), a small bucket or container, a drain snake or wire hanger, rubber gloves, a flashlight, and penetrating oil (such as WD-40 or Liquid Wrench). Ensuring adequate ventilation is also recommended, especially when using penetrating oil. Prior to commencing, the surrounding area should be protected with a drop cloth or towels to prevent scratches or damage to the bathtub surface.
The information presented will detail various methods for removing common types of metal bathtub stoppers. These methods focus on the safe and effective extraction of the stopper without causing harm to the drain assembly or the bathtub itself. Each method outlined will provide step-by-step instructions and useful tips for troubleshooting common issues that may arise during the removal process.
Identifying the Type of Metal Bathtub Stopper
The first step in removing a metal bathtub stopper is to accurately identify the type of stopper in place. Different stopper designs require different approaches. Common types of metal bathtub stoppers include: Lift-and-Turn stoppers, Toe-Touch stoppers, Pop-Up stoppers, and Stopper/Overflow Assemblies. Each of these types operates on a different mechanical principle and requires a unique removal technique.
Lift-and-Turn Stoppers: These stoppers are characterized by a knob or handle on the top of the stopper. Rotating the knob lifts or lowers the stopper, sealing or opening the drain. Identification is relatively straightforward due to the prominent knob and the turning mechanism.
Toe-Touch Stoppers: These stoppers feature a spring-loaded mechanism that is activated by pressing down on the stopper with a toe or foot. Pressing the stopper again releases it, allowing water to drain. The flush appearance and spring-loaded action are key identifiers.
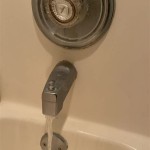
Pop-Up Stoppers: Pop-Up stoppers are often controlled by a lever located on the overflow plate below the faucet. The lever raises and lowers the stopper via a connecting rod. Identifying a Pop-Up stopper involves locating the overflow lever and observing the stopper's movement in conjunction with the lever's operation.
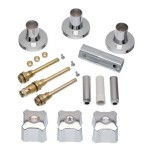
Stopper/Overflow Assemblies: These assemblies combine the stopper and overflow drain into a single unit. They often feature a complex mechanism that requires a more involved removal process, typically involving access through the overflow drain.
Accurate identification of the stopper type is essential because using the wrong removal technique can damage the stopper, the drain assembly, or even the tub itself. Taking the time to carefully examine the stopper and understand its operational mechanism will greatly increase the chances of a successful and damage-free removal.
Removing a Lift-and-Turn Stopper
Removing a lift-and-turn stopper usually involves a relatively simple process. However, corrosion or mineral buildup can sometimes complicate the procedure. The primary goal is to detach the stopper from the internal linkage or screw that secures it to the drain flange.
Step 1: Loosening the Stopper: Begin by attempting to turn the stopper counterclockwise. Some lift-and-turn stoppers are directly threaded onto a post. If the stopper turns freely, continue unscrewing it until it is completely detached. If the stopper is stuck, apply penetrating oil around the base where it meets the drain flange. Allow the oil to soak for 15-30 minutes to help loosen any corrosion or buildup.
Step 2: Removing Screws (if applicable): Some lift-and-turn stoppers have a small set screw located on the side of the knob or base. Use a small flathead or Phillips head screwdriver to loosen the screw. Once the screw is loosened, the knob should detach from the stopper body. If the set screw is heavily corroded, applying penetrating oil and allowing it to soak may be necessary before attempting to loosen it.
Step 3: Detaching the Stopper: Once the knob is detached or unscrewed, gently lift the stopper out of the drain. If the stopper is stuck, try wiggling it gently from side to side while pulling upwards. Avoid using excessive force, as this could damage the drain assembly. If resistance persists, apply more penetrating oil and allow it to soak for a longer period.
Step 4: Cleaning the Drain: After removing the stopper, inspect the drain opening for any debris or buildup. Use a drain snake or wire hanger to remove any obstructions. Flushing the drain with hot water can also help to clear away any remaining residue.
Troubleshooting: If the stopper is extremely difficult to remove, even after applying penetrating oil, it may be necessary to use pliers to grip the stopper and apply more leverage. However, be careful not to damage the stopper or the drain flange. In cases of severe corrosion, the stopper may need to be broken apart in order to remove it. If this becomes necessary, protect the bathtub surface with a towel and use caution to avoid injury.
Removing a Toe-Touch Stopper
Removing a toe-touch stopper requires understanding its spring-loaded mechanism. The stopper is typically held in place by friction and a series of internal components. The removal process involves disengaging these components to release the stopper.
Step 1: Assess the Stopper: Examine the stopper for any visible screws or access points. Some toe-touch stoppers have a removable cap on the top that provides access to the internal mechanism. If a cap is present, use a small flathead screwdriver to carefully pry it off.
Step 2: Loosening the Stopper: Attempt to twist the stopper counterclockwise. Some toe-touch stoppers are threaded and can be unscrewed. If the stopper is stuck, apply penetrating oil around the base and allow it to soak for 15-30 minutes.
Step 3: Using Pliers (if necessary): If twisting the stopper does not work, use pliers to gently grip the stopper and attempt to pull it straight up. Be careful not to scratch or damage the surrounding drain flange. Wiggling the stopper from side to side while pulling can help to loosen it.
Step 4: Accessing Internal Components: If the stopper has a removable cap, use a small screwdriver to manipulate the internal components. Look for a retaining clip or spring that may need to be disengaged. Depressing the spring or releasing the clip may allow the stopper to be pulled out.
Step 5: Cleaning the Drain: Once the stopper is removed, clean the drain opening with a drain snake or wire hanger. Remove any debris or buildup that may be present. Flushing the drain with hot water can help to clear any remaining residue.
Troubleshooting: Toe-touch stoppers can be challenging to remove if they are heavily corroded or if the internal mechanism is damaged. If the stopper is completely stuck, it may be necessary to use a more aggressive approach, such as drilling a small hole in the top of the stopper and using a screw extractor to pull it out. However, this should only be done as a last resort, as it can damage the drain assembly.
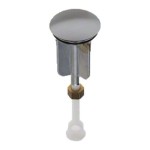
Removing a Pop-Up Stopper
Removing a pop-up stopper requires accessing the linkage that connects the stopper to the overflow lever. This linkage is typically located behind the overflow plate.
Step 1: Removing the Overflow Plate: Locate the overflow plate below the faucet. This plate is usually held in place by one or two screws. Use a screwdriver to remove the screws and carefully detach the overflow plate.
Step 2: Accessing the Linkage: Once the overflow plate is removed, the linkage that connects the stopper to the lever will be visible. This linkage usually consists of a rod or a series of connected pieces.
Step 3: Disconnecting the Linkage: Carefully disconnect the linkage from the stopper. This may involve loosening a screw, releasing a clip, or simply pulling the rod out of a slot. Pay attention to how the linkage is connected, as this will be important when reinstalling the stopper.
Step 4: Removing the Stopper: Once the linkage is disconnected, the stopper should be free to be removed from the drain opening. Gently pull the stopper straight up and out of the drain.
Step 5: Cleaning the Drain: Clean the drain opening with a drain snake or wire hanger. Remove any debris or buildup that may be present. Flushing the drain with hot water can help to clear any remaining residue.
Troubleshooting: Pop-up stoppers can be difficult to remove if the linkage is heavily corroded or if the connecting rod is bent or broken. If the linkage is stuck, apply penetrating oil and allow it to soak for a period of time. If the rod is bent, it may be necessary to straighten it before attempting to remove the stopper. In some cases, it may be necessary to replace the entire overflow assembly.
Throughout any removal process, patience and careful observation are key. Avoid forcing any components, and always consider applying penetrating oil to loosen stubborn parts. When dealing with older plumbing, the potential for breakage is higher, so proceed with caution and consult a professional plumber if necessary.

How To Easily Remove Bathtub Drain Plug Stopper Unclog In 1 Minute Jonny Diy

How To Remove A Bathtub Drain The Home Depot

Remove A Bathtub Drain Stopper To Unclog The Quick Easy

How To Remove A Bathtub Drain Stopper

How To Remove Bathtub Drain Stopper That Spins Freely

4 Easy Ways To Remove A Tub Drain Stopper Wikihow
How To Remove 6 Diffe Kinds Of Drain Stoppers

4 Easy Ways To Remove A Tub Drain Stopper Wikihow
How To Remove 6 Diffe Kinds Of Drain Stoppers

How To Remove A Bathtub Drain Stopper