How to Install a Bathtub Overflow Cover
Bathtub overflow covers are essential components of plumbing systems, designed to prevent water from exceeding the intended fill level and potentially causing water damage within a home. These covers are strategically positioned near the top of a bathtub, usually a few inches below the rim, and are connected to a drain pipe that redirects excess water to the main drain line. Installing a bathtub overflow cover is a relatively straightforward task that can be accomplished by individuals with basic plumbing knowledge and the appropriate tools. This article provides a detailed guide on how to install a bathtub overflow cover, covering preparation, removal of the old cover (if applicable), installation of the new cover, and testing the installation.
Before initiating any plumbing work, safety precautions must be taken. The initial step involves turning off the water supply to the bathtub. Typically, shut-off valves are located near the bathtub or in the basement or utility room serving the bathroom. Once the water supply has been turned off, the drain plug should be removed from the bathtub to ensure no water remains in the tub during the installation process. Additionally, gathering all necessary tools and materials is crucial for a smooth and efficient installation. These tools generally include a screwdriver (both Phillips head and flathead may be needed), pliers, a putty knife or scraper, plumbing putty, and the new overflow cover kit.
Key Point 1: Removing the Existing Overflow Cover
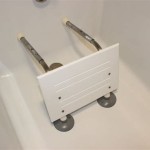
The first practical phase in installing a new bathtub overflow cover involves removing the existing cover, if one is present. The removal procedure depends on the type of cover currently installed. There are generally two main types of overflow covers: those secured with screws and those that are a pressure fit. For covers secured with screws, the process begins by locating the screws, which are typically positioned on the face of the cover. These screws are unscrewed using the appropriate screwdriver (either Phillips head or flathead). It is beneficial to keep the screws in a safe place to avoid losing them, as they might be needed for the purpose of reinstalling or identifying the correct size should they need to be replaced.
Once the screws are removed, the cover should detach from the overflow drain pipe. In some instances, the cover may be sealed to the tub surface with old putty or caulk. If this is the case, a putty knife or scraper can be carefully used to break the seal. Gentle pressure should be applied to avoid damaging the tub's surface. After the seal is broken, the cover should be able to be removed by gently pulling it away from the tub.
For pressure-fit overflow covers, the removal method differs. These covers are held in place by friction and do not have visible screws. To remove a pressure-fit cover, it can be helpful to gently twist the cover while simultaneously pulling it away from the tub. If the cover is difficult to remove, a flathead screwdriver can be used to carefully pry it away from the tub wall. Insert the screwdriver between the cover and the tub surface and gently apply pressure to loosen the cover. Care should be exercised to prevent scratching or damaging the surrounding surface of the tub. Once loosened, the cover should be removed by hand.
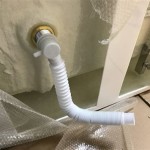
After the cover is removed, examine the overflow drain pipe. It may be necessary to clean out any debris, old putty, or caulk that may be present. A putty knife or scraper can be used to scrape away any residue. A clean surface promotes a proper seal for the new overflow cover, preventing potential leaks.
Key Point 2: Preparing the New Overflow Cover
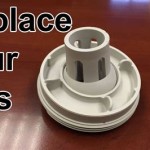
Prior to installing the new bathtub overflow cover, certain preparatory steps are necessary to ensure a secure and watertight fit. Firstly, the new overflow cover kit should be thoroughly inspected to ensure that all necessary components are included, such as the cover plate, screws, linkage (if applicable), and rubber gasket. Comparing the new cover to the old one can be helpful to ensure compatibility and identify any variations in design or functionality. If the kit includes a rubber gasket, it should be examined for any signs of damage or deterioration. A damaged gasket could compromise the seal and result in leaks.
The next step involves applying a layer of plumbing putty around the back of the new overflow cover plate where it will come into contact with the tub surface. Plumbing putty is a pliable sealant used to create a watertight seal between plumbing fixtures and surfaces. The putty should be rolled into a thin, uniform rope and applied evenly around the edge of the cover plate. The putty layer should be thick enough to fill any gaps or irregularities between the cover plate and the tub surface, but not so thick that it squishes out excessively when the cover is installed.
If the overflow cover incorporates a linkage mechanism (such as a trip lever or plunger), it is essential to ensure that the mechanism is properly assembled and aligned. The linkage connects the overflow cover to the drain stopper, allowing the user to control the opening and closing of the drain. The mechanism should be tested to verify that it operates smoothly and without obstruction. Any adjustments or modifications should be made to ensure proper functionality before installing the cover.
Key Point 3: Installing the New Overflow Cover
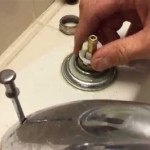
With the preparatory steps completed, the installation of the new bathtub overflow cover can proceed. The initial step involves positioning the cover plate against the tub wall, aligning it with the overflow drain pipe. The cover plate should be pressed firmly against the tub surface, ensuring that the plumbing putty makes full contact and creates a watertight seal. If the cover plate has screw holes, care should be taken to align them with the corresponding holes in the overflow drain pipe.
The screws should then be inserted through the cover plate and tightened into the overflow drain pipe. A screwdriver of the appropriate type (Phillips head or flathead) should be used to tighten the screws. The screws should be tightened evenly and gradually, ensuring that the cover plate is drawn snugly against the tub surface. Over-tightening the screws should be avoided, as this could potentially crack the cover plate or damage the overflow drain pipe. The screws should be tightened until the cover plate is secure and the plumbing putty begins to slightly squeeze out from around the edges.
After the screws have been tightened, the excess plumbing putty can be removed. A putty knife or scraper can be used to carefully scrape away the excess putty, leaving a clean and smooth bead around the edge of the cover plate. The removed putty can be discarded or reused for other plumbing applications. The surrounding area should be cleaned to remove any residue or debris.
If the overflow cover incorporates a linkage mechanism, the mechanism should be connected to the drain stopper according to the manufacturer's instructions. The linkage should be adjusted until the drain stopper operates smoothly and seals the drain effectively. The operation of the drain stopper should be tested by filling the bathtub with a small amount of water and observing whether the stopper holds the water or allows it to leak out. If leaks are detected, the linkage or stopper may need to be adjusted to improve the seal.
After the installation is complete, the area surrounding the overflow cover should be cleaned and inspected. Any remaining debris or residue should be removed, and the surrounding surfaces should be wiped clean. The installation should be visually inspected to ensure that the cover plate is properly aligned, the screws are secure, and the plumbing putty is creating a watertight seal. The installation should be allowed to cure for a period of time recommended by the putty's manufacturer, typically 24 to 48 hours, before the bathtub is used.
Once the installation is cured, the overflow cover should be thoroughly tested to ensure that it functions properly. This can be achieved by filling the bathtub with water to a level slightly above the overflow drain. The overflow cover should effectively divert the excess water into the overflow drain, preventing the water from overflowing onto the bathroom floor. If the overflow cover fails to function properly, the installation should be re-examined, and any necessary adjustments or corrections should be made to ensure proper operation. The entire area should be kept dry during the checking phase to easily detect any unexpected leak.

How To Replace Bathtub Overflow Plate With Trip Lever Easy Simple

How To Install A New Bathtub Overflow Plate Assembly

How To Install A New Bathtub Overflow Plate Assembly

Bathtub Overflow Cover Replacement

When And How You Should Replace A Bathtub Overflow Cover Plate Service Plus Plumbing

Bathtub Overflow Gaskets

Silicone Bathtub Overflow Drain Cover How To Get A Deeper Bath With Better Soak

How To Replace Bathtub Overflow Drain Gasket

Bathtub Drain Replacement How To Replace Or Install A Homeserve Usa

Replace A Bathtub Overflow Plate
Related Posts