How To Install A Shower Screen On A Bathtub Drainage System
Installing a shower screen on a bathtub requires careful planning and execution to ensure a watertight seal and a functional enclosure. The integration of the screen with the existing bathtub drainage system is crucial for preventing leaks and maintaining proper water flow. This article provides a detailed guide on how to install a shower screen on a bathtub, taking into account the drainage system considerations.
Before commencing the installation, it's imperative to gather all the necessary tools and materials. This includes the shower screen kit, which usually comprises the screen panel(s), hinges, mounting hardware, and sealing strips. Additional tools required are a drill with appropriate drill bits for various surfaces (tile, drywall, and stud framing), a measuring tape, a level, a pencil for marking, a caulk gun, silicone sealant (mold-resistant is recommended), a screwdriver, a safety hammer, safety glasses, and gloves. Checking that the bathroom has good ventilation is also optimal as it can affect how well the silicon sealant dries and prevent molding in the future.
Preparation of the Bathtub and Surrounding Area is critical before installing the shower screen. The bathtub surface and the surrounding walls must be thoroughly cleaned and dried. Remove any existing caulk or sealant along the edges of the bathtub and walls using a utility knife or caulk removal tool. Ensure the surfaces are free of soap scum, mildew, and debris. A clean surface promotes better adhesion of the new sealant and ensures a watertight seal. If there are any pre-existing damages to the bathtub or surrounding walls, such as cracks or chips, they should be repaired before proceeding with the installation. Failure to address these issues may compromise the integrity of the shower screen installation and lead to leaks in the future.
Key Point 1: Assessing the Existing Bathtub Drainage System
The existing bathtub drainage system plays a significant role in the overall functionality and water tightness of the shower screen installation. Before installing the screen, it is essential to assess the current drainage setup. This assessment involves checking the drain's functionality, ensuring it is free from blockages, and verifying the integrity of the drain components. A slow or clogged drain can cause water to accumulate within the shower area, potentially leading to leaks around the shower screen and beyond. Addressing any drainage issues prior to installing the shower screen can prevent future problems and ensure the shower enclosure remains dry and functional.
Begin by inspecting the drain for any visible obstructions, such as hair, soap residue, or other debris. Remove any visible blockages using tweezers or a bent wire. If the drain remains slow, consider using a drain cleaner to dissolve any stubborn clogs. Follow the manufacturer's instructions carefully and avoid using harsh chemicals that could damage the drain pipes or the bathtub's surface. If chemical solutions are ineffective, it may be necessary to use a drain snake to physically remove the blockage. Insert the drain snake into the drain opening and rotate it to break up or retrieve the clog. Once the blockage is removed, flush the drain with hot water to ensure it is flowing freely. Regularly cleaning the drain prevents future build-up.
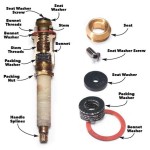
Next, inspect the drain components for any signs of leaks or damage. Examine the drain flange, which is the part of the drain that sits flush with the bathtub's surface, for cracks or corrosion. Also, inspect the overflow drain, which is located on the bathtub wall near the top, for any signs of leaks. If any damage is detected, it may be necessary to replace the drain components before proceeding with the shower screen installation. Replacing the drain components ensures a watertight seal and prevents water from leaking behind the bathtub or into the surrounding walls.
When assessing the existing drainage system, it is also crucial to consider the slope of the bathtub. The bathtub should have a slight slope towards the drain to ensure that water flows effectively and does not pool in any areas. If the bathtub is not properly sloped, water may accumulate near the shower screen, increasing the risk of leaks. If the slope of the bathtub is insufficient, it may be necessary to adjust the bathtub's leveling to improve water drainage. This may involve shimming the bathtub or adjusting its supporting structure. Ensuring proper drainage is crucial for preventing water damage and maintaining a functional shower enclosure.
Once the existing bathtub drainage system has been thoroughly assessed and any issues have been addressed, the installation of the shower screen can proceed with confidence. A fully functional and well-maintained drainage system will help to ensure that the shower screen installation is watertight and long-lasting. Regular maintenance of the bathtub drain will further help prevent issues from occurring.
Key Point 2: Installing the Shower Screen Frame and Hinges
The accurate installation of the shower screen frame and hinges is paramount for ensuring proper alignment, stability, and functionality of the entire enclosure. The frame provides the structural support for the shower screen panel(s), while the hinges allow the screen to swing open and closed smoothly. Any misalignment or instability in the frame or hinges can compromise the watertight seal and lead to operational issues.
Begin by carefully measuring the width and height of the bathtub opening where the shower screen will be installed. Use a measuring tape to obtain accurate measurements and ensure the shower screen frame fits snugly within the opening. Transfer these measurements to the wall and bathtub surfaces using a pencil. These pencil marks will serve as a guide for positioning the shower screen frame. It is critical to take precise measurements to avoid gaps or overlaps that can compromise the water tightness of the enclosure. Inaccurate measurements can lead to significant problems later in the installation process.
Next, assemble the shower screen frame according to the manufacturer's instructions. Most frames consist of vertical and horizontal profiles that are joined together using screws or other fasteners. Ensure the frame is square and level before proceeding. Use a level to verify that the vertical profiles are plumb and the horizontal profiles are level. Adjust the frame as needed to achieve a perfect square. A square and level frame is essential for ensuring proper alignment of the shower screen panel and hinges.
Position the assembled frame against the wall and bathtub surfaces, aligning it with the pencil marks that were previously made. Use a level to verify that the frame is still plumb and level. Once the frame is properly positioned, use a drill to create pilot holes through the frame and into the wall studs or mounting surfaces. The pilot holes should be slightly smaller than the screws that will be used to secure the frame in place. Drilling pilot holes prevents the wood from splitting and ensures a secure connection.
Attach the frame to the wall and bathtub using appropriate screws. Use screws that are long enough to penetrate the wall studs or mounting surfaces and provide a secure hold. Drive the screws in straight and tight, but avoid over-tightening them, as this can damage the frame or the surrounding surfaces. Periodically check the frame with a level to ensure it remains plumb and level as the screws are being tightened. A secure and level frame is essential for the long-term stability and functionality of the shower screen.
Once the frame is securely attached, install the hinges according to the manufacturer's instructions. The hinges allow the shower screen panel to swing open and closed. Ensure the hinges are properly aligned and securely fastened to the frame and the shower screen panel. Use a screwdriver to tighten the screws that hold the hinges in place, but avoid over-tightening them. Properly installed hinges will ensure the shower screen operates smoothly and reliably.
Key Point 3: Sealing and Waterproofing the Shower Screen
Proper sealing and waterproofing are vital for preventing water from seeping through the shower screen installation and causing water damage to the surrounding areas. This involves applying silicone sealant along all the joints and edges of the screen, ensuring a watertight barrier against water penetration.
Before applying the sealant, ensure that the surfaces are clean, dry, and free of any dust, debris, or old sealant. Use a utility knife or caulk removal tool to remove any remnants of old sealant along the edges of the bathtub and walls. Clean the surfaces with a damp cloth and allow them to dry completely before proceeding. Dry surfaces are essential for proper adhesion of the new sealant.
Load a tube of silicone sealant into a caulk gun. Cut the tip of the sealant tube at a 45-degree angle, making the opening the desired width for the sealant bead. Apply a continuous bead of silicone sealant along all the joints and edges of the shower screen, including the frame, hinges, and where the screen meets the bathtub and walls. Ensure the sealant bead is uniform in thickness and covers all gaps and seams. A continuous and uniform sealant bead is essential for creating a watertight seal.
After applying the sealant, use a wet finger or a sealant smoothing tool to smooth the bead and remove any excess sealant. This will create a clean, professional-looking finish and enhance the water tightness of the seal. Wipe away any excess sealant with a damp cloth. Dispose of the used sealant tube and any waste materials properly.
Allow the silicone sealant to cure completely according to the manufacturer's instructions. This typically takes 24 to 48 hours. Avoid using the shower during the curing period to allow the sealant to fully set and form a watertight bond. Premature use of the shower can compromise the sealant's integrity and lead to leaks.
Inspect the sealant after it has fully cured to ensure there are no gaps, cracks, or imperfections. If any imperfections are found, reapply the sealant as needed to create a complete and watertight seal. Regular inspection and maintenance of the sealant are essential for preventing water damage and ensuring the long-term performance of the shower screen. Mold-resistant sealant is recommended to prevent mold from growing in the seams.
Once the shower screen installation is complete, test the shower to ensure it is functioning properly and there are no leaks. Run water over the shower screen and check for any signs of water seeping through the joints or edges. If any leaks are detected, address them immediately by reapplying sealant or making other necessary repairs. Thorough testing and inspection are essential for ensuring a watertight and functional shower enclosure.

How To Fit A Bath Screen Step By Diy Guide

Three Ways To Add A Shower Walk In Bathtub Posh Living

How To Fit A Shower Screen Drench

Installing A Shower Cubicle Step By Guide And

How To Fit A Shower Screen Victorian Plumbing

Three Ways To Add A Shower Walk In Bathtub Posh Living

Shower Without A Door How To Install Glass Panel Bathroom Remodel Part 8

How To Fit A Bath Screen Step By Diy Guide

Three Ways To Add A Shower Walk In Bathtub Posh Living

Your Complete Guide To Designing A Wet Room
Related Posts