DIY Bathtub Reglazing: A Simple Guide to Refresh Your Bathroom
Upgrading your bathroom doesn't always require a complete remodel. With a little DIY spirit and the right techniques, you can breathe new life into your existing bathtub by reglazing it. Reglazing, also known as refinishing, is a cost-effective way to restore the luster of your worn-out bathtub and give it a refreshed look. ### Benefits of DIY Bathtub Reglazing *Cost-effective:
Reglazing is significantly cheaper than replacing your entire bathtub. *Quick and easy:
The entire process can be completed in a few hours, allowing you to enjoy your new bathtub in no time. *Wide range of colors and finishes:
You can choose from a variety of colors and finishes to match your bathroom's décor. *Durability:
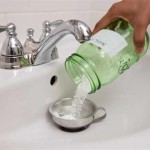
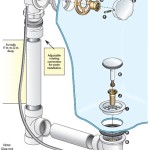
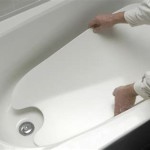
A professionally applied reglaze can last for up to 15 years. ### Step-by-Step Guide to DIY Bathtub Reglazing #### 1. Preparation * Ensure your bathtub is clean and free of dirt, grime, and old caulk. * Remove all hardware, such as faucets and showerheads. * Mask off the areas around the bathtub to protect them from the reglazing material. #### 2. Apply a Bonding Agent * Apply a bonding agent to the bathtub's surface using a paintbrush or roller. * Allow the bonding agent to dry completely according to the manufacturer's instructions. #### 3. Apply the Primer * Apply the primer to the bathtub's surface using a paintbrush or roller. * Allow the primer to dry completely according to the manufacturer's instructions. #### 4. Apply the Reglazing Material * Apply the reglazing material to the bathtub's surface using a paintbrush or roller. * Apply multiple thin coats rather than one thick coat to avoid drips and streaks. * Allow each coat to dry completely according to the manufacturer's instructions. #### 5. Apply the Sealer * Apply the sealer to the bathtub's surface using a paintbrush or roller. * Allow the sealer to dry completely according to the manufacturer's instructions. #### 6. Reinstall Hardware and Caulk * Reinstall the hardware, such as faucets and showerheads, once the reglazing material has completely dried. * Apply caulk around the bathtub's edges to prevent water leakage. ### Tips for a Successful DIY Bathtub Reglazing Project * Ensure adequate ventilation throughout the reglazing process. * Wear protective gear, such as gloves and a face mask, to prevent exposure to harsh chemicals. * Follow the manufacturer's instructions precisely for the best results. * Allow sufficient drying time between each step to ensure the reglazing material adheres properly. ### Conclusion DIY bathtub reglazing is a cost-effective and rewarding project that can transform your bathroom in a matter of hours. With careful preparation, attention to detail, and the right materials, you can achieve a professional-looking finish that will refresh your bathtub and enhance your bathroom's整體風格。
My Painted Bathtub 5 Years Later An Honest Review Of Refinished Jacuzzi Tub

Bathtub Refinishing Kit Guide Diy Bathroom Update

Diy Bathtub Reglazing For Beginners And Professionals With Dwil Tub Tile Refinishing Kit

Bathtub Reglazing Me A Fresh And New Look

How To Refinish A Bathtub On Budget

Do Diy Bathtub Resurfacing Kits Really Work Todd S Bathtubs

Diy Painted Bathtub Follow Up Your Questions Answered Addicted 2 Decorating

How To Reglaze A Bathtub Step By Full Reglazing In Depth Process Dp Tubs

How To Paint A Tub With Rustoleum What Not Do

Bathtub Refinishing Wipe On Primer Extends Life Of Rustoleum Tub Kits Diy Tile Countertop Reglazing Longest Lasting Bonding Agent Com