Bathtub Diverter Replacement: A Comprehensive Guide
Experiencing problems with your bathtub's water flow? A faulty bathtub diverter might be the culprit. Replacing a bathtub diverter is a relatively simple yet essential home maintenance task that can restore your bathroom's functionality and enhance your bathing experience.
In this comprehensive guide, we will walk you through the essential aspects of bathtub diverter replacement, including identifying the problem, gathering necessary tools and materials, and following step-by-step instructions. By understanding the process, you can tackle this plumbing task with confidence and save yourself the cost of a plumber.
Identifying a Faulty Bathtub Diverter
Before diving into the replacement process, it's crucial to confirm that the bathtub diverter is indeed malfunctioning. Common signs of a faulty diverter include:
- Difficulty switching water flow between the bathtub and showerhead.
- Leaking water from the diverter handle or spout.
- Reduced water pressure in either the bathtub or showerhead.
- A loose or wobbly diverter handle.
If you encounter any of these issues, it's likely that your bathtub diverter needs to be replaced.
Gathering Necessary Tools and Materials
Once you've confirmed the need for a diverter replacement, gather the following tools and materials:
- New bathtub diverter valve
- Adjustable wrench
- Phillips head screwdriver
- Flat head screwdriver
- Teflon tape or plumber's putty
- Plumber's wrench
- Bucket or towels (for catching water)
Step-by-Step Bathtub Diverter Replacement Instructions
With the necessary tools and materials in hand, follow these step-by-step instructions to replace your bathtub diverter:
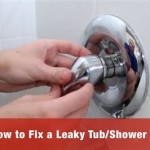
- Turn off the water supply to the bathtub by closing the shut-off valves located under the sink.
- Open the bathtub faucet to release any remaining water pressure.
- Using the adjustable wrench, disconnect the water supply lines from the diverter valve.
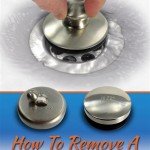
- Remove the diverter handle by unscrewing the set screw with the Phillips head screwdriver.
- Carefully pull out the old diverter valve from the bathtub spout.
- Apply Teflon tape or plumber's putty to the threads of the new diverter valve for a watertight seal.
- Insert the new diverter valve into the bathtub spout and tighten it securely using the adjustable wrench.
- Reattach the water supply lines to the diverter valve.
- Install the diverter handle by screwing it back onto the valve and tightening the set screw.
- Turn on the water supply and check for any leaks around the diverter valve or handle.
- If there are no leaks, your bathtub diverter is successfully replaced.
Congratulations! You have successfully replaced your bathtub diverter. If you encounter any difficulties during the process, do not hesitate to consult a qualified plumber for assistance.

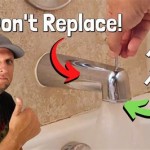
Learn How To Remove And Install Various Tub Spouts

Danco Tub Spout Diverter Repair Kit For Moen In The Bathtub Parts Department At Com

Learn How To Remove And Install Various Tub Spouts

Everbilt Tub Spout Diverter Repair Kit 865320 The Home Depot

Danco Tub Spout Diverter Repair Kit 89205 The Home Depot

How To Replace A Bathtub Spout Diy Family Handyman

Learn How To Remove And Install Various Tub Spouts

Replacing A Tub Spout An Easy Repair Job Theworldlink Com

How To Replace A Tub Spout Project Tutorial Bob Vila

Plumbmaster Approved Repair Kit Retail For Delta Diverter Bath Spout