Vanity Art Bathtub Installation: A Step-by-Step Guide to Enhancing Your Bathroom's Aesthetic
Installing a Vanity Art bathtub is an excellent way to add a touch of style and luxury to your bathroom. These bathtubs are made from high-quality materials and feature unique designs that can complement any décor. While the installation process may seem complex, it can be done with the right tools and knowledge. Here is a step-by-step guide to help you install your Vanity Art bathtub:
1. Gather Your Tools and Materials
Before you begin the installation process, it is important to gather all of the necessary tools and materials. These include:
- Vanity Art bathtub
- Level
- Tape measure
- Pencil
- Screwdriver
- Drill
- Faucet and drain assembly
- Plumber's putty
- Teflon tape
- Silicone caulk
2. Prepare the Installation Site
The first step is to prepare the installation site. This involves removing any existing bathtub or shower, as well as any fixtures or fittings that may be in the way. Once the area is clear, you can use a level to ensure that the floor is level. If the floor is not level, you will need to shim the tub to make it level.
3. Install the Bathtub
Once the installation site is prepared, you can begin installing the bathtub. Start by placing the tub in the desired location. Use a level to ensure that the tub is level, and then use a pencil to mark the location of the screw holes. Drill pilot holes at each of the marked locations.
Apply a bead of plumber's putty around the bottom edge of the tub. This will help to create a watertight seal. Carefully lift the tub into place and align it with the screw holes. Insert the screws and tighten them until the tub is secure.
4. Install the Faucet Assembly
The next step is to install the faucet assembly. Remove the aerator cap and handle from the faucet. Apply a small amount of Teflon tape to the threads of the faucet body. Screw the faucet body into the tub deck. Tighten the set screws to secure the faucet. Replace the handle and aerator cap.
5. Install the Drain Assembly
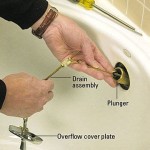
Install the drain assembly by removing the plug and overflow plate. Apply a bead of plumber's putty around the drain hole. Insert the drain assembly and tighten the locknut. Replace the overflow plate and plug.
6. Caulk the Bathtub
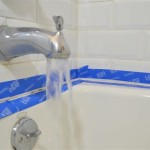
To create a watertight seal, apply a bead of silicone caulk around the base of the tub and around the edges of the faucet and drain. Use a wet finger to smooth out the caulk and remove any excess.
7. Finishing Touches
Once the caulk has dried, your Vanity Art bathtub is ready to use. Enjoy the beauty and luxury of your new bathtub for years to come.

Have A Question About Vanity Art 71 In Acrylic Flatbottom Freestanding Bathtub White Polished Chrome Pg 4 The Home Depot

Vanity Art 71 X 34 Inches Freestanding White Acrylic Bathtub Modern St Homebeyond

Vanity Art Va6812 Bl 67 3 4 Inch Freestanding Acrylic Soaking Bathtub With Round Overflow And Pop Up Drain Black

Vanity Art Va6839 70 1 8 Inch Freestanding Acrylic Soaking Bathtub With Round Overflow And Pop Up Drain White

Vanity Art Strasbourg 59 In X 30 Acrylic Freestanding Soaking Bathtub With Center Drain White Titanium Gold Va6817 S Tg The Home Depot

Vanity Art 69 X 40 White Modern Stand Alone Soaking Tub With Polishe Us Bath

Vanity Art 71 X 35 White Acrylic Freestanding Bathtub With Polished Us Bath

Vanity Art 59 In X 30 Freestanding Soaking Bathtub Va6610

Have A Question About Vanity Art Montpellier 59 In L X 30 W Acrylic Flatbottom Freestanding Bathtub White Classic Chrome Pg 3 The Home Depot

Vanity Art 71 X 34 Inches Freestanding White Acrylic Bathtub Modern St Homebeyond

