Tiling a Bathtub: A Detailed Guide to Achieve a Stunning Bathroom Transformation
Transforming your bathroom into a tranquil oasis requires meticulous attention to detail, and tiling the bathtub is a crucial step in achieving a cohesive and aesthetically pleasing space. Whether you're embarking on a do-it-yourself project or enlisting the help of professionals, this comprehensive guide will equip you with the knowledge and expertise to tile your bathtub like a pro. ### Step 1: Preparation is Key Before you dive into the tiling process, thorough preparation is essential to ensure a smooth and successful project. 1.Safely Remove the Old Tiles:
If your bathtub already has tiles, carefully remove them using a hammer and chisel. Wear protective gear, including gloves, safety glasses, and a dust mask, to protect yourself from flying debris. 2.Clean the Bathtub Surface:
Once the old tiles are removed, thoroughly clean the bathtub surface with a degreaser and a scrub brush. Rinse the surface with clean water and allow it to dry completely. 3.Apply Waterproofing Membrane:
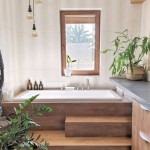
To prevent water damage and leaks, apply a waterproofing membrane to the bathtub surface. Follow the manufacturer's instructions for application. This step is vital in areas where water exposure is likely, such as the shower area. ### Step 2: Choosing the Right Tiles The choice of tiles is essential in determining the overall look and feel of your bathroom. 1.Consider Style and Design:
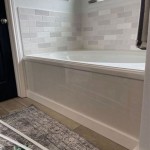
Select tiles that complement the bathroom's overall design theme. From classic subway tiles to modern mosaic tiles, the possibilities are endless. 2.Material and Durability:
Opt for tiles that are durable and can withstand moisture and wear. Ceramic and porcelain tiles are popular choices due to their resilience and ease of maintenance. 3.Slip Resistance:
For safety, choose tiles with a non-slip surface, especially for areas where water is likely to accumulate. ### Step 3: Gather the Necessary Tools and Materials To ensure a successful tiling project, gather the following tools and materials: 1.Tiling Tools:
- Tile cutter or wet saw - Notched trowel - Grout float - Sponges - Bucket - Mixing paddle 2.Materials:
- Tiles - Thin-set mortar - Grout - Tile spacers - Sealant ### Step 4: Plan Your Tiling Layout Planning the tiling layout is crucial to minimize wastage and achieve a visually pleasing result. 1.Measure and Calculate:
Measure the bathtub's dimensions and calculate the number of tiles needed. Consider any cut tiles or intricate patterns that may affect the quantity required. 2.Dry Layout:
Before applying thin-set mortar, arrange the tiles in their intended pattern on the bathtub surface. This helps visualize the final layout and identify any adjustments needed. ### Step 5: Apply Thin-Set Mortar and Install Tiles 1.Prepare Thin-Set Mortar:
Mix the thin-set mortar according to the manufacturer's instructions. Use a notched trowel to apply a thin layer of mortar onto the bathtub surface, ensuring even coverage. 2.Install Tiles:
Starting from a corner, press each tile firmly into the thin-set mortar, ensuring proper alignment with the adjacent tiles. Use tile spacers to maintain consistent grout lines. 3.Allow Drying Time:
Allow the thin-set mortar to dry completely before proceeding to the next step. Refer to the manufacturer's guidelines for specific drying times. ### Step 6: Apply Grout and Seal the Tiles 1.Prepare Grout:
Mix the grout according to the manufacturer's instructions. Use a grout float to apply grout to the spaces between the tiles, pressing it firmly to fill the gaps. 2.Clean Excess Grout:
After the grout has set slightly, use a damp sponge to remove excess grout from the tile surfaces. Rinse the sponge frequently to prevent smudging. 3.Seal the Tiles:
Once the grout has dried completely, apply a sealant to protect the tiles and grout from moisture and stains. Follow the manufacturer's instructions for application. By following this step-by-step guide and paying meticulous attention to detail, you can confidently transform your bathtub into a stunning focal point of your bathroom, creating a space that exudes elegance and sophistication.
How To Tile A Bathtub Surround The Handyman S Daughter
:max_bytes(150000):strip_icc()/5-56a49d0a3df78cf7728343d9.JPG?strip=all "10 Ideas For Bathtub Surrounds")
10 Ideas For Bathtub Surrounds

Tile Installation Backer Board Around A Bathtub Family Handyman

Diy Tips For Tiling A Tub Surround Twofeetfirst

The Complete Guide To Installing Tile On Shower Or Bathtub Walls

How To Tile A Bathtub For Stylish Practical Finish
.jpg?strip=all "Installing The Ceramic Tile Tub Surround My Old House Ibuildit Ca")
Installing The Ceramic Tile Tub Surround My Old House Ibuildit Ca

A Diyer S Guide To Waterproofing And Tiling Tub Surround Ugly Duckling House

Part 1 How To Tile 60 Tub Surround Walls Preparation Where Start Tiling Layout

Correctly Installing A Bath Bathroom Guru