Taking Out a Bathtub Drain Stopper: A Comprehensive Guide
Bathtub drain stoppers, while seemingly simple mechanisms, play a crucial role in water retention during bathing. Over time, these stoppers can become clogged with hair, soap scum, and other debris, hindering their functionality and potentially causing drainage issues. Regular cleaning and occasional removal are necessary to maintain optimal drain performance. This article provides a detailed guide on how to remove various types of bathtub drain stoppers safely and effectively.
Identifying the Type of Bathtub Drain Stopper
Before attempting removal, accurately identifying the type of drain stopper is paramount. Different stopper designs require specific removal techniques, and using the wrong method can lead to damage to the stopper, the drain assembly, or even the bathtub itself. Common types of bathtub drain stoppers include pop-up stoppers, lift-and-turn stoppers, push-and-pull stoppers, toe-touch stoppers, and trip-lever stoppers. Each variety operates using a distinct mechanism to seal and unseal the drain. Accurately identifying the stopper is crucial for choosing the appropriate removal steps. Misidentification can lead to forcing the stopper, causing damage and unnecessary repairs.
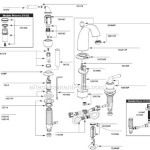
Pop-up stoppers are characterized by a simple, often mushroom-shaped, stopper that sits directly in the drain opening. They are typically controlled by a lever located near the overflow drain on the bathtub wall. The lever actuates a linkage within the drain pipe, raising and lowering the stopper. Lift-and-turn stoppers feature a stopper with a small knob on top. Turning the knob either raises or lowers the stopper, creating or breaking the seal. These are known for their easy manual operation. Push-and-pull stoppers, as the name suggests, operate by pushing the stopper down to close the drain and pulling it up to open it. Toe-touch stoppers, similarly, are activated by pressing down on the stopper with a toe. A second press releases the stopper, allowing the water to drain. These types may require specific tools for removal. Trip-lever stoppers are controlled by a lever often located on the overflow drain. The lever operates an internal mechanism that raises and lowers the stopper in the drain. These systems can be more complex and may involve accessing the drain assembly through the overflow plate.
Inspecting the stopper's appearance and attempting to operate it will usually reveal its type. Observing the presence of a lever or knob, or feeling the mechanism as it opens and closes, provides valuable identifying clues. If the mechanism appears jammed or non-functional, further inspection might be necessary to determine if debris is obstructing the operation before attempting removal.
Tools and Materials Required
Having the appropriate tools and materials readily available is crucial for a successful and safe removal process. A variety of tools might be necessary, depending on the type of drain stopper being removed. Furthermore, preparing the work area prevents damage to the bathtub or surrounding surfaces. The necessary tools can be acquired at any local hardware store or home center.
Essential tools include a flat-head screwdriver, a Phillips-head screwdriver, pliers (preferably needle-nose pliers), a drain stopper removal tool (designed specifically for certain stopper types), and possibly a small wrench. The screwdrivers are used for removing screws that may be holding the stopper in place or securing the overflow plate of a trip-lever drain. Pliers are useful for gripping and manipulating small parts, such as linkages in pop-up drains or debris obstructing the stopper. A drain stopper removal tool, often a specialized wrench or key-shaped tool, is specifically designed for certain stopper types and can provide leverage and grip without damaging the stopper’s surface. The small wrench might be required to loosen nuts and bolts within the drain assembly, particularly in trip-lever drains.
Additional helpful materials include rubber gloves to protect hands from dirt and bacteria, a container to collect removed debris, a flashlight to illuminate the drain and identify obstructions, and old rags or towels to protect the bathtub surface from scratches. A penetrating oil lubricant can also be beneficial for loosening corroded or stuck parts. Additionally, a plumber's snake or wire hanger can be used to remove debris from the drain after the stopper is removed. Having these materials on hand will facilitate the removal process and help avoid any unnecessary delays or complications.
Step-by-Step Removal Procedures for Different Stopper Types
Once the stopper type has been identified and the necessary tools are gathered, proceeding with the appropriate removal procedure is critical. Each stopper type requires a specific approach, as outlined below. Proper adherence to these steps mitigates the risk of damage and ensures a safe and effective removal. Trying to forcefully remove a stopper without identifying its type and following the correct procedure can easily lead to breakage and further complications.
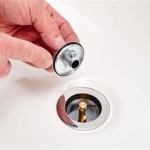
Pop-Up Stopper Removal: The removal of a pop-up stopper typically involves accessing the linkage through the overflow drain. First, remove the overflow plate by unscrewing it. Once removed, the linkage connected to the stopper is visible. Carefully pull out the linkage. This may require some maneuvering to avoid bending or breaking the connecting rods. With the linkage removed, the stopper should lift directly out of the drain. If the stopper is stuck, gently wiggle it to dislodge any debris. If needed, use pliers to gently grip the stopper (being careful not to scratch the surface) and pull it free. After removing the stopper, clean any debris from the drain and the stopper itself. Reinstalling the stopper involves reversing these steps, ensuring the linkage is properly connected before reattaching the overflow plate.
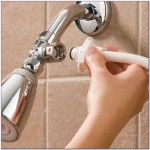
Lift-and-Turn Stopper Removal: Lift-and-turn stoppers often have a small set screw located on the side of the knob or directly beneath it. Loosen the set screw using a small flat-head screwdriver. Once the set screw is loosened, the knob should detach from the stopper stem. Then, simply lift the stopper directly out of the drain. If the stopper is stuck, gently rock it back and forth to dislodge any buildup. If that fails, carefully use pliers to grip the stopper (protecting the surface with a cloth) and attempt to gently turn and pull upward simultaneously. Cleaning the stopper and the drain opening is essential before reinstalling. Reinstallation is usually as simple as inserting the stopper stem back into the drain and tightening the set screw to secure the knob.
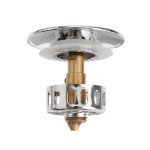
Push-and-Pull Stopper Removal: Push-and-pull stoppers typically have a simple friction or screw-in mechanism. Check for a visible set screw. If a set screw is present, loosen it using the appropriate screwdriver. If there is no set screw, forcefully pull the stopper straight up out of the drain. This may require considerable force due to friction. Rocking the stopper gently from side to side while pulling upward can help loosen it. If the stopper has a screw-in mechanism, turn the stopper counter-clockwise to unscrew it from the drain assembly. Once removed, clean the stopper and drain opening thoroughly to ensure smooth operation upon reinstallation. Reinstallation involves either pushing the stopper back into place (friction type) or screwing it back in (screw-in type), tightening any set screws if present.
Toe-Touch Stopper Removal: Toe-touch stoppers generally have a screw-in or snap-in design. Attempt to unscrew the stopper by turning it counter-clockwise. If it does not unscrew easily, it may have a snap-in design. In this case, try gently prying the stopper up using a flat-head screwdriver. Be careful not to scratch the bathtub surface. Protect the surface with a rag if necessary. Once the stopper is removed, clean both the stopper and the drain opening. Reinstallation involves either screwing the stopper back into place or snapping it back into the drain opening, depending on the design.
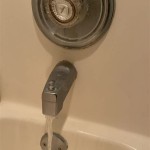
Trip-Lever Stopper Removal: Trip-lever stoppers are more complex and often require accessing the drain assembly from behind the overflow plate. Remove the overflow plate by unscrewing it. Inside, a linkage connected to the stopper will be visible. Carefully detach the linkage from the stopper. This may involve loosening a screw or disconnecting a ball-and-socket joint. Once the linkage is detached, the stopper should lift out of the drain. If the stopper is stuck, gently wiggle it to dislodge any debris. If needed, use pliers to gently grip the stopper (being careful not to scratch the surface) and pull it free. Clean the stopper and drain thoroughly. Reinstallation involves reconnecting the linkage to the stopper and reattaching the overflow plate. Ensure the linkage is properly aligned and secured before tightening the overflow plate screws.
Addressing Common Issues During Removal
Despite following the correct procedures, encountering difficulties during stopper removal is not uncommon. Factors like corrosion, mineral buildup, and stubborn debris can hinder the process. Addressing these issues effectively requires patience and appropriate techniques to prevent damage or injury.
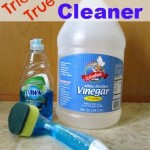
If the stopper is stuck due to corrosion or mineral buildup, applying a penetrating oil lubricant can be highly effective. Spray the lubricant around the base of the stopper and allow it to soak for several minutes or even hours. This will help loosen the corrosion and make the stopper easier to remove. Avoid using excessive force, as this could damage the stopper or the drain assembly. Gently wiggling or rocking the stopper from side to side while applying upward pressure can also help break the bond of corrosion. A heat gun (used carefully) can also sometimes help loosen stubborn mineral buildup.
If debris like hair or soap scum is obstructing the stopper, using needle-nose pliers or a bent wire hanger can help dislodge it. Carefully insert the pliers or wire into the drain opening around the stopper and attempt to grab and remove the debris. A plumber's snake can also be used to clear debris further down the drainpipe. Be careful not to push the debris further down, which could exacerbate the problem. Flushing the drain with hot water after removing the stopper can help wash away any remaining residue.
If the stopper breaks during removal, carefully remove any broken pieces from the drain opening. Using a small brush or vacuum cleaner can help extract small fragments. Exercise caution to avoid cutting or scratching yourself on sharp edges. If a significant portion of the stopper remains lodged in the drain, professional assistance might be required to avoid damaging the drainpipe. Replacing the entire drain assembly might be necessary in severe cases of damage or breakage.
Properly addressing these common issues ensures a successful stopper removal and prevents potential damage to the plumbing system. Patience and methodical techniques are key to overcoming these challenges.

How To Remove A Bathtub Drain The Home Depot

4 Easy Ways To Remove A Tub Drain Stopper Wikihow

How To Remove A Bathtub Drain Stopper Mr Rooter

Bathtub How Can I Remove A Stuck Bath Stopper Assembly Home Improvement Stack Exchange

How To Remove A Bathtub Drain Stopper Shower

How To Remove A Bathtub Drain Stopper

How To Remove A Bathtub Drain The Home Depot

Steps To Take In Order Remove A Drain Stopper Ricks Plumbing

How To Remove Bathtub Drain Stopper That Spins Freely

How To Remove A Bathtub Drain Stopper
Related Posts