Take Out Bathtub Drain: Essential Aspects
Bathtubs are an indispensable part of any bathroom, providing a relaxing and comfortable way to unwind after a long day. However, occasional clogs and blockages can hinder their functionality. If you find yourself facing such an issue, removing the bathtub drain may be necessary to address the problem effectively.
Removing a bathtub drain is a relatively straightforward process that can be completed with a few simple tools and a bit of know-how. In this article, we will provide a step-by-step guide to taking out a bathtub drain, ensuring a smooth and efficient resolution to your plumbing problem.
Materials Required
Before embarking on the task, gather the necessary materials:
- Adjustable wrench
- Phillips head screwdriver
- Flathead screwdriver
- Bucket or basin
- Gloves (optional)
Step-by-Step Guide
Follow these steps to remove the bathtub drain:
- Turn off the water supply: Locate the water supply valves beneath the sink or behind the bathtub and turn them off to prevent water from flowing into the bathtub during the process.
- Remove the overflow plate: Use a Phillips head screwdriver to remove the overflow plate, which is typically located near the top of the tub.
- Disconnect the overflow tube: Once the overflow plate is removed, locate the overflow tube connected to the drain assembly and detach it.
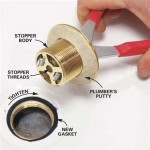
- Loosen the drain flange: Use an adjustable wrench to loosen the drain flange, which is the circular metal part around the drain hole.
- Remove the drain stopper: Insert a flathead screwdriver into the drain stopper and lift it out.
- Remove the drain assembly: Once the drain stopper is removed, you can proceed to take out the drain assembly. Gently pull it upward until it comes loose.
- Clean the drain: With the drain assembly removed, you can now access and clean the drainpipe to remove any clogs or debris.
- Reinstall the drain assembly: Once the drain is cleaned, insert the drain assembly back into place and tighten the drain flange using the adjustable wrench.
- Reattach the overflow tube: Connect the overflow tube to the drain assembly and secure it.
- Replace the overflow plate: Install the overflow plate over the overflow tube and tighten it using a Phillips head screwdriver.
- Turn on the water supply: Open the water supply valves to allow water to flow into the bathtub and check for any leaks.
Conclusion
By following the steps outlined above, you can remove the bathtub drain efficiently, allowing you to unclog or replace it as needed. Remember to take necessary safety precautions, such as wearing gloves, and if you encounter any difficulties during the process, do not hesitate to seek professional assistance from a plumber.

How To Remove A Bathtub Drain The Home Depot

How To Remove A Bathtub Drain Forbes Home

How To Remove A Bathtub Drain Stopper

How To Unclog A Shower Drain Without Chemicals Diy Family Handyman

How To Remove Any Bathtub Drain In 11 Steps Ryan Old Plumbing

4 Easy Ways To Remove A Tub Drain Stopper Wikihow

Diy Bathtub Drain Removal And Or Installation Tool Procedure

How To Remove A Bathtub Drain The Home Depot

How To Remove A Bathtub Drain Stopper

How To Easily Remove Bathtub Drain Plug Stopper Unclog In 1 Minute Jonny Diy