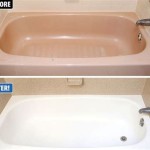
Addressing and Repairing a Small Chip in a Bathtub
A chipped bathtub, even a seemingly insignificant one, presents more than just an aesthetic issue. While a small chip might appear harmless, it can lead to further damage and potentially compromise the integrity of the bathtub's surface. Understanding the implications of a small chip and knowing the appropriate repair methods are crucial for maintaining the longevity and functionality of the fixture.
Bathtubs are typically constructed from various materials, including porcelain-enameled cast iron, acrylic, fiberglass, and cultured marble. Each material possesses unique properties and vulnerabilities, influencing the type of damage it sustains and the best approach to repair. For example, a chip in a porcelain bathtub exposes the underlying cast iron, which is susceptible to rust. Conversely, a chip in an acrylic or fiberglass bathtub can create a stress concentration point, potentially leading to cracking and further material degradation.
Ignoring a small chip can result in several problems. Water intrusion is a significant concern, particularly for cast iron bathtubs. The exposed metal will rust over time, leading to an unsightly stain and weakening the structure. Moreover, the rough edges of a chip can be uncomfortable and even pose a safety hazard, especially for children or individuals with sensitive skin. The chip provides a breeding ground for bacteria and mold, which can contribute to unpleasant odors and potential health issues. Furthermore, a chipped bathtub detracts from the overall appearance of the bathroom, potentially diminishing the property's value.
Identifying the Bathtub Material
Before attempting any repair, it is essential to identify the material of the bathtub. This crucial step dictates the appropriate repair products and techniques. Porcelain-enameled cast iron bathtubs are heavy and durable. They often exhibit a ringing sound when tapped firmly. Acrylic bathtubs are lightweight and have a smooth, plastic-like feel. Fiberglass bathtubs are also lightweight but may have a slightly rougher surface. Cultured marble bathtubs are heavier than acrylic or fiberglass and have a smooth, glossy finish that resembles natural marble.
Visual inspection can aid in material identification. Examine the area around the chip. Porcelain chips typically reveal a dark gray or black underlying material (the cast iron). Acrylic and fiberglass chips show a color similar to the surface, although the layers may be slightly different in shade. Cultured marble chips often display a layered appearance with swirling patterns.
If the bathtub's material remains uncertain after visual inspection, consult the manufacturer's documentation or contact a local plumbing professional for assistance. Incorrect material identification can lead to using incompatible repair products, resulting in failed repairs or further damage to the bathtub.
Essential Tools and Materials for Bathtub Chip Repair
Successful bathtub chip repair requires the right tools and materials. Gathering these items before commencing the repair ensures a smooth and efficient process. A standard repair kit, specific to the bathtub's material is highly recommended. Generic repair kits, while seemingly convenient, may not provide optimal adhesion or color matching for specific bathtub finishes.
For cleaning and preparation, rubbing alcohol or a specialized surface cleaner is necessary to remove dirt, grime, and soap scum from the damaged area. Fine-grit sandpaper (400-grit or higher) is used to smooth the edges of the chip and create a slightly roughened surface for better adhesion. A tack cloth or lint-free cloth removes sanding dust and debris.
The actual repair materials vary depending on the bathtub's material. For porcelain, a porcelain chip repair kit containing epoxy filler and touch-up paint is generally required. Acrylic and fiberglass bathtubs often use a repair kit featuring a two-part epoxy resin and hardener, sometimes with fiberglass strands for added strength. Cultured marble repair kits typically include a color-matched gel coat and polishing compound.
Application tools are equally important. A small putty knife or applicator is used to apply the filler or resin smoothly and evenly. Masking tape protects the surrounding area from accidental spills or scratches. A heat gun or hairdryer can accelerate the curing process of some epoxy resins, although caution must be exercised to avoid overheating and damaging the bathtub surface. Finally, safety glasses and gloves protect the eyes and skin from chemicals and debris.
Steps for Repairing a Small Chip
The actual repair process involves several key steps, each contributing to a successful and durable outcome. Proper preparation is critical for ensuring the repair adheres correctly and blends seamlessly with the surrounding surface. The specific steps may vary slightly depending on the type of repair kit and the bathtub material, so always consult the manufacturer's instructions.
First, thoroughly clean the chipped area and the surrounding surface with rubbing alcohol or a specialized surface cleaner. This removes any contaminants that could hinder adhesion. Next, carefully sand the edges of the chip with fine-grit sandpaper to create a smooth transition and roughen the surface for better bonding. Remove all sanding dust with a tack cloth or lint-free cloth. Mask off the area surrounding the chip with masking tape to protect it from accidental spills or scratches. This creates a clean and defined repair area.
Prepare the repair material according to the manufacturer's instructions. For epoxy-based kits, this typically involves mixing the resin and hardener in the specified proportions. Thoroughly mix the components to ensure proper curing. Using a small putty knife or applicator, carefully apply the filler or resin to the chip, filling it slightly above the surrounding surface. This allows for subsequent sanding and leveling. Allow the filler or resin to cure completely according to the manufacturer's recommended drying time. Some products may require heat from a heat gun or hairdryer to accelerate curing.
Once the filler or resin is cured, carefully sand it down with fine-grit sandpaper until it is level with the surrounding surface. Start with a slightly coarser grit (e.g., 600-grit) and gradually progress to finer grits (e.g., 1000-grit or higher) to achieve a smooth, polished finish. After sanding, clean the area with a damp cloth to remove any remaining dust. If the repair kit includes touch-up paint, apply it in thin, even coats to match the surrounding color. Allow each coat to dry completely before applying the next. Once the paint is dry, carefully remove the masking tape and inspect the repair. If necessary, apply a polishing compound to blend the repair seamlessly with the surrounding surface and restore the original shine.
For deep chips, consider applying the filler in multiple layers, allowing each layer to cure completely before applying the next. This prevents shrinkage and ensures a strong, durable repair. Color matching can be challenging, especially for older bathtubs. If the repair kit does not provide a perfect color match, consider mixing different shades of touch-up paint to achieve a closer match. A professional bathtub refinisher can provide expert color matching and repair services for complex or extensive damage.
Proper ventilation is crucial when working with epoxy resins and solvents. Open windows or use a fan to ensure adequate airflow. Always wear safety glasses and gloves to protect the eyes and skin from chemicals. Dispose of used materials and containers properly according to local regulations. After completing the repair, allow the area to dry and cure completely before using the bathtub. Avoid using harsh cleaning chemicals on the repaired area, as they can damage the finish. Regularly inspect the repair for any signs of cracking or deterioration and reapply touch-up paint or sealant as needed to maintain its integrity.
While DIY bathtub chip repair can be effective for small, superficial damage, larger or more complex chips may require professional attention. A professional bathtub refinisher has the expertise and equipment to perform a high-quality repair that blends seamlessly with the surrounding surface and restores the bathtub's original appearance and functionality. If unsure about the extent of the damage or the appropriate repair techniques, consulting a professional is always recommended.

Bathtub Chip Repair For Only 199 Happy Tubs

How To Fix A Chip In Bathtub Bunnings Work Community

Bathtub Chip Repair For Only 199 Happy Tubs

How To Fix A Chip In Bathtub Bunnings Work Community

Bath Chip Repair Highest Quality Bathtub Service Call Now

How To Repair A Chip In Bathtub Simple And Easy Diy Process Dp Tubs

How To Fix Chips In Acrylic Bath Tub Hometalk

How To Repair A Chip In Bathtub And Make It Disappear Easy Diy Dp Tubs

S Chips And Holes Diy Bathtub Shower Repair Tips

How To Fix A Chipped Bathtub For Bugs And Beans Repair Cover
Related Posts

