Shower Door Installation: A Comprehensive Guide for Bathtubs
Installing a shower door for a bathtub is a practical upgrade that enhances both the functionality and aesthetics of a bathroom. It effectively contains water, preventing splashes and reducing the risk of slips, while also adding a touch of elegance and modernity. This article provides a comprehensive guide to understanding the process involved in shower door installation for bathtubs, focusing on different types of doors, essential tools, preparation steps, and detailed installation instructions. This information will be valuable to homeowners considering a DIY project or those seeking to understand the scope of work before hiring a professional.
Understanding Different Types of Shower Doors for Bathtubs
The first step in planning a shower door installation is understanding the various types of doors available, each offering different features and benefits. Selecting the right door depends on the bathroom's layout, personal preferences, and budget.
Sliding Shower Doors: These are a popular choice for bathtub enclosures due to their space-saving design. Sliding doors consist of two or more panels that slide horizontally along a track. They are ideal for smaller bathrooms where a swinging door would obstruct movement. The mechanism is relatively simple, making them easier to install compared to other types. However, overlapping panels can make cleaning slightly more challenging. Materials commonly used include tempered glass and aluminum frames, although frameless options are also available for a more minimalist aesthetic.
Hinged Shower Doors: Also known as swing doors, hinged shower doors pivot open on hinges. These doors offer a wider opening and a more luxurious feel. They are best suited for larger bathrooms with ample space for the door to swing without hitting any fixtures. The installation is generally straightforward, involving attaching hinges to the wall and the door. However, it's crucial to ensure the wall is structurally sound to support the weight of the door and the stress of frequent opening and closing. Hinged doors often come with a variety of frame finishes and glass designs to match different bathroom styles.
Folding Shower Doors (Bifold): Folding shower doors, or bifold doors, are a practical option for smaller bathrooms where both space and access are limited. These doors consist of two or more panels that fold inward, minimizing the space required for opening. They offer a wider opening than sliding doors when fully retracted. The installation process is similar to that of sliding doors, involving the installation of tracks and hinges. Bifold doors are a good compromise between sliding and hinged doors, providing a balance of space-saving design and ease of access.
Frameless Shower Doors: Frameless shower doors provide a clean, modern look by eliminating the metal frame around the glass. They are typically made of thicker tempered glass for stability and safety. While frameless doors can be installed in sliding, hinged, or bifold configurations, the installation process is more complex than that of framed doors. It requires precise measurements and careful alignment to ensure a watertight seal. Due to the weight and fragile nature of the glass, professional installation is often recommended for frameless shower doors.
Semi-Frameless Shower Doors: These doors offer a compromise between framed and frameless designs. They have minimal framing around the edges of the glass panels, providing a cleaner look than traditional framed doors while still offering some structural support. Semi-frameless doors are generally easier to install than frameless doors, and they can be a more cost-effective option.
Essential Tools and Materials for Shower Door Installation
Before commencing the installation process, it is imperative to gather all the necessary tools and materials. Having everything readily available will streamline the process and minimize frustration.
Safety Gear: Safety should be the utmost priority. Safety glasses protect eyes from debris during drilling and cutting. Work gloves provide a better grip and protect hands from sharp edges on the glass or metal components.
Measuring Tools: Accurate measurements are critical for a successful installation. A measuring tape ensures precise dimensions are obtained. A level is essential for ensuring the door is plumb and aligned correctly. A pencil is used for marking drilling locations and cutting lines.
Drilling and Cutting Tools: A power drill with appropriate drill bits (for tile, drywall, and metal) is required for creating pilot holes and attaching hardware. A stud finder helps locate wall studs for secure mounting of the door frame. A hacksaw or metal-cutting blade is used for trimming the door frame or track if necessary.
Fasteners and Sealants: Screws, anchors, and bolts are necessary for securely attaching the door frame to the wall. Silicone sealant is used to create a watertight seal between the door frame and the wall, preventing water leaks. A caulk gun is required for applying the silicone sealant smoothly and evenly.
Hand Tools: A screwdriver (both Phillips head and flat head) is needed for tightening screws. A utility knife is used for trimming excess sealant and removing old caulk. A rubber mallet may be required for tapping the door frame into place.
Cleaning Supplies: Clean rags or paper towels are necessary for cleaning the surfaces before applying sealant and for wiping away excess sealant after installation. A glass cleaner is used to clean the glass door after installation.
Step-by-Step Shower Door Installation Guide
The installation process can vary slightly depending on the type of shower door being installed. However, the following steps provide a general guideline for installing a shower door for a bathtub.
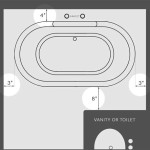
Step 1: Preparation and Measurement: Begin by thoroughly cleaning the surfaces where the door frame will be installed. Remove any old caulk or sealant using a utility knife and scraper. Carefully measure the width of the bathtub opening at the top, middle, and bottom. Use the narrowest measurement to determine the size of the shower door needed. Consult the manufacturer's instructions for specific measurement requirements.
Step 2: Assembling the Door Frame: Most shower door kits require some assembly of the frame. Follow the manufacturer's instructions to assemble the frame components, including the header, side jambs, and bottom track. Ensure all screws and fasteners are tightened securely.
Step 3: Installing the Side Jambs: Position the side jambs against the wall, ensuring they are plumb using a level. Mark the locations for the mounting holes through the jambs onto the wall. Use a stud finder to locate any wall studs behind the drywall. If possible, align the mounting holes with the studs for added support. If studs are not available, use appropriate wall anchors to provide a secure attachment. Drill pilot holes at the marked locations, using the appropriate drill bit for the wall material (tile or drywall). Attach the side jambs to the wall using screws and anchors.
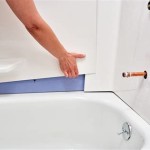
Step 4: Installing the Header and Bottom Track: Position the header at the top of the side jambs and attach it using screws. Ensure the header is level. Position the bottom track along the bathtub edge, ensuring it is aligned with the side jambs. Attach the bottom track to the bathtub edge using screws or adhesive, depending on the manufacturer's instructions. Silicone sealant may be applied to the bottom track to create a watertight seal.
Step 5: Installing the Shower Door: Carefully lift the shower door into the frame, following the manufacturer's instructions. For sliding doors, insert the door panels into the tracks. For hinged doors, attach the door to the hinges on the side jamb. For bifold doors, attach the door panels to the hinges and track. Ensure the door operates smoothly and freely.
Step 6: Adjusting the Door: Adjust the door as needed to ensure it is plumb and aligned correctly. For sliding doors, adjust the rollers to ensure the door slides smoothly. For hinged doors, adjust the hinges to ensure the door closes properly and does not rub against the frame. For bifold doors, adjust the hinges and track to ensure the door folds and opens smoothly.
Step 7: Applying Sealant: Apply silicone sealant along the inside and outside edges of the door frame, where it meets the wall and bathtub edge. Smooth the sealant with a wet finger or a sealant smoothing tool to create a clean, professional finish. Allow the sealant to cure completely according to the manufacturer's instructions before using the shower.
Step 8: Final Inspection and Cleaning: Inspect the shower door for any leaks or gaps. Touch up any areas where the sealant is missing or incomplete. Clean the glass door with glass cleaner to remove any smudges or fingerprints. Ensure all tools and materials are removed from the bathroom.
Step 9: Safety Precautions: Always review the manufacturer's instructions thoroughly before beginning the installation process. If unsure about any step, consult a professional installer. Allow the sealant to fully cure before using the shower to avoid leaks. Test the door's operation before relying on it. If the door does not close or seal correctly, make adjustments as needed.

Understanding Glass Shower Doors For Your Tub

Bathtub Enclosures Double Swinging Door

How To Install Delta Shower Glass Door On A Bathtub

4 Innovative Bathtub Door Designs To Transform Your Bathroom Pioneer Glass

How To Install Sliding Bathtub Shower Doors Delavin

How To Install Sliding Bathtub Shower Doors Delavin

Bathtub Glass Doors Screens

Aqua Hinged Tub Door

How To Install A Delta Tub And Shower Sliding Glass Doors

All Tub Doors Page 2 Delta Shower