Sealant for Bathtub Spout Diverter Valves: A Comprehensive Guide
The bathtub spout diverter valve is a common plumbing component that allows a user to switch water flow between the bathtub faucet and the showerhead. Over time, these valves can develop leaks, either around the base of the spout where it connects to the water pipe or within the diverter mechanism itself. Choosing and applying the correct sealant is crucial for achieving a long-lasting, watertight repair. This article will delve into the different types of sealants suitable for bathtub spout diverter valves, proper application techniques, troubleshooting common issues, and preventive maintenance strategies.
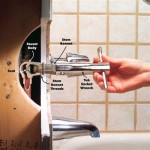
Understanding the anatomy of a bathtub spout diverter valve is essential before selecting a sealant. Most diverter spouts are connected to the water pipe using a threaded connection or a slip-fit connection. Threaded connections typically involve screwing the spout onto a threaded pipe nipple extending from the wall. Slip-fit connections rely on an O-ring or rubber gasket to create a seal when the spout is pushed onto a smooth pipe. The diverter mechanism itself, which is usually located within the spout body, redirects water flow. This mechanism might consist of a lever, knob, or push-pull mechanism that engages a valve or gate.
Leaks can occur at various points. A leak around the base of the spout where it meets the wall usually indicates a problem with the threaded connection or the O-ring in a slip-fit connection. A leak from the showerhead while the tub faucet is running suggests a malfunctioning diverter valve within the spout itself. Identifying the source of the leak is the first step in determining the appropriate repair strategy and sealant.
Choosing the Right Sealant
Several types of sealants are suitable for use on bathtub spout diverter valves. However, the specific choice depends on the type of connection and the materials involved. Here are some of the most common and effective options:
Plumber's Putty: Plumber's putty is a pliable, clay-like substance used primarily for creating watertight seals around drains and faucets. While it is not typically used for sealing threaded connections subjected to high water pressure, it can be effective for sealing the base of a slip-fit spout against the wall. Plumber's putty remains flexible and does not harden completely, allowing for easy removal and adjustments if needed. It's important to note that some types of plumber's putty can stain certain surfaces, so it's advisable to select a stain-free variety, especially when working with porous materials like natural stone.
Thread Seal Tape (Teflon Tape): Thread seal tape, also known as Teflon tape or PTFE tape, is a thin, non-adhesive tape used to create a watertight seal on threaded pipe connections. It works by filling the microscopic gaps between the threads, preventing water from seeping through. Thread seal tape is easy to apply and is resistant to a wide range of chemicals and temperatures. However, it is only suitable for threaded connections and should not be used on slip-fit connections or as a general-purpose sealant.
Pipe Dope (Pipe Joint Compound): Pipe dope, also known as pipe joint compound or pipe thread sealant, is a paste-like substance that is applied to threaded pipe connections to create a watertight seal. Pipe dope typically contains a mixture of lubricating agents, fillers, and solvents that help fill the gaps between the threads and prevent corrosion. Unlike thread seal tape, pipe dope provides some lubrication to the threads, making it easier to tighten the connection. It is available in various formulations, including those specifically designed for potable water systems. When selecting pipe dope, it is crucial to choose a non-toxic, lead-free formulation that is compatible with the pipe material.
Silicone Sealant: Silicone sealant is a flexible, waterproof sealant that is suitable for a wide range of plumbing applications. It adheres well to various surfaces, including metal, plastic, and ceramic. Silicone sealant is available in different formulations, including those specifically designed for bathrooms and kitchens. These formulations often contain mildew inhibitors to prevent the growth of mold and mildew in damp environments. When using silicone sealant, it is essential to choose a 100% silicone formula for optimal water resistance and longevity. Avoid using acrylic latex caulk, which is less durable and prone to shrinking and cracking over time.
O-Rings and Rubber Gaskets: For slip-fit connections, the primary sealing mechanism is the O-ring or rubber gasket. If the O-ring or gasket is damaged, worn, or missing, it must be replaced. While a sealant can provide a temporary solution, it is not a substitute for a properly functioning O-ring or gasket. When replacing an O-ring or gasket, it is essential to select the correct size and material for the specific spout and pipe. Applying a thin layer of silicone grease to the O-ring or gasket can help it slide into place and create a better seal.
Proper Application Techniques
Even the best sealant will fail if applied incorrectly. Following proper application techniques is crucial for achieving a long-lasting, watertight seal. The following steps outline the general procedure for applying sealant to a bathtub spout diverter valve:
Preparation: Before applying any sealant, thoroughly clean the surfaces to be sealed. Remove any old sealant, debris, or corrosion. Use a wire brush, scraper, or solvent to remove stubborn residue. Ensure the surfaces are dry before proceeding.
Threaded Connections: For threaded connections, apply thread seal tape or pipe dope to the male threads of the pipe nipple. When using thread seal tape, wrap the tape in the direction of the threads, overlapping each layer slightly. Apply several layers of tape for optimal sealing. When using pipe dope, apply a thin, even coat to the male threads, being careful not to get any dope on the female threads. Tighten the spout onto the pipe nipple until snug. Avoid over-tightening, which can damage the threads or the spout.
Slip-Fit Connections: For slip-fit connections, inspect the O-ring or rubber gasket for damage. If necessary, replace it with a new one. Apply a thin layer of silicone grease to the O-ring or gasket to help it slide into place. Push the spout onto the pipe until it is fully seated. If desired, apply a bead of plumber's putty or silicone sealant around the base of the spout where it meets the wall to prevent water from seeping behind the spout.
Silicone Sealant Application: When applying silicone sealant, use a caulking gun to apply a consistent bead of sealant along the joint. Smooth the sealant with a wet finger or a caulking tool to create a clean, professional-looking finish. Remove any excess sealant with a damp cloth. Allow the sealant to cure completely according to the manufacturer's instructions before using the bathtub or shower.
Curing Time: Allow the sealant to cure completely before exposing it to water. The curing time varies depending on the type of sealant and the ambient temperature and humidity. Refer to the manufacturer's instructions for specific curing time recommendations. Rushing the curing process can compromise the integrity of the seal and lead to leaks.
Troubleshooting Common Issues
Despite careful application, leaks can sometimes persist or reappear after a repair. Troubleshooting common issues is essential for identifying the underlying cause and implementing the appropriate corrective action.
Persistent Leaks: If a leak persists after applying sealant, the problem may not be with the sealant itself. Check for other potential sources of the leak, such as a cracked pipe, a loose fitting, or a malfunctioning diverter valve. If the diverter valve is leaking internally, it may need to be replaced. If the pipe is cracked or the fitting is loose, it will need to be repaired by a qualified plumber.
Sealant Failure: Sealant can fail due to various factors, including improper application, incompatibility with the materials, or exposure to harsh chemicals. If the sealant is cracked, peeling, or discolored, it needs to be replaced. When replacing sealant, be sure to remove all of the old sealant before applying the new sealant. Choose a sealant that is compatible with the materials being sealed and that is resistant to the chemicals and conditions to which it will be exposed.
Diverter Valve Problems: If the diverter valve is not working properly, it may be difficult to switch between the tub faucet and the showerhead. This can be caused by a worn or damaged diverter valve mechanism. In some cases, the diverter valve can be repaired by replacing the worn parts. However, in other cases, it may be necessary to replace the entire spout assembly.
Mineral Buildup: Mineral deposits, such as calcium and lime, can accumulate on the diverter valve and spout over time, hindering its operation and potentially causing leaks. Periodically cleaning the spout and diverter valve with a descaling solution can help prevent mineral buildup. Soak the spout in a solution of vinegar and water for several hours to dissolve mineral deposits. Rinse thoroughly with water before reinstalling.
Preventive Maintenance
Regular preventive maintenance can help extend the life of the bathtub spout diverter valve and prevent leaks from occurring. The following are some simple steps that can be taken to maintain a bathtub spout diverter valve:
Regular Cleaning: Clean the spout and diverter valve regularly to remove soap scum, dirt, and mineral deposits. Use a mild detergent and a soft cloth. Avoid using abrasive cleaners, which can damage the finish.
Inspect for Leaks: Periodically inspect the spout and diverter valve for leaks. Check around the base of the spout where it meets the wall, as well as the showerhead while the tub faucet is running. Early detection of leaks can prevent more serious problems from developing.
Lubricate the Diverter Valve: Occasionally lubricate the diverter valve mechanism with a silicone-based lubricant. This will help keep the valve moving smoothly and prevent it from sticking. Apply a small amount of lubricant to the moving parts of the valve.
Replace Worn Parts: Replace worn or damaged O-rings, gaskets, and other parts as needed. These parts are relatively inexpensive and easy to replace. Replacing them promptly can prevent leaks and extend the life of the spout and diverter valve.
By understanding the different types of sealants available, following proper application techniques, troubleshooting common issues, and implementing preventive maintenance strategies, one can effectively seal and maintain bathtub spout diverter valves, ensuring a leak-free and functional plumbing system.

How To Install Red Disc Seal Protect Your Bathtub Wall Prevent Drywall Damage Www Reddiscseal Com

How To Fix A Shower Diverter Repair Or Replace

How To Seal Tub Spout And Valve Trim With Silicone Caulking The Fixer Clips

Bathtub Spout With Diverter Replacement Fix Leaking Tub Jonny Diy

How To Fix A Failed Tub Spout Seal Diy Friendly Task

Water Not Coming Out Of Shower Head Tub Spout Diverter Repair

How To Repair A Shower Diverter Mr Rooter Blog

Plumbing New Bathtub Diverter Spout Drains Back Into Wall Home Improvement Stack Exchange

How To Install A Tub Spout The Home Depot

Danco Tub Spout Diverter Repair Kit 89205
Related Posts