Sealant For Bathtub Spout: A Comprehensive Guide
The bathtub spout, a seemingly simple fixture, plays a crucial role in the functionality and aesthetic appeal of any bathroom. Its primary function is to deliver water into the tub, but its integration with the surrounding wall and plumbing can be susceptible to leaks and water damage. Addressing this potential weakness involves the proper application of sealant. This article will delve into the various aspects of selecting and applying sealant for a bathtub spout, covering types of sealants, preparation techniques, application methods, and maintenance considerations.
Understanding the Importance of Bathtub Spout Sealant
Water intrusion is a common problem in bathrooms, leading to mold growth, structural damage, and costly repairs. The area around the bathtub spout is particularly vulnerable because it houses the plumbing connections and is frequently exposed to water. A properly applied sealant acts as a barrier, preventing water from seeping behind the wall, into the subfloor, or into adjacent rooms. Without adequate sealing, even minor leaks can accumulate over time, resulting in significant damage. This is especially true if the spout is not properly connected, or if there are small imperfections in the wall or tile surrounding the spout.
Furthermore, sealant contributes to the overall aesthetic of the bathroom. A clean, well-applied bead of sealant provides a finished look and prevents unsightly gaps where dirt and grime can accumulate. A deteriorated or poorly applied sealant line detracts from the bathroom's appearance and signals a potential problem. Therefore, choosing the right sealant and applying it correctly is not just a matter of preventing water damage but also of maintaining the bathroom's visual appeal.
Beyond preventing larger issues, the appropriate sealant around a bathtub spout helps to maintain consistent water pressure. A leaky spout connection, even a small one, can reduce the overall water pressure delivered to the tub, potentially affecting the shower experience (if the spout has a diverter) and filling time. By ensuring a tight and waterproof seal, the sealant contributes to optimal plumbing performance.
Types of Sealant Suitable for Bathtub Spouts
The market offers various types of sealants, each with its own properties and suitability for specific applications. The choice of sealant for a bathtub spout depends on factors such as the material of the spout and surrounding surfaces, the desired level of water resistance, and the ease of application. Here are some of the most common types:
Silicone Sealant: Silicone sealants are widely used in bathrooms due to their excellent water resistance, flexibility, and adhesion to various surfaces. They are available in different formulations, including 100% silicone and acrylic-modified silicone. 100% silicone sealants are known for their superior durability and mold resistance, making them ideal for areas constantly exposed to moisture. Acrylic-modified silicone sealants are easier to apply and paintable but may not offer the same level of water resistance as 100% silicone. When selecting a silicone sealant, look for products specifically labeled for bathroom or kitchen use, as these often contain mildewcides to inhibit mold growth.
Acrylic Latex Caulk: Acrylic latex caulk is another common choice for sealing around bathtub spouts. It is easier to apply than silicone sealant and can be painted, making it suitable for situations where color matching is important. However, acrylic latex caulk is less flexible and water-resistant than silicone, so it may not be the best option for areas with high moisture exposure. While some acrylic latex caulks are formulated with mildewcides, they generally do not offer the same level of mold resistance as silicone sealants.
Polyurethane Sealant: Polyurethane sealants are known for their exceptional strength and durability. They offer excellent adhesion to a wide range of materials and are highly resistant to water, chemicals, and UV radiation. However, polyurethane sealants can be more difficult to apply than silicone or acrylic latex caulks, and they may require specialized tools and techniques. They also tend to be less flexible than silicone sealants, which could be a disadvantage in areas prone to movement or vibration. While generally more expensive, polyurethane sealants are often considered for high-performance applications where long-term durability is paramount.
Hybrid Polymer Sealants: These sealants combine the best properties of silicone and polyurethane sealants. They offer excellent adhesion, flexibility, water resistance, and UV resistance. They are also paintable and easy to apply. Hybrid polymer sealants are a relatively new technology, and they tend to be more expensive than traditional sealants, but their superior performance makes them a worthwhile investment for certain applications.
When selecting a sealant, it's crucial to consider the manufacturer's recommendations and the specific requirements of the project. Always read the product label carefully and choose a sealant that is specifically designed for bathroom use and compatible with the materials being sealed.
Preparing the Surface for Sealant Application
Proper surface preparation is essential for ensuring a strong and long-lasting seal. The existing sealant must be removed entirely, and the surface cleaned thoroughly before applying new sealant. The following steps outline the process:
Remove Old Sealant: Use a sealant removal tool or a utility knife to carefully remove the old sealant. Avoid damaging the surrounding surfaces, such as the tile or the spout itself. Softening the old caulk with a hairdryer can help loosen it before removal. For stubborn sealant, specialized sealant remover solvents are available at most hardware stores. It's important to work slowly and methodically to ensure that all traces of the old sealant are removed.
Clean the Surface: Once the old sealant is removed, clean the surface thoroughly with a mild detergent and water. Remove any soap scum, mildew, or dirt. Rinse the surface well and allow it to dry completely. For stubborn mildew stains, a solution of bleach and water can be used, but be sure to rinse thoroughly and allow the surface to dry completely before applying the new sealant.
Dry the Area Completely: Moisture is the enemy of sealant adhesion. Before applying the new sealant, ensure that the area is completely dry. Use a clean cloth to wipe the surface dry, and consider using a hairdryer on a low setting to expedite the drying process. Pay particular attention to corners and crevices where moisture may linger. Allow ample time for the surface to air dry to ensure the best possible bond.
Masking (Optional): Applying painter's tape along the edges of the area to be sealed can help create a clean and professional-looking sealant line. Apply the tape carefully, ensuring that it is straight and even. The tape will also protect the surrounding surfaces from accidental sealant smudges. Masking is particularly helpful when working with darker sealants or on surfaces that are difficult to clean.
By taking the time to properly prepare the surface, you can significantly improve the adhesion and longevity of the sealant, ensuring a watertight and aesthetically pleasing result.
Applying the Sealant to the Bathtub Spout
Applying sealant requires a steady hand and attention to detail. The goal is to create a smooth, uniform bead that effectively seals the gap between the spout and the surrounding surface. These steps will guide the application process:
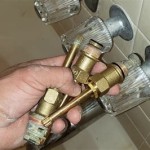
Load the Caulk Gun: Insert the sealant cartridge into the caulk gun. Cut the tip of the cartridge at a 45-degree angle, using a utility knife. The diameter of the opening should be slightly smaller than the width of the gap to be sealed. Puncture the seal at the base of the cartridge using the caulk gun's built-in wire or a long nail.
Apply the Sealant: Hold the caulk gun at a 45-degree angle to the surface and apply a continuous bead of sealant along the gap. Maintain a consistent pressure on the trigger of the caulk gun to ensure a uniform flow of sealant. Move the gun slowly and steadily along the gap, avoiding starts and stops. Overlapping the sealant slightly onto the surrounding surfaces will help create a watertight seal.
Smooth the Sealant: Immediately after applying the sealant, smooth the bead with a wet finger or a sealant smoothing tool. Use light pressure to create a concave profile that blends seamlessly with the surrounding surfaces. Wipe away any excess sealant with a damp cloth. Smoothing the sealant not only improves its appearance but also helps to force it into the gap, ensuring a better seal.
Remove the Masking Tape (If Used): If you used masking tape, remove it carefully while the sealant is still wet. Pull the tape away from the sealant at a 45-degree angle. This will help prevent the sealant from tearing or separating from the surface. Removing the tape while the sealant is wet will also prevent it from hardening and adhering to the tape.
Cure the Sealant: Allow the sealant to cure completely according to the manufacturer's instructions. This typically takes 24 to 48 hours. Avoid exposing the sealant to water or moisture during the curing process. Read the instructions provided with the specific sealant purchased for the most accurate curing time specifics.
Maintaining the Sealant Around the Bathtub Spout
Even with proper application, sealant can degrade over time due to exposure to water, chemicals, and UV radiation. Regular maintenance can extend the life of the sealant and prevent water damage. Here are some tips for maintaining the sealant around your bathtub spout:
Regular Cleaning: Clean the sealant regularly with a mild detergent and water. This will remove soap scum, mildew, and dirt that can accumulate and degrade the sealant. Avoid using abrasive cleaners or scrub brushes, as these can damage the sealant's surface. A soft sponge or cloth is sufficient for most cleaning tasks.
Inspect Regularly: Inspect the sealant regularly for cracks, gaps, or signs of deterioration. Pay particular attention to areas where the sealant meets the spout or the surrounding surfaces. Early detection of problems allows for timely repairs and prevents water damage. A small crack can quickly escalate into a significant leak if left unaddressed.
Recaulk as Needed: If the sealant is cracked, damaged, or showing signs of deterioration, remove it and reapply new sealant. Following the steps outlined earlier in this article will ensure a successful recaulking. Recaulking is a relatively simple and inexpensive task that can prevent costly water damage repairs. Do not attempt to simply apply new sealant on top of old sealant as it will not adhere and prevent water infiltration.
Proper Ventilation: Ensure that the bathroom is well-ventilated to reduce moisture levels. Use the exhaust fan during and after showers and baths. This will help prevent mold and mildew growth, which can damage the sealant. Proper ventilation also helps to dry out the sealant and prevent premature degradation.
By following these maintenance tips, you can prolong the life of the sealant around your bathtub spout and prevent water damage in your bathroom.

How To Seal Tub Spout And Valve Trim With Silicone Caulking The Fixer Clips

How To Install Red Disc Seal Protect Your Bathtub Wall Prevent Drywall Damage Www Reddiscseal Com

How To Install A Tub Spout The Home Depot

How To Fix A Failed Tub Spout Seal Diy Friendly Task

How To Apply Caulk Around A Tub Spout Bathroomaccessories Plumbingissues Howto Diy

Caulk Or Sealant Which Is Right For Your Bathtub Badeloft

How To Caulk A Bathtub 13 Steps With Pictures Wikihow

Seal A Leaky Bathtub Easily With Silicone Sealant

How To Seal A Bath Drench
:max_bytes(150000):strip_icc()/wipe_dap-56a73ba03df78cf77293815a.jpg?strip=all "How To Caulk Shower And Bathtub Trim")
How To Caulk Shower And Bathtub Trim