Replacing Old Bathtub Faucet Handles with New
The bathtub faucet handle is a frequently used component of the plumbing system, and over time, it can suffer from wear and tear. Discoloration, cracking, and difficulty in turning are common indicators that a replacement may be necessary. Replacing old bathtub faucet handles is a relatively straightforward home improvement task that can significantly enhance the aesthetics and functionality of a bathroom. This article provides a detailed guide on how to successfully replace old bathtub faucet handles with new ones, outlining the necessary tools, preparation steps, and installation procedures.
Assessing the Existing Faucet and Selecting Replacement Handles
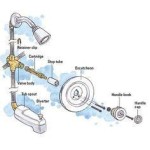
Before commencing the replacement process, a thorough assessment of the existing faucet and handle configuration is essential. The first step is to identify the type of faucet in place. Bathtub faucets generally fall into a few categories: two-handle faucets, single-handle faucets, and more complex diverter valve systems. Two-handle faucets typically have separate handles for hot and cold water, while single-handle faucets control both temperature and flow with a single lever. Diverter valves usually have a third handle or knob used to switch water flow between the tub spout and the showerhead.
Once the faucet type is identified, careful measurements should be taken. Note the dimensions of the existing handles, including the diameter and the length of the handle stem. This information is crucial when selecting replacement handles to ensure compatibility. Pay particular attention to the connection mechanism between the handle and the faucet stem. Some handles are secured with screws, while others utilize a spline adapter. Understanding this connection type is critical for selecting the correct replacement.
When selecting replacement handles, consider the style of the bathroom and the desired aesthetic. Numerous styles are available, ranging from traditional to modern designs. Matching the handle finish to the existing bathroom fixtures, such as the showerhead and sink faucet, can create a cohesive look. Consider the material of the handles as well. Common materials include chrome, brushed nickel, and oil-rubbed bronze. Each material offers different levels of durability and resistance to corrosion.
Furthermore, it's crucial to ensure that the replacement handles are compatible with the valve stems. Different faucet manufacturers employ varying stem designs, and not all handles are universally compatible. Refer to the faucet manufacturer's specifications or consult with a plumbing supply retailer to verify compatibility. Purchasing a complete handle kit, which includes the handles, adapters (if needed), and screws, can simplify the selection process and ensure that all the necessary components are included.
Finally, before purchasing, inspect the existing faucet for any signs of damage to the valve stems themselves. If the stems are corroded or damaged, simply replacing the handles will not solve the underlying problem. In such cases, replacing the entire faucet may be a more practical solution.
Gathering the Necessary Tools and Materials
Proper preparation is key to a successful faucet handle replacement. Having the correct tools and materials on hand will streamline the process and minimize potential complications.
The following tools are typically required:
- Screwdrivers (both flathead and Phillips head)
- Adjustable wrench
- Penetrating oil
- Pliers
- Allen wrench (if applicable)
- Clean rags or towels
- Plumber's tape
- Basin wrench (optional, but helpful for accessing tight spaces)
In addition to the tools, the following materials will be needed:
- Replacement faucet handles
- Set screws (if needed)
- Handle adapters (if needed)
- Replacement O-rings or washers (if necessary)
- Cleaning solution (for cleaning the faucet and surrounding area)
Before beginning the work, it’s highly recommended to turn off the water supply to the bathtub faucet. The shut-off valves are typically located under the sink or in a nearby utility closet. If the shut-off valves are not readily accessible or are not functioning correctly, the main water supply to the house may need to be shut off. To prevent water damage, place towels or a bucket underneath the faucet to catch any residual water that may drip out.
Once the water supply is turned off, the work area should be properly prepared. Clear any obstructions around the bathtub faucet to provide ample space to maneuver the tools. Cover the bathtub surface with a protective cloth or towel to prevent scratches or damage. Good lighting is also essential. A portable work light can be used to illuminate the area and improve visibility.
Step-by-Step Guide to Replacing Bathtub Faucet Handles
With the assessment completed, the tools gathered, and the work area prepared, the actual replacement process can begin. This section provides a detailed step-by-step guide to replacing bathtub faucet handles.
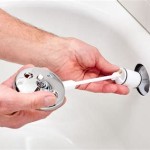
Step 1: Remove the Old Handles
The first step is to remove the existing faucet handles. The removal method will vary depending on the handle design. Some handles are secured with visible screws, while others have hidden screws covered by decorative caps. If there are visible screws, use a screwdriver to loosen and remove them. For handles with hidden screws, carefully pry off the decorative cap using a small flathead screwdriver. Once the cap is removed, the screw will be visible and can be removed.
If the handles are stuck or difficult to remove, apply a liberal amount of penetrating oil to the handle stem and allow it to soak for several minutes. The penetrating oil will help to loosen any corrosion or mineral buildup that may be causing the handle to stick. After soaking, try gently wiggling the handle back and forth while pulling it outward. Avoid using excessive force, as this could damage the valve stem.
Once the screws are removed, the handles should slide off the valve stems. If the handles are secured with a spline adapter, the adapter may need to be removed separately. Use pliers or an adjustable wrench to gently grip the adapter and twist it off the stem. Be careful not to damage the stem during this process.
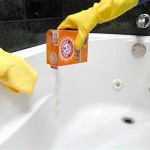
Step 2: Clean the Faucet Area
After removing the old handles, thoroughly clean the faucet area. Use a cleaning solution to remove any grime, mineral deposits, or soap scum that may have accumulated around the faucet base. This is also a good opportunity to inspect the valve stems for any signs of corrosion or damage. If the stems are corroded, they may need to be cleaned or replaced. Use a wire brush or sandpaper to remove any surface rust or mineral deposits. If the stems are significantly damaged, consider replacing the entire faucet.
Step 3: Install the New Handles
With the faucet area cleaned and the valve stems inspected, the new handles can be installed. Begin by attaching any necessary adapters to the valve stems. Ensure that the adapters are properly aligned and securely fastened. Apply plumber's tape to the threads of the valve stems to create a watertight seal.
Next, slide the new handles onto the valve stems. Align the handles with the adapters, ensuring that they are properly positioned. Secure the handles with the screws, tightening them until they are snug but not overtightened. Overtightening the screws can damage the handles or the valve stems.
If the handles have decorative caps, snap them into place to cover the screws. Ensure that the caps are securely attached and flush with the handle surface.
Step 4: Test the New Handles
After installing the new handles, carefully turn the water supply back on. Check for any leaks around the faucet base and the handle connections. If any leaks are detected, tighten the screws or adapters as needed. If the leaks persist, turn off the water supply and inspect the connections more closely. It may be necessary to replace the O-rings or washers on the valve stems to create a better seal.
Test the functionality of the new handles by turning them on and off. Ensure that the water flows smoothly and that the handles turn easily. Check the water temperature to ensure that the hot and cold water are functioning correctly. If the handles are difficult to turn or the water temperature is not correct, the valve stems may need to be adjusted or replaced.
Step 5: Final Adjustments and Cleanup
Once the new handles have been successfully installed and tested, make any final adjustments as needed. Ensure that the handles are properly aligned and that all screws are securely tightened. Clean up the work area, removing any tools, materials, and debris. Dispose of the old handles and any packaging materials properly.
By following these steps carefully, homeowners can successfully replace old bathtub faucet handles and enhance the appearance and functionality of their bathrooms. Remember to prioritize safety, take accurate measurements, and select compatible replacement handles to ensure a seamless and satisfactory outcome.

Replace Upgrade Your Shower And Bath Handle

How To Replace Bathtub Faucet Handles

Diy Bathtub Old Style Shower Faucet Handle To New Replacement Easy

Diy Bathtub Faucet Repair

Replace Faucet Handles In Existing Bathtub Home Improvement Stack Exchange

Diy Replace Old 3 Handle Shower Valve With New Single

How To Replace Shower Faucet Trim

2 Handle Shower Faucet Replacement 1 Tom Plumber

Replacing A Tub Faucet Bathtub Spout Replacement

How To Replace A Mobile Home Bathtub Faucet
Related Posts