Replacing a Faucet Stem for a Bathtub
A bathtub faucet stem is a crucial component that controls the flow of water to the spout. Over time, these stems can wear out, leading to leaks, drips, or difficulty in controlling the water flow. If you're experiencing these issues, replacing the faucet stem is a common and relatively straightforward DIY project. This article will guide you through the process of replacing a bathtub faucet stem, providing step-by-step instructions and helpful tips.
1. Gather the Necessary Tools and Materials
Before embarking on the replacement process, ensure you have the following tools and materials readily available:
- Adjustable wrench
- Channel-lock pliers
- Phillips screwdriver
- Flathead screwdriver
- Basin wrench (optional, but highly recommended)
- New faucet stem (compatible with your existing faucet)
- Teflon tape
- Bucket or container to catch water
- Shop towel or rag
It's essential to ensure that the replacement stem is compatible with your existing faucet model. Consult the manufacturer's specifications or the original stem for compatibility information. You can typically find this information on the stem itself or in the manufacturer's documentation.
2. Turn Off the Water Supply
Safety is paramount when working with plumbing. Before disassembling any part of the faucet, turn off the water supply to the bathtub. Locate the shut-off valve for the bathtub, typically found under the sink or near the bathtub itself. Turn the valve clockwise to fully shut off the water flow. It's always a good practice to run the faucet to drain any residual water in the pipes.
3. Remove the Faucet Handle and Escutcheon
The faucet handle and escutcheon (the decorative plate that covers the faucet stem) need to be removed to access the stem. Depending on the faucet type, there might be a set screw holding the handle in place. Use a Phillips or flathead screwdriver to loosen the set screw, then gently pull the handle off. Once the handle is removed, the escutcheon can be unscrewed with an adjustable wrench or channel-lock pliers. Be careful not to damage the surrounding finish when removing the escutcheon.
4. Access and Remove the Old Stem
Now, you can access the worn-out faucet stem. Depending on the faucet type, there are two common methods for removing the stem.
- Compression Faucets: In this type, the stem is held in place by a packing nut. Use an adjustable wrench or channel-lock pliers to loosen and remove the packing nut, then carefully pull the old stem out.
- Cartridge Faucets: Cartridge faucets employ a cartridge that houses the stem and other internal components. Remove the cartridge by unscrewing it with an appropriate wrench. For this type, it's usually easier to replace the entire cartridge instead of just the stem.
If you encounter difficulty removing the old stem, a basin wrench can be a helpful tool. A basin wrench is specially designed to grip and loosen stubborn stems from the faucet body, preventing damage to the surrounding area.
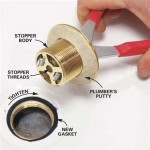
5. Install the New Stem
With the old stem removed, it's time to install the new one. Before attaching the new stem, ensure the faucet body is clean and free of debris. Wrap a few layers of Teflon tape around the threads of the new stem. This will help ensure a tight seal and prevent leaks. Carefully insert the new stem into the faucet body, ensuring it's seated properly.
For compression faucets, tighten the packing nut onto the stem using an adjustable wrench or channel-lock pliers. Ensure the nut is securely tightened but avoid overtightening, as this can damage the stem or faucet body.
For cartridge faucets, insert the new cartridge firmly into the faucet body. Ensure the cartridge properly aligns with the faucet's internal components before tightening it down.
6. Reassemble the Faucet
Once the new stem is installed, reassemble the faucet in reverse order. Reattach the escutcheon, ensuring a snug fit, then reattach the handle and secure the set screw if applicable.
7. Turn the Water Supply Back On and Test
After reassembling the faucet, carefully turn the water supply back on. Check for any leaks around the stem, faucet body, escutcheon, and handle. If you find any leaks, tighten the corresponding parts, and repeat the leak check. Once you've confirmed no leaks, run the faucet to ensure it operates smoothly and the water flow is controlled properly.
8. Clean Up
After completing the replacement process, clean up any tools, debris, or water spills. Discard the old faucet stem properly and wash your hands thoroughly.
Replacing a bathtub faucet stem is a common plumbing task that can be accomplished with the right tools and a bit of patience. By following these steps, you can successfully repair a leaky faucet and restore proper water flow without the expense of hiring a professional. Remember to prioritize safety and always check for leaks after completing the repair.

How To Fix A Leaking Bathtub Faucet Diy Family Handyman

How To Fix A Leaking Bathtub Faucet Diy Family Handyman

Fixing Faucets How To Replace A Difficult Tub Faucet Cartridge

How To Replace A Bathtub Faucet The Home Depot

How To Replace A Bathtub Faucet The Home Depot

How To Remove Bathtub Faucet Stems Quick And Easy

How To Replace A Bathtub Faucet The Home Depot

How To Repair Replace 3 Way Shower Valve Stem Fast Easy

How To Replace A Shower Valve 12 Steps With Pictures Wikihow

How To Fix A Leaky Bathtub Faucet 6 Ways Stop Drips