Essential Aspects of Replacing Bathtub Faucets
Replacing a bathtub faucet can seem like a daunting task, but with the right tools and a bit of preparation, you can save time, money, and hassle. Here are the essential aspects of replacing bathtub faucets to ensure a successful project:Tools and Materials:
Gather the necessary tools and materials before starting. These typically include a wrench, pliers, screwdriver, putty knife, plumber's tape, and the new faucet. Ensure the new faucet is compatible with your existing plumbing and bathroom style.Safety Precautions:
Always turn off the water supply to the bathtub before beginning work. Protect your eyes and hands by wearing safety glasses and gloves. If the faucet is rusty or old, it may have sharp edges, so handle it with care.Removing the Old Faucet:
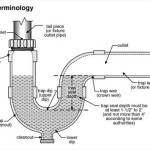
Use the wrench to disconnect the water supply lines from the old faucet. Then, remove the mounting nuts and pull the faucet straight up to detach it from the tub surface. If the faucet is stuck, gently tap it with a hammer to loosen it.Preparing the New Faucet:
Apply a layer of plumber's tape to the threads of the new faucet's water supply lines and mounting bolts. This will help create a watertight seal.Installing the New Faucet:
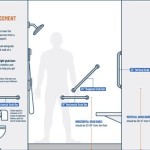
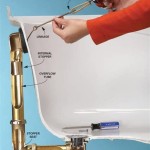
Place the new faucet in the desired location on the tub surface and secure the mounting nuts tightly. Connect the water supply lines to the faucet and tighten them securely. Ensure the faucet is level and aligned properly.Final Touches:
Turn on the water supply and check for leaks. If any leaks occur, tighten the connections or apply additional plumber's tape. Install the handle(s) and any decorative parts, such as a faceplate or escutcheon.Finishing Up:
Wipe down the new faucet and the surrounding area to remove any debris or fingerprints. Enjoy your updated and functional bathtub faucet.Additional Tips:
- If you are replacing a faucet with different handles, ensure the holes in the tub surface are appropriately sized. - Use a putty knife to remove old caulk or sealant around the faucet base and apply new caulk after the new faucet is installed. - If the faucet is leaking from the spout, check if the aerator is clogged. Cleaning or replacing the aerator may resolve the issue.
How To Fix A Leaking Bathtub Faucet Diy Family Handyman

How To Replace A Mobile Home Bathtub Faucet Parts Latest News

How To Replace A Bathtub Faucet

How To Change A Bathtub Faucet 14 Steps With Pictures Wikihow

How To Fix A Leaking Bathtub Faucet Diy Family Handyman

How To Replace A Tub Spout Project Tutorial Bob Vila

Replacing Shower Tub Faucet How To Install A New

Learn How To Remove And Install Various Tub Spouts

3 Ways To Remove A Tub Faucet Wikihow

Learn How To Remove And Install Various Tub Spouts
Related Posts