Replacing Bathtub Faucet Handle
The bathtub faucet handle, a seemingly small component, plays a crucial role in controlling water flow and temperature during bathing or showering. Over time, these handles can become damaged, worn out, or simply aesthetically unappealing. Replacing a bathtub faucet handle is a common home improvement task that homeowners can often accomplish with basic tools and a methodical approach. This article provides a comprehensive guide to replacing a single bathtub faucet handle, covering the necessary preparations, step-by-step instructions, and important considerations.
Identifying the Faucet Type
Before initiating the replacement process, accurate identification of the existing faucet type is paramount. This is because different faucet types have distinct mechanisms and require specific handle removal and installation techniques. The most common types of bathtub faucets include compression faucets, ball faucets, cartridge faucets, and ceramic disc faucets. Compression faucets are characterized by separate hot and cold water handles that, when turned, compress a rubber washer against the valve seat to stop the flow of water. Ball faucets feature a single handle that controls both water temperature and flow through a rotating ball mechanism inside the faucet body. Cartridge faucets also typically have a single handle, but they utilize a cartridge, a pre-assembled unit containing the valve and sealing components. Ceramic disc faucets are identifiable by their tall, cylindrical body and a single lever that controls water flow and temperature using two ceramic discs that slide against each other.
Visual inspection of the faucet and its handle is usually sufficient to determine the faucet type. Examining the way the handle operates and the number of handles present are key indicators. Consulting the manufacturer's documentation, if available, can provide definitive confirmation. Knowing the faucet type will significantly streamline the handle replacement process and ensure compatibility with the new handle.
Gathering Necessary Tools and Materials
Successful handle replacement hinges on having the right tools and materials at hand. A well-prepared workspace minimizes disruptions and ensures a smooth operation. The essential tools typically include a screwdriver set (both flathead and Phillips head), an adjustable wrench, pliers (regular and possibly needle-nose), a basin wrench (for accessing tight spaces), and a utility knife. A small container or resealable bag is helpful for storing small parts to prevent loss. In addition to the tools, the primary material is the replacement faucet handle itself. When selecting a replacement handle, ensure it is compatible with the existing faucet type and stem. Measurement of the stem diameter and length is crucial for a proper fit. Teflon tape is also useful for sealing any threaded connections to prevent leaks. Lastly, a cleaning solution and a cloth will be needed to clean the area around the faucet before and after the replacement.
Prior to commencing any work, the main water supply to the bathroom must be shut off. The shut-off valves are usually located under the sink or in the basement. Turning off the water supply prevents water from spraying out when the faucet handle is removed and minimizes the risk of water damage. After shutting off the water, turn on the affected faucet to relieve any residual pressure in the pipes. This step is crucial for safety and prevents unexpected water surges during the handle removal process.
Step-by-Step Handle Replacement Procedure
The following steps outline the general procedure for replacing a bathtub faucet handle. However, it is important to note that variations may exist depending on the specific faucet type and model.
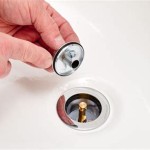
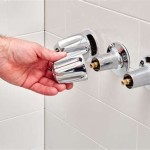
Step 1: Removing the Old Handle. The initial step involves removing the existing faucet handle. The method for removing the handle varies depending on the faucet type. Some handles are secured by a visible screw, typically located under a decorative cap or in a recess on the handle itself. Use a screwdriver to remove the screw and then gently pull the handle straight off the stem. If the handle is corroded or stuck, applying penetrating oil can help loosen it. Other handles may be secured with a setscrew, which is a small screw that is tightened onto the faucet stem. Use an Allen wrench or a small screwdriver to loosen the setscrew and then pull the handle off. In some cases, the handle may be threaded onto the stem. In this case, simply unscrew the handle counterclockwise. If the handle is difficult to remove, avoid excessive force, as this can damage the valve stem or the surrounding plumbing.
Step 2: Inspecting the Valve Stem. Once the handle is removed, carefully inspect the valve stem for any signs of damage or corrosion. Clean the stem with a small brush or cloth to remove any debris or buildup. If the stem is damaged, it may need to be replaced in addition to the handle. If the valve stem appears to be in good condition, proceed to the next step.
Step 3: Installing the New Handle. With the old handle removed and the valve stem inspected, the new handle can be installed. Align the new handle with the stem and gently push it onto the stem. If the handle is secured with a screw, insert the screw and tighten it securely. If the handle is secured with a setscrew, tighten the setscrew onto the stem. If the handle is threaded, screw it onto the stem until it is snug. Ensure that the handle is properly aligned and that it operates smoothly. Avoid over-tightening any screws or setscrews, as this can damage the handle or the valve stem.
Step 4: Testing the New Handle. After installing the new handle, turn the water supply back on slowly. Check for any leaks around the handle and the base of the faucet. Turn the handle to test the water flow and temperature. If there are any leaks, tighten the handle or the surrounding connections. If the leaks persist, Teflon tape can be applied to the threaded connections to create a better seal. Continuously monitor the area for leaks for several hours after installation.
Addressing Common Issues and Troubleshooting
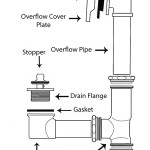
While the handle replacement process is typically straightforward, certain issues may arise. One common problem is a stuck or corroded handle. Applying penetrating oil and allowing it to soak for several minutes can often loosen the handle. Gentle tapping with a rubber mallet can also help to dislodge the handle. Another issue is difficulty removing the screw that secures the handle. If the screw is stripped, a screw extractor may be necessary. Alternatively, a rubber band or steel wool can be placed between the screwdriver and the screw head to provide better grip. Leaks after installing the new handle are also a common concern. Ensure that all connections are properly tightened and that Teflon tape is used on any threaded connections. If the leaks persist, the valve seat may be damaged and require replacement. Additionally, if the new handle does not fit properly on the stem, double-check the stem size and handle compatibility. Measure the stem diameter and length and compare it to the specifications of the new handle. Lastly, if the water pressure is low after installing the new handle, check the aerator for debris or buildup. Clean the aerator to restore the water pressure.
In situations where the homeowner is uncomfortable performing the handle replacement, it is advisable to seek assistance from a qualified plumber. Attempting to force or improperly install a handle can damage the faucet or the plumbing system, leading to more extensive and costly repairs. A licensed plumber possesses the expertise and tools necessary to diagnose and resolve any issues that may arise during the replacement process. Furthermore, a professional plumber can ensure that the handle is installed correctly and that all plumbing connections are secure, preventing potential leaks and water damage.

How To Fix A Leaking Bathtub Faucet Diy Family Handyman

How To Fix A Leaking Single Handle Bathtub Faucet Quick And Easy

How To Replace A Bathtub Faucet

How To Replace A Single Handle Shower Cartridge In 3 Steps

Shower Handle Replacement

How To Fix A Leaking Bathtub Faucet The Home Depot

How To Fix A Leaky Bathtub Faucet 6 Ways Stop Drips

How To Change A Bathtub Faucet 14 Steps With Pictures Wikihow

How To Replace A Single Handle Bathtub Faucet Yourself

How To Replace A Mobile Home Bathtub Faucet
Related Posts