```html
Replacing A Bathtub Faucet Stem: A Comprehensive Guide
The bathtub faucet stem, a critical component of the plumbing system, regulates the flow of water to the bathtub. Over time, these stems can become worn or damaged, leading to drips, leaks, and difficulties in controlling water temperature. Replacing a faulty bathtub faucet stem is a common plumbing repair that can often be accomplished through careful execution of steps and the use of common tools. This article provides a detailed guide to replacing a bathtub faucet stem, covering preparation, identification, removal, and installation.
Key Point 1: Preparation and Safety
Before beginning any plumbing repair, prioritizing safety is paramount. The initial step involves turning off the water supply to the affected faucet. This can typically be achieved by locating the shut-off valves for the hot and cold water lines leading to the bathtub. These valves are often situated beneath the sink or within an access panel behind the bathtub. If individual shut-off valves are not available, the main water supply to the entire house must be turned off. Once the water supply is shut off, open the bathtub faucet to relieve any residual pressure in the pipes.
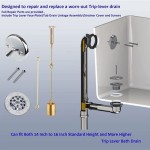
Gathering the necessary tools and materials is crucial for a smooth replacement process. Essential tools include: adjustable wrench, socket wrench set, flathead screwdriver, Phillips head screwdriver, penetrating oil, plumber's grease, and a flashlight. The most crucial material is the replacement faucet stem itself. Determining the correct replacement stem requires identifying the make and model of the existing faucet. If the faucet's brand and model are unknown, the old stem must be physically brought to a plumbing supply store for matching. Taking a photograph of the faucet assembly before disassembly can also be helpful for reassembly later.
Protecting the bathtub's finish is important during the replacement procedure. Laying down a drop cloth or old towel around the faucet base can prevent scratches or damage from dropped tools. Finally, it's advisable to wear safety glasses to protect the eyes from debris or splashing water.
Key Point 2: Faucet Stem Removal
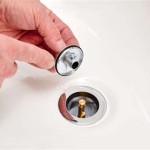
The process of removing the old faucet stem varies slightly depending on the type of faucet. However, the general principles remain consistent. First, the faucet handle must be removed. This typically involves using a small screwdriver to loosen a set screw located on the side or beneath the handle. Once the set screw is loosened, the handle should pull off. Some handles may be secured with a decorative cap that needs to be pried off first to reveal the screw.
With the handle removed, the escutcheon, a decorative plate surrounding the stem, can be detached. This may require unscrewing it or gently prying it off. The escutcheon often covers the valve body and the stem's packing nut.
The packing nut, which secures the faucet stem to the valve body, is the next component to be removed. Using an adjustable wrench or socket wrench, carefully loosen the packing nut. It's crucial to avoid damaging the nut or the valve body during this step. If the nut is corroded or difficult to loosen, apply penetrating oil and allow it to sit for several minutes before attempting to loosen it again. Once the packing nut is loosened, it can be unscrewed by hand.
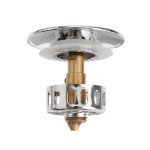
After the packing nut is removed, the faucet stem can be carefully pulled out from the valve body. It may be necessary to gently wiggle the stem to dislodge it if it is stuck. Examine the removed stem for signs of wear or damage, such as corroded threads, worn rubber washers, or cracks in the stem body. This assessment can help confirm the need for replacement and potentially identify the cause of the faucet problem.
Inside the valve body, there may be a seat washer or a valve seat. The valve seat is a critical component that the stem's washer presses against to stop the flow of water. If the valve seat is damaged, it may also need to be replaced using a valve seat wrench, a specialized tool designed for this purpose. This step is only necessary if the valve seat exhibits signs of damage or corrosion.
Key Point 3: Faucet Stem Installation and Reassembly
Before installing the new faucet stem, it's advisable to clean the valve body thoroughly. Use a clean cloth or brush to remove any debris or mineral deposits that may have accumulated inside the valve body. Applying a small amount of plumber's grease to the threads of the new faucet stem can facilitate smooth installation and prevent future corrosion.
Carefully insert the new faucet stem into the valve body, ensuring that it is properly aligned. Screw the packing nut back onto the valve body, tightening it securely with an adjustable wrench or socket wrench. Avoid over-tightening the packing nut, as this can damage the stem or the valve body. The nut should be snug enough to prevent leaks but not so tight that it restricts the stem's movement.
Reattach the escutcheon to the faucet, ensuring that it is properly aligned and secured. If the escutcheon is screwed on, tighten the screws until the escutcheon is firmly in place. If the escutcheon is a snap-on type, ensure that it is securely snapped into place.
Reinstall the faucet handle, aligning it properly with the stem. Tighten the set screw to secure the handle to the stem. Ensure that the handle operates smoothly and that the stem turns freely without any binding or resistance. If the handle is difficult to turn, loosen the packing nut slightly until the handle moves freely.
After reassembling the faucet, slowly turn the water supply back on, either at the individual shut-off valves or at the main water supply. Monitor the faucet for any leaks around the packing nut, the handle, or the base of the faucet. If any leaks are detected, carefully tighten the packing nut slightly. If the leaks persist, the stem may not be seated correctly or the valve seat may be damaged, requiring further investigation.
Operate the faucet to test the hot and cold water flow, ensuring that the water temperature is properly regulated. Check for any unusual noises or vibrations during operation. Allow the water to run for several minutes to flush out any debris that may have entered the pipes during the repair. Once the faucet is functioning properly and there are no leaks, the replacement process is complete.
If, after completing these steps, the faucet continues to leak or malfunction, it may be necessary to consult with a qualified plumber. Complex plumbing issues may require specialized tools or expertise to resolve effectively. Persistent leaks can lead to water damage and increased water bills, so it's crucial to address them promptly and properly.
Regular maintenance, such as lubricating the faucet stem periodically with plumber's grease, can help extend the lifespan of the faucet and prevent future problems. Keeping the faucet clean and free of mineral deposits can also contribute to its optimal performance and longevity. By following these guidelines, homeowners can effectively replace bathtub faucet stems and maintain the functionality of their plumbing systems.
```
How To Fix A Leaking Bathtub Faucet Diy Family Handyman
:max_bytes(150000):strip_icc()/how-to-replace-a-bathtub-faucet-5210836-08-dde7e85413a9421cb4414bb4655e49e3.jpg?strip=all "How To Replace A Bathtub Faucet")
How To Replace A Bathtub Faucet

Plumbing Repairing A Leaky Valve Stem Home Improvement Stack Exchange
:max_bytes(150000):strip_icc()/how-to-replace-a-bathtub-faucet-5210836-10-6825223c1e75442187d5ab09690510d4.jpg?strip=all "How To Replace A Bathtub Faucet")
How To Replace A Bathtub Faucet

How To Remove Bathtub Faucet Stems Quick And Easy

Bathtub Faucet Stem And Seat Replacement

Bathtub Stem And Seat Replacement

Plumbing How Can I Un This Old Bathtub Faucet Stem Home Improvement Stack Exchange

How To Replace A Shower Valve 12 Steps With Pictures Wikihow

How To Change A Bathtub Faucet 14 Steps With Pictures Wikihow