Replacing a Bathtub Faucet Spout Diverter Valve
The bathtub faucet spout diverter valve is a critical component of a standard bathtub faucet assembly. It controls the direction of water flow, allowing the user to switch between water exiting the spout for filling the tub and water flowing through the showerhead for showering. When this diverter valve malfunctions, it can lead to a frustrating and inconvenient situation, often marked by a weak shower stream, constant dripping from the spout while showering, or the inability to switch between the tub and shower altogether. Replacing a faulty diverter valve is a common plumbing repair that can be undertaken by a homeowner with basic plumbing knowledge and the appropriate tools, often avoiding the expense of hiring a professional plumber.
This article provides a comprehensive guide to replacing a bathtub faucet spout diverter valve. It will cover the identification of different types of diverter valves, the necessary tools and materials, a step-by-step procedure for the replacement process, and troubleshooting tips to address common issues that may arise. Following these instructions carefully can result in a successful repair and restore the proper functionality of the bathtub faucet.
Understanding the Different Types of Diverter Valves
Bathtub faucet spouts utilize different types of diverter valves, and understanding these variations is crucial for selecting the correct replacement part. The most common types include:
Pull-Up Diverter: Located on the spout itself, this type of diverter features a knob or ring that is pulled upward to divert water to the showerhead. When released, gravity returns the diverter to its resting position, allowing water to flow through the spout. The internal mechanism typically consists of a rubber or plastic seal that presses against the water passage to redirect the flow. This type is generally easier to replace due to its straightforward access and mechanism.
T-Handle Diverter: This diverter is usually positioned above the spout and features a T-shaped handle that is rotated to divert water. The rotation moves a valve within the handle assembly, shifting the water flow between the tub spout and the showerhead. These diverters can sometimes be more complex to replace, depending on the specific design and the underlying plumbing connections.
Diverter Located in the Faucet Handle: In some modern faucets, the diverter mechanism is integrated directly into the faucet handle itself. Rotating or pulling the handle activates the diverter, directing water to the desired outlet. These integrated systems can be more difficult to repair, often requiring the replacement of the entire faucet assembly if the diverter malfunctions. This also goes when the faucet handle is located on the wall itself.
Identifying the specific type of diverter valve installed is the first step towards a successful replacement. Observing the location, type of handle, and method of operation will help in selecting the correct replacement part and understanding the specific steps involved in the removal and installation process.
Gathering the Necessary Tools and Materials
Before commencing the replacement procedure, it is essential to gather all the necessary tools and materials. Having everything readily available will streamline the process and minimize potential delays. The following is a list of commonly required items:
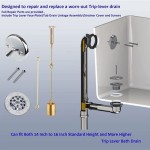
New Diverter Valve: This is the most critical item. Ensure that the replacement diverter valve is compatible with the existing faucet spout. Take careful measurements of the spout diameter and the diverter valve stem length to ensure a proper fit. If unsure, it is recommended to bring the old diverter valve to a plumbing supply store for comparison.
Adjustable Wrench or Pipe Wrench: These tools are necessary for loosening and tightening the faucet spout and any associated plumbing connections. Choose a wrench size that adequately grips the components without causing damage.
Screwdriver Set: A set of screwdrivers, including both flathead and Phillips head types, may be required to remove any screws securing the spout or diverter valve assembly.
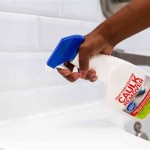
Plumber's Tape (Teflon Tape): This tape is used to create a watertight seal on threaded plumbing connections. Apply a few wraps of plumber's tape to the threads of the new diverter valve before installation.
Penetrating Oil (Optional): If the faucet spout or diverter valve is corroded or difficult to remove, applying penetrating oil can help loosen the connections.
Channel-Lock Pliers (Optional): These pliers can provide extra grip when loosening or tightening stubborn components.
Clean Rags or Towels: Use these to wipe up any spills and protect the surrounding surfaces from scratches.
Bucket: Place a bucket underneath the work area to catch any water that may leak during the removal process.
Flashlight: A flashlight can be helpful for illuminating the work area, especially in dimly lit bathrooms.
Having these tools and materials on hand will ensure a smooth and efficient replacement process.
Step-by-Step Replacement Procedure
Once the necessary tools and materials have been gathered, the diverter valve replacement can begin. The following is a general step-by-step procedure, which may need to be adapted slightly depending on the specific type of diverter valve and faucet spout.
Shut Off the Water Supply: Before commencing any plumbing work, it is crucial to shut off the water supply to the bathtub faucet. This can typically be done by closing the shut-off valves located beneath the sink or in the basement. If individual shut-off valves are not available, it may be necessary to turn off the main water supply to the entire house. Verify that the water is completely shut off by turning on the faucet until no water flows.
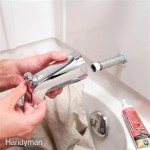
Remove the Existing Faucet Spout: The method of removal depends on the type of spout. Some spouts are threaded and can be unscrewed by hand or with a wrench. Others are secured with a set screw located on the underside of the spout. If a set screw is present, loosen it with a screwdriver. Once the set screw is loose, the spout should slide off the pipe. If the spout is stuck, applying penetrating oil and gently rocking it back and forth may help loosen it. Be prepared for some residual water to drain from the spout and pipe.
Identify and Remove the Old Diverter Valve: Once the spout is removed, the diverter valve will be visible. In pull-up diverters, the diverter is usually housed within the spout body and can be accessed once the spout is removed from the pipe. For T-handle diverters, the entire handle assembly may need to be unscrewed from the faucet body. Observe how the diverter valve is attached and use the appropriate tools to detach it. Some diverters are held in place by screws, while others are simply pressed into place.
Clean the Spout Interior: Before installing the new diverter valve, thoroughly clean the interior of the faucet spout. Use a clean rag to remove any mineral deposits, debris, or old sealant. This will ensure a proper seal and prevent future leaks. Inspect the inner walls for any signs of corrosion or damage, addressing them as necessary to prevent future problems.
Install the New Diverter Valve: Apply several wraps of plumber's tape to the threads of the new diverter valve, wrapping in the direction that the valve will be screwed in. This will create a watertight seal. Carefully insert the new diverter valve into the faucet spout, ensuring that it is properly aligned and seated. Tighten any screws or connections securely, but avoid over-tightening, which can damage the valve or spout.
Reinstall the Faucet Spout: Once the new diverter valve is installed, carefully reattach the faucet spout to the pipe. If the spout is threaded, screw it onto the pipe until it is snug. If the spout is secured with a set screw, slide it onto the pipe and tighten the set screw to hold it in place. Ensure that the spout is properly aligned and that there are no gaps or leaks.
Turn On the Water Supply and Test: Slowly turn the water supply back on, checking for any leaks around the faucet spout and diverter valve. If any leaks are detected, immediately shut off the water supply and tighten the connections further. Once the leaks are resolved, test the diverter valve by switching between the tub spout and the showerhead. Ensure that the water flows smoothly and that the diverter valve functions correctly.
By following these steps carefully, a homeowner can successfully replace a bathtub faucet spout diverter valve and restore the proper functionality of the faucet.
Troubleshooting Common Issues
While the replacement process is generally straightforward, some issues may arise. Being prepared to troubleshoot these problems can help ensure a successful repair. Common problems and solutions include:
Leaking After Installation: If the faucet leaks after installation, the most likely cause is an improper seal. Check the connections for any gaps or loose fittings. Tighten the connections further and apply more plumber's tape to the threads. If the leak persists, the diverter valve itself may be defective and need to be replaced again.
Difficulty Removing the Old Spout: If the old spout is corroded or stuck, applying penetrating oil and gently rocking it back and forth may help loosen it. Avoid using excessive force, as this can damage the pipe or the spout. If the spout remains stuck, consider using a pipe wrench with caution, protecting the spout with a cloth to avoid scratches.
Incorrect Diverter Valve Size: If the new diverter valve is too small or too large, it will not fit properly and will not function correctly. Ensure that the replacement diverter valve is the correct size and type for the faucet spout. Take careful measurements and compare the new valve to the old valve before installation.
Weak Shower Stream: A weak shower stream after replacing the diverter valve can be caused by several factors, including a clogged showerhead or a blockage in the diverter valve. Clean the showerhead to remove any mineral deposits or debris. If the problem persists, inspect the diverter valve for any blockages and clean them out. If the problem still persists, there may be an issue with the water pressure in the house.
Dripping from Spout While Showering: This is a common symptom of a faulty diverter valve. Ensure the new diverter valve is properly seated and sealed. If the issue persists, the replacement valve may be defective or there could be damage to the spout itself, not allowing a proper seal to be made.
By addressing these common issues effectively, a homeowner can overcome any challenges encountered during the diverter valve replacement process.

Tub Spout Diverter How To Fix From Beginning The End Using Danco Repair Kit

Bathtub Spout With Diverter Replacement Fix Leaking Tub Jonny Diy

Replace Tub Spout Diverter Pull Kit Diy Fix

Bathtub Spout Diverter Replacement Easy

Replacing A Tub Faucet Bathtub Spout Replacement

Learn How To Remove And Install Various Tub Spouts

How To Replace A Tub Spout

How To Fix A Shower Diverter Repair Or Replace

Repair Leaking Tub Spout Diverter Pull In Shower Mode

Everbilt Tub Spout Diverter Repair Kit 865320 The Home Depot
Related Posts