Replacing A Bathtub Faucet Spout Diverter
The bathtub faucet spout diverter, a seemingly small component, plays a crucial role in directing water flow either to the bathtub spout for filling the tub or to the showerhead for showering. Over time, this diverter can malfunction due to mineral buildup, corrosion, or general wear and tear, leading to issues such as weak shower pressure, water leaking from the spout while showering, or a diverter that simply refuses to stay engaged. Replacing the diverter is often a straightforward DIY project that can save the expense of hiring a plumber. This article will provide a comprehensive guide to understanding the diverter’s function, identifying problems, and successfully replacing it.
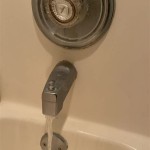
The diverter mechanism itself is typically integrated within the bathtub spout. It consists of a valve or gate that, when activated, redirects the water supply. There are several types of diverters, each with its own design and potential points of failure. The most common types include pull-up diverters, which are activated by pulling up on a knob or lever on the spout; push-pull diverters, which are activated by pushing or pulling the spout itself; and tee diverters, found mainly in older homes, which have a separate handle to control the water direction. Understanding the type of diverter installed in the bathtub is the first step towards a successful replacement.
Before embarking on the replacement process, it's important to gather the necessary tools and materials. This typically includes a new bathtub spout with a diverter, a pipe wrench or adjustable wrench, a screwdriver (usually a flathead or Phillips head depending on the set screw), penetrating oil, Teflon tape or pipe sealant, and potentially a cloth or towel to protect the existing bathtub finish from scratches. Safety is paramount; turning off the water supply to the bathroom is crucial. The shut-off valves are usually located under the sink or in the basement. If unsure, the main water shut-off valve for the entire house should be located and turned off.
Identifying the Problem and Choosing a Replacement Spout
The first step in replacing the spout is correctly diagnosing the problem. The most common symptom of a failing diverter is a noticeable decrease in water pressure at the showerhead, often accompanied by water leaking from the bathtub spout while the shower is running. In some instances, the diverter knob or lever might become stiff or difficult to operate, indicating a buildup of mineral deposits or corrosion within the diverter mechanism. A completely broken diverter may fail to engage at all, rendering the showerhead unusable.
Once the problem is identified, selecting the correct replacement spout is essential. The new spout must be compatible with the existing plumbing setup, specifically the type of connection to the water supply pipe. The two primary types of spout connections are slip-on and threaded. Slip-on spouts are secured to a copper pipe using a set screw, while threaded spouts screw directly onto a threaded pipe nipple extending from the wall. Determining which type of connection is present in the bathtub is critical for purchasing the appropriate replacement.
Furthermore, ensuring that the new spout has the same type of diverter mechanism (pull-up, push-pull, or tee) as the old spout is also important for ease of installation and usability. While it's possible to convert from one type of diverter to another, this usually involves more extensive plumbing modifications and is not recommended for novice DIYers. When purchasing a replacement spout, it's advisable to take the old spout to the hardware store for comparison to ensure a proper fit and compatibility.
Removing the Old Bathtub Spout
With the new spout acquired and the water supply turned off, the next step is removing the existing spout. The removal process varies depending on the type of connection. For slip-on spouts, locate the set screw, usually positioned underneath the spout near the wall. Use a screwdriver to loosen the set screw. It may be necessary to apply penetrating oil to the screw if it’s corroded or stuck. Once the set screw is loosened sufficiently, the spout should slide off the copper pipe. If the spout is stuck, gently wiggle it back and forth while pulling it away from the wall. Avoid applying excessive force, as this could damage the copper pipe.
For threaded spouts, the process is slightly different. Apply penetrating oil to the joint where the spout meets the wall to help loosen any corrosion or mineral buildup. Use a pipe wrench or adjustable wrench to grip the spout firmly. Wrap a cloth or towel around the spout to protect its finish from scratches caused by the wrench. Turn the spout counterclockwise to unscrew it from the pipe nipple. It may require significant effort to loosen the spout, particularly if it has been in place for many years. If the spout is extremely difficult to remove, consider using a heat gun (carefully) to warm up the joint and help break the seal. However, be extremely cautious when using heat near plumbing lines.
After removing the old spout, thoroughly clean the pipe nipple extending from the wall. Remove any old Teflon tape or pipe sealant using a wire brush or scraper. Inspect the pipe nipple for any signs of corrosion or damage. If the nipple is damaged, it may need to be replaced by a qualified plumber. It is imperative that the pipe is clean before installing the new spout to ensure a watertight seal.
Installing the New Bathtub Spout
Before installing the new spout, prepare the pipe connection. For slip-on spouts, ensure that the copper pipe extending from the wall is clean and free of any burrs or sharp edges. Lightly sand the pipe to create a smooth surface for the new spout to slide onto. For threaded spouts, apply several layers of Teflon tape or pipe sealant to the threads of the pipe nipple. Wrap the tape clockwise, ensuring that it covers all the threads. This will create a watertight seal and prevent leaks.
For slip-on spouts, slide the new spout onto the copper pipe, ensuring that it is pushed back against the wall. Align the spout so that the set screw is accessible from underneath. Tighten the set screw securely using a screwdriver. Avoid over-tightening the set screw, as this could damage the copper pipe. For threaded spouts, carefully align the spout with the pipe nipple and begin threading it on by hand. Ensure that the threads are properly aligned to prevent cross-threading. Once the spout is hand-tightened, use a pipe wrench or adjustable wrench to tighten it further. Again, wrap a cloth or towel around the spout to protect its finish. Tighten the spout until it is snug against the wall and the diverter handle is in the desired position. Avoid over-tightening the spout, as this could damage the pipe or the spout itself.
Once the new spout is installed, turn the water supply back on slowly and carefully. Inspect the connection between the spout and the wall for any leaks. If leaks are present, tighten the set screw (for slip-on spouts) or the spout itself (for threaded spouts) slightly. If the leaks persist, turn off the water supply again and inspect the connection. It may be necessary to reapply Teflon tape or pipe sealant to ensure a watertight seal. Test the diverter by pulling up or pushing the handle and observing the water flow at the showerhead. Ensure that the diverter functions smoothly and that there is no water leaking from the spout while the shower is running. If the diverter is functioning properly and there are no leaks, the replacement process is complete.

Bathtub Spout With Diverter Replacement Fix Leaking Tub Jonny Diy

Tub Spout Diverter How To Fix From Beginning The End Using Danco Repair Kit

Bathtub Spout Diverter Replacement Easy

Replace Tub Spout Diverter Pull Kit Diy Fix

Learn How To Remove And Install Various Tub Spouts

Replacing A Tub Faucet Bathtub Spout Replacement

Replacing A Tub Spout An Easy Repair Job Theworldlink Com

Tub Spout Diverter How To Fix From Beginning The End Using Danco Repair Kit

How To Replace A Bathtub Spout Family Handyman

Everbilt Tub Spout Diverter Repair Kit 865320 The Home Depot