Replacing A Bathtub Faucet: A Comprehensive Guide
Replacing a bathtub faucet may seem like a daunting task, but it's actually a straightforward process that can be completed in a few hours. With the right tools and materials, you can easily give your bathroom a fresh new look and enjoy the convenience of a properly functioning faucet.
Tools and Materials Needed:
- Adjustable wrench
- Phillips head screwdriver
- Flat head screwdriver
- Plumber's putty
- Teflon tape
- New bathtub faucet
- Shut-off valves (optional)
Step-by-Step Guide:
-
Turn off the Water Supply:
Locate the shut-off valves for your bathtub faucet. These valves are usually located under the sink or behind the bathtub. Turn the valves clockwise to shut off the water supply. If your bathtub doesn't have shut-off valves, you'll need to turn off the main water supply to your house. -
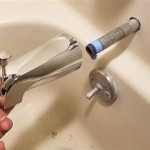
Remove the Old Faucet:
Using the adjustable wrench, loosen the nuts that hold the old faucet in place. Be careful not to drop the nuts down the drain. Once the nuts are loose, remove the old faucet. -
Clean the Faucet Area:
Use a damp cloth to clean the area where the old faucet was installed. Remove any dirt, debris, or old sealant. -
Apply Plumber's Putty:
Roll out a pea-sized amount of plumber's putty into a rope. Place the putty around the base of the new faucet. The putty will help create a water-tight seal. -
Install the New Faucet:
Insert the new faucet into the hole in the bathtub. Hand-tighten the nuts until they are snug. Use the adjustable wrench to tighten the nuts further, but be careful not to overtighten them. -
Attach the Supply Lines:
Connect the hot and cold water supply lines to the corresponding valves on the new faucet. Use Teflon tape to wrap the threads of the supply lines to create a water-tight seal. -
Turn on the Water Supply:
Turn the shut-off valves counterclockwise to turn on the water supply. Check for leaks around the base of the faucet and the supply lines. If you see any leaks, tighten the connections until the leaks stop. -
Test the Faucet:
Turn on the faucet and let the water run for a few minutes. Check for any leaks. If you see any leaks, tighten the connections until the leaks stop.
Additional Tips:
- If you're not comfortable working with plumbing, consider hiring a professional plumber to replace your bathtub faucet.
- When choosing a new bathtub faucet, make sure it's compatible with the type of plumbing in your bathroom.
- Replace your bathtub faucet every 10-15 years to prevent leaks and damage.
Replacing a bathtub faucet is a relatively simple task that can save you money and give your bathroom a fresh new look. By following the steps outlined in this guide, you can easily replace your bathtub faucet and enjoy the convenience of a properly functioning faucet.

Replacing A Tub Spout An Easy Repair Job Theworldlink Com

Replacing Shower Tub Faucet How To Install A New

Learn How To Remove And Install Various Tub Spouts

How To Replace A Bathtub Spout Diy Family Handyman

How To Install A Tub Spout The Home Depot With Thisoldhouse

Learn How To Remove And Install Various Tub Spouts

How To Replace A Bathroom Faucet Home Repair Tutor

How To Replace A Mobile Home Bathtub Faucet Parts Latest News

Installing A Tub Faucet Fine Homebuilding

Replacing Mobile Home 8 Bathtub Faucet Repair Bathtubs Fixture