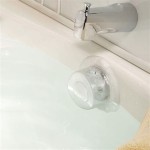
Replacing Your Bathtub Faucet: A Step-by-Step Guide
A worn-out or leaky bathtub faucet can be a source of frustration and wasted water. Replacing it is a relatively straightforward DIY project that can enhance the functionality and aesthetics of your bathroom. This guide will walk you through the process of replacing a bathtub faucet, providing clear instructions and helpful tips to ensure a successful installation.
1. Gathering the Necessary Tools and Supplies
Before beginning the replacement process, gather the following tools and supplies:
- New bathtub faucet assembly
- Adjustable wrench
- Channel-lock pliers
- Plumbers' tape
- Screwdriver (Phillips and flathead)
- Basin wrench
- Hacksaw (if necessary)
- Pipe thread sealant
- Bucket or container for catching water
- Towels or rags
- Safety glasses
It is essential to ensure that the new faucet assembly is compatible with your existing plumbing setup. Consult the product specifications or seek advice from a plumbing professional if you have any doubts.
2. Shutting Off the Water Supply
The first step is to shut off the water supply to the bathtub faucet. Locate the shut-off valves for the hot and cold water lines that feed the faucet. These valves are typically located under the sink or on the wall behind the tub. Turn the valves clockwise to completely shut off the water flow.
To ensure that the water has been fully shut off, open the bathtub faucet briefly. If water continues to flow, check the valves again and ensure they are properly closed.
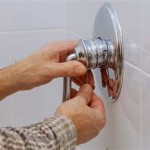
3. Disconnecting the Old Faucet
Once the water supply is turned off, you can proceed to disconnect the old faucet. Using an adjustable wrench, loosen the nuts that connect the faucet's supply lines to the plumbing pipes. If the nuts are stubborn, use channel-lock pliers to provide extra leverage.
Next, unscrew the mounting screws that hold the faucet body to the bathtub deck. The number and location of these screws may vary depending on the faucet model. Once the screws are removed, lift the faucet assembly off the tub deck.
4. Preparing the New Faucet Assembly
Before installing the new faucet, ensure the supply lines are compatible with the new faucet connections. If not, you may need to purchase adapter fittings.
Wrap plumbers' tape around the threaded ends of the new faucet's supply lines to prevent leaks. Wrap the tape in a clockwise direction, ensuring each layer overlaps slightly.
If the new faucet has different mounting holes than the old one, you may need to adjust the existing holes in the tub deck. Use a hacksaw to enlarge or modify the holes as needed.
5. Installing the New Faucet
Once the new faucet is prepared, position it on the bathtub deck and align the mounting holes. Insert the mounting screws through the holes and tighten them securely.
Connect the new faucet's supply lines to the plumbing pipes using the wrenches. Tighten the nuts firmly, but avoid overtightening, which could damage the pipes or fittings.
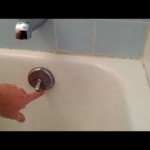
6. Testing the New Faucet
After installing the new faucet, turn the water supply back on and test for leaks. Check all connections and ensure the faucet operates smoothly.
If there are any leaks, tighten the connections further or re-wrap the plumbers' tape. If the leak persists, consult a professional plumber for assistance.

How To Fix A Leaking Bathtub Faucet Diy Family Handyman

How To Change A Bathtub Faucet 14 Steps With Pictures Wikihow

Replacing A Tub Spout An Easy Repair Job Theworldlink Com

How To Change A Bathtub Faucet 14 Steps With Pictures Wikihow

Installing A Tub Faucet Fine Homebuilding

How To Replace A Bathtub Spout Family Handyman

Bathtub Spout With Diverter Replacement Fix Leaking Tub Jonny Diy

Learn How To Remove And Install Various Tub Spouts

How To Replace A Mobile Home Bathtub Faucet

Plumbing How To Replace A Jacuzzi Bathtub Faucet Home Improvement Stack Exchange