Replacing Bathtub Faucet Handles: A DIY Guide for Homeowners
Are you tired of dealing with a leaky or malfunctioning bathtub faucet? Replacing your bathtub faucet handles is an easy and cost-effective way to update your bathroom and improve its functionality. With a few simple tools and a bit of patience, you can easily replace your existing faucet handles in just a few minutes.
Step-by-Step Guide: 1. Gather Your Tools: Before you begin, ensure you have the following tools and materials: -Replacement faucet handles (make sure they fit your existing faucet)
-Allen wrench (if required for your faucet handles)
-Adjustable wrench
-Pliers
-Tape measure
-Screwdriver
-Putty knife
-Old towel or cloth
-Bucket
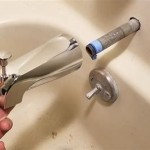
2. Turn Off the Water Supply: Locate the shutoff valves under your sink or behind your bathtub. Turn the valves clockwise to turn off the water supply. 3. Remove the Faucet Handles: -Use the Allen wrench or screwdriver to loosen the set screws on the handles.
-Gently pull the handles straight off the faucet.
4. Clean the Faucet Base: -Use a putty knife to remove any old caulk or sealant around the base of the faucet.
-Wipe the area clean with a damp cloth.
5. Install the New Handles: -Align the new handles with the faucet base and insert them straight.
-Tighten the set screws with the Allen wrench or screwdriver.
-Ensure the handles are secure and move smoothly.
6. Apply Caulk or Sealant: -Use a caulk gun to apply a thin bead of caulk or sealant around the base of the faucet.
-Smooth the caulk with your finger or a damp cloth.
7. Turn On the Water Supply: -Slowly turn the shutoff valves counterclockwise to turn the water supply back on.
-Check for any leaks around the faucet base.
-If you see any leaks, tighten the set screws or apply more caulk.
8. Test the Faucet Handles: -Turn the handles to make sure they operate smoothly and control the water flow properly.
-Adjust the handles as needed to achieve the desired water temperature and pressure.
Additional Tips: -If your faucet handles have decorative caps, remove them before loosening the set screws.
-If your faucet has a cartridge, you may need to replace it before installing new handles.
-When choosing new faucet handles, consider the style, finish, and functionality that best suits your bathroom.
-Regularly clean and maintain your faucet handles to prevent leaks and extend their lifespan.
Conclusion: Replacing bathtub faucet handles is a simple and affordable DIY project that can enhance the look and functionality of your bathroom. By following these steps and using the appropriate tools and materials, you can easily update your faucet handles and enjoy a refreshed and leak-free bathroom. With a little care and attention, your new faucet handles will provide years of trouble-free use.
Danco Small Universal Replacement Faucet Handle In Clear Acrylic 10804 The Home Depot

How To Fix A Leaking Bathtub Faucet Diy Family Handyman

Danco Replacement Tub Shower Faucet Handle For American Standard Heritage In Chrome 10801 The Home Depot

Empire Faucets Bathtub Faucet Handles Chrome Replacement Knobs Com

Moen Clear Knob Shower Handle In The Faucet Handles Department At Com

How To Fix A Leaky Single Handle Tub Shower Faucet Danco

Moen Bathtub Faucet Handle Repair

Mainstays Universal Kitchen And Bathroom Faucet Handles In Clear Acrylic 2 Pack 0 5 Lbs 80010 Com

Longer Version Replace A Bathtub Faucet Handle Handles Bathroom Tub

Replace A Bathtub Faucet Handle Longer Version