Here is an article addressing the replacement of a bathtub overflow drain, formatted as requested:
Replacing a Bathtub Overflow Drain: A Comprehensive Guide
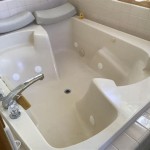
The bathtub overflow drain, often overlooked, plays a critical role in bathroom safety and preventing water damage. It serves as a secondary drain, positioned near the top of the tub, designed to channel excess water away when the primary drain is blocked or the faucet is inadvertently left running. A malfunctioning or corroded overflow drain can lead to leaks, water damage behind walls, and potentially costly repairs. Understanding the components, identifying problems, and properly executing the replacement process are essential for maintaining the integrity of the bathroom and preventing future issues.
This article provides a detailed guide on how to replace a bathtub overflow drain, covering the necessary tools, step-by-step instructions, and crucial considerations for a successful installation. It emphasizes the importance of proper preparation and careful execution to avoid further damage and ensure a watertight seal.
Identifying the Need for Replacement
Several indicators suggest the need to replace a bathtub overflow drain. Visible signs of corrosion, such as rust or pitting on the overflow plate or connecting pipe, are common indicators. Leaks originating from the overflow area, even when the primary drain is functioning correctly, warrant immediate attention. Water stains on the ceiling below the bathroom, or on adjacent walls, are a serious sign, indicating water is seeping through the structure due to a faulty overflow drain. Furthermore, a loose or damaged overflow plate, often caused by stripped screws or physical impact, compromises the drain's ability to effectively channel water and signifies the need for a replacement. Ignoring these signs can lead to significant water damage, mold growth, and structural problems within the bathroom and adjacent areas.
A less obvious, but equally important, reason for replacement is age. Over time, the rubber gaskets and seals within the overflow drain assembly can degrade and lose their flexibility, leading to leaks even if no visible damage is present. If the overflow drain is old, even without obvious signs of problems, replacing it as part of preventative maintenance can save significant expenses in the long run.
Finally, if completing a bathroom renovation, replacing the overflow drain is a logical step. While replacing the bathtub, the removal of the old drain and replacement with a new one is an easy task before the new bathtub is installed. This ensures the new bathtub has a new, fully functional overflow drain from the start, eliminating any future issues.
Gathering the Necessary Tools and Materials
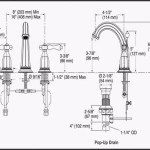
Successful replacement of a bathtub overflow drain requires specific tools and materials. A new overflow drain assembly is, of course, essential. Ensure it is compatible with the bathtub model and plumbing configuration. A screwdriver set, including both Phillips and flat-head screwdrivers, is necessary to remove and install screws. Pliers are needed for gripping and loosening connections. A plumber's wrench or adjustable wrench provides leverage for tightening and loosening larger nuts. A putty knife assists in removing old putty or sealant. Plumber's putty is crucial for creating a watertight seal around the overflow plate and drain flange. Clean rags are necessary for wiping away excess putty and cleaning surfaces. A bucket is recommended for catching any residual water during the process. Safety glasses should be worn to protect eyes from debris. Optionally, a penetrating oil spray can be used to loosen stubborn nuts or bolts.
In addition to these standard tools and materials, consider the specific requirements of the bathtub's plumbing. Some bathtubs have unique overflow drain configurations that require specialized tools or fittings. Consulting the bathtub's manual or seeking advice from a plumbing professional can help ensure the correct tools and materials are obtained before beginning the replacement process.
Proper planning ensures the job goes smoothly and will lower the probability of needing to stop the project in the middle because of missing tools or equipment.
Step-by-Step Replacement Procedure
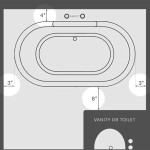
Before starting, turn off the water supply to the bathroom to prevent accidental flooding. This is usually accomplished by closing the shut-off valves located near the toilet or under the sink. If individual shut-off valves are not present, the main water supply to the house must be turned off.
Begin by removing the overflow plate, this is the decorative plate with a lever located near the top of the bathtub. Typically, this is secured with two screws. Carefully remove the screws and set them aside. If the screws are stripped, use a screw extractor to remove them without damaging the plate. Once the screws are removed, gently pull the overflow plate and the attached linkage out of the overflow pipe. Be prepared for some residual water to drain out.
Next, loosen the nut connecting the overflow pipe to the drain elbow located underneath the bathtub. Accessing this nut may require removing an access panel or working in a tight space. Use a plumber's wrench or adjustable wrench to loosen the nut. If the nut is corroded or stuck, apply penetrating oil spray and allow it to soak for a few minutes before attempting to loosen it again. Once the nut is loosened, carefully detach the overflow pipe from the drain elbow.
Loosen the waste shoe nut. It will be located on the underside of the bathtub and may require the removal of the access panel discussed above. Use penetrating oil spray, if necessary.
Once the overflow pipe is disconnected, remove the old drain flange from inside the tub. This flange is typically secured with plumber's putty. Use a putty knife to carefully break the seal between the flange and the bathtub surface. Once the seal is broken, the flange should lift out easily. Clean the area around the drain opening to remove any remaining putty or sealant.
Install the new drain flange. Roll a rope of plumber's putty in hands and apply it to the underside of the new drain flange. Place the flange into the drain opening and press it firmly to create a watertight seal. Remove any excess putty with a clean rag. Attach the new overflow pipe to the drain elbow using the new nut and washer. Tighten the nut securely with a plumber's wrench or adjustable wrench, ensuring a tight connection.
Reinstall the overflow plate. Insert the linkage into the overflow pipe and align the plate with the screw holes. Secure the plate with the screws, tightening them evenly to avoid cracking the plate. Turn on the water supply and check for leaks around the overflow plate and drain connections.
Finally, test the overflow drain by filling the bathtub until water reaches the overflow opening. Observe to verify that water flows freely through the overflow drain and into the drainpipe. Check for leaks around all connections. If any leaks are detected, tighten the connections or reapply plumber's putty as needed.
Ensuring a Watertight Seal
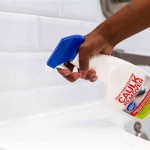
Creating a watertight seal is critical to prevent leaks and water damage. Thoroughly cleaning all surfaces is paramount. Before applying any plumber's putty or sealant, remove any old putty, rust, or debris from the drain opening and flange. A clean, smooth surface ensures proper adhesion and a tight seal.
Using the correct amount of plumber's putty is also important. Too little putty will not create a complete seal, while too much putty can squeeze out and make a mess. Roll the putty into a rope that is thick enough to fill the gap between the flange and the bathtub surface, but not so thick that it overflows excessively. Press the flange firmly into the opening to create a tight seal and remove any excess putty with a clean rag.
Check the condition of the rubber gaskets and washers used in the overflow drain assembly. These components are designed to create a watertight seal between the pipes and fittings. If the gaskets or washers are worn, cracked, or deteriorated, replace them with new ones. Use only high-quality replacement gaskets and washers that are compatible with the overflow drain assembly. Ensure the gaskets and washers are properly seated and aligned before tightening the connections.
Addressing Common Challenges
Several challenges may arise during the replacement process. Stripped screws are a common problem when removing the overflow plate. Use a screw extractor to remove stripped screws without damaging the plate. If a screw extractor is not available, try using a rubber band or steel wool to create a tighter grip between the screwdriver and the screw head.
Corroded or stuck nuts can also be difficult to loosen. Apply penetrating oil spray to the nut and allow it to soak for several minutes before attempting to loosen it with a wrench. If the nut is severely corroded, it may be necessary to use a pipe wrench or cutting tool to remove it. Exercise caution when using these tools to avoid damaging the surrounding pipes or fittings.
Limited access to the drain connections beneath the bathtub can also pose a challenge. Removing an access panel or using a flexible wrench can improve access to the connections. If access is severely limited, it may be necessary to hire a plumbing professional to complete the replacement.
Matching the new overflow drain assembly to the existing plumbing can be difficult. Different bathtub models and plumbing configurations may require different types of overflow drains. Consult the bathtub's manual or seek advice from a plumbing professional to ensure the new overflow drain assembly is compatible with the existing plumbing. Bring the old overflow drain assembly with you when purchasing the new one to ensure a proper match.

How To Replace A Bathtub Drain

How To Replace Bathtub Overflow Drain Gasket

How To Replace Bathtub Overflow Drain Gasket

How To Install A New Bathtub Overflow Plate Assembly

Bathtub Drain Replacement How To Replace Or Install A Homeserve Usa

How To Replace Bathtub Overflow Plate With Trip Lever Easy Simple

Replacing Bathtub Drain Lever No Holes S Rusted Off Doityourself Com Community Forums

Drain Overflow Assemblies Fine Homebuilding

How To Remove A Bathtub Drain Forbes Home

1x Bathtub Overflow Cover Basin Insert Silicone Replacement Drain
Related Posts