```html
Replacing a Bathtub Overflow Cover: A Comprehensive Guide
The bathtub overflow cover is a small but crucial component of a standard bathtub. Its primary function is to prevent water from overflowing the tub, directing excess water down the drain once it reaches a certain level. While seemingly insignificant, a damaged, corroded, or missing overflow cover can lead to water damage, reduced bathing enjoyment, and potential plumbing issues. Replacing the bathtub overflow cover is a relatively simple DIY project that can save homeowners time and money compared to calling a professional plumber. This article provides a detailed guide on how to replace a bathtub overflow cover effectively.
Understanding the different types of bathtub overflow covers is essential before beginning the replacement process. Several designs are available, each with slightly different installation methods. The most common types include:
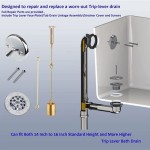
- Trip Lever Overflow: This type uses a lever that, when flipped, opens and closes the drain stopper. The cover typically conceals the lever mechanism and is secured with screws.
- Lift-and-Turn Overflow: This design features a knob or handle that is lifted or turned to operate the drain stopper. Similar to the trip lever type, it is also usually screw-mounted.
- Push-Button Overflow: As the name suggests, this type uses a button to engage and disengage the drain stopper. The cover is usually sleek and contemporary in design.
- Flat Overflow Plate: This is a simple, flat plate with holes that allow excess water to drain. It is typically secured with screws and doesn't directly control the drain stopper.
Identifying the existing overflow cover type is the first step in choosing the correct replacement. Take a close look at the mechanism and how it operates the drain stopper. Make sure the replacement cover is compatible with the existing drain system.
Key Point 1: Preparation and Necessary Tools
Before starting any plumbing project, proper preparation is key to a smooth and successful outcome. This involves gathering the necessary tools and materials and taking appropriate safety precautions. Neglecting this step can lead to frustration, delays, and, potentially, damage to the plumbing system.
The following tools and materials are typically required for replacing a bathtub overflow cover:
- New Bathtub Overflow Cover: Purchase a replacement cover that matches the style and functionality of the existing one. Ensure it includes the necessary screws.
- Screwdriver: A Phillips head or flathead screwdriver, depending on the type of screws used in the existing cover, is essential. Having both types available is recommended.
- Pliers (Optional): Pliers can be helpful for gripping and removing stubborn screws.
- Clean Cloth or Sponge: Use a clean cloth or sponge to wipe away any dirt, grime, or soap scum around the overflow area.
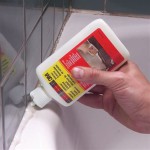
- Plumber's Putty (Optional): Plumber's putty can be used to create a watertight seal between the overflow cover and the tub. This is particularly useful if the old seal is damaged or missing.
- Penetrating Oil (Optional): If the screws are corroded or stuck, apply a small amount of penetrating oil to loosen them.
Safety is paramount when working with plumbing fixtures. Before beginning, ensure the area around the bathtub is dry and well-lit. Wear appropriate eye protection to prevent debris from entering the eyes. Turn off the water supply to the bathtub if you are concerned about accidental water leaks during the process. Although, disconnecting the water supply isn’t always necessary for simply replacing the overflow cover.
Finally, take a picture of the existing overflow cover before removing it. This photo can serve as a reference point during the installation process, especially when dealing with complex mechanisms.
Key Point 2: Removing the Old Overflow Cover
The removal process depends on the type of overflow cover installed. However, the general process involves unscrewing the existing cover and carefully detaching it from the bathtub. The following steps outline the typical approach for removing different types of overflow covers:
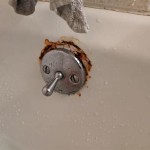
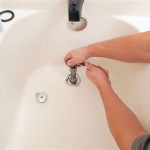
- Locate the Screws: Most overflow covers are secured with one or two screws. Identify the screw locations and the type of screwdriver required.
- Loosen the Screws: Using the appropriate screwdriver, carefully loosen the screws. If the screws are stuck, apply a small amount of penetrating oil and wait a few minutes before attempting to loosen them again. Avoid applying excessive force, which can strip the screw heads.
- Remove the Screws: Once the screws are loosened, remove them completely. Store the screws in a safe place to avoid losing them.
- Detach the Cover: After removing the screws, gently detach the overflow cover from the bathtub. If the cover is stuck, use a flathead screwdriver to carefully pry it loose. Be careful not to damage the tub's finish.
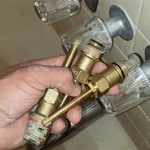
- Inspect the Drain Linkage (Trip Lever Only): If the cover is a trip lever type, inspect the drain linkage connected to the overflow mechanism. Note how the linkage is connected to the cover and the drain stopper. This will be helpful during the reassembly process.
In some cases, the overflow cover might be sealed with plumber's putty or caulk. If this is the case, use a utility knife or scraper to carefully break the seal before attempting to remove the cover. Remove any old putty or caulk from the bathtub surface.
After removing the cover, thoroughly clean the area around the overflow drain. Remove any dirt, grime, or soap scum using a clean cloth or sponge. This will ensure a clean surface for the new overflow cover to seal against.
Key Point 3: Installing the New Overflow Cover
Installing the new overflow cover involves attaching it to the bathtub and securing it with screws. The installation process will vary slightly depending on the type of overflow cover, but the general principles remain the same. Follow these steps for a successful installation:
- Apply Plumber's Putty (Optional): If desired, apply a small bead of plumber's putty around the back of the new overflow cover where it will contact the bathtub. This will create a watertight seal and prevent leaks.
- Align the Cover: Carefully align the new overflow cover with the screw holes in the bathtub. Ensure the cover is properly oriented and that the drain linkage (if applicable) is correctly positioned. Refer to the picture taken during the removal process for guidance.
- Attach the Drain Linkage (Trip Lever Only): If the cover is a trip lever type, reattach the drain linkage to the overflow mechanism, ensuring it is properly connected to the drain stopper. Test the lever to ensure it opens and closes the drain stopper correctly. Make necessary adjustments to the linkage until it functions smoothly.
- Secure the Cover with Screws: Insert the screws through the overflow cover and into the screw holes in the bathtub. Tighten the screws securely, but avoid over-tightening, which can damage the cover or the tub's finish.
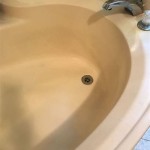
- Test for Leaks: After installing the new overflow cover, fill the bathtub with water to just below the overflow opening. Check for any leaks around the cover. If any leaks are detected, tighten the screws slightly or apply additional plumber's putty to create a better seal.
- Clean Up: Once the installation is complete and the overflow cover is leak-free, clean up any excess plumber's putty or debris around the area. Dispose of the old overflow cover and any used materials properly.
For push-button overflow covers, the installation process might involve aligning the button mechanism and ensuring it engages properly with the drain stopper. Consult the manufacturer's instructions for specific installation guidelines.
Following these steps carefully will ensure a properly installed and functional bathtub overflow cover, preventing water damage and enhancing the bathing experience.
Throughout this process, checking the drain linkage and ensuring that the drain stopper works flawlessly is critical, especially when dealing with trip level overflows. If the drainage does not work as expected, the linkage may need adjustment or there may be an issue with the drain stopper itself. Adjust the linkage by bending it slightly until the stopper fully seals the drain when the lever is in the closed position and fully opens the drain when the lever is in the open position.
Regularly inspect the bathtub overflow cover for signs of damage, corrosion, or leaks. Addressing these issues promptly can prevent more significant plumbing problems in the future. A well-maintained overflow system is essential for the proper functioning of a bathtub and the prevention of water damage.
```
How To Replace Bathtub Overflow Plate With Trip Lever Easy Simple

How To Install A New Bathtub Overflow Plate Assembly

When And How You Should Replace A Bathtub Overflow Cover Plate Service Plus Plumbing

Replace A Bathtub Overflow Drain Plate Cover Overflowing Diy Plumbing

Bathtub Overflow Gaskets

Here S The Best Way To Replace Your Tub Overflow Plate Eagle Mountain Woodford Watco Blog

Dad Replaces A Tub S Overflow Cover Plate

Silicone Bathtub Overflow Drain Cover How To Get A Deeper Bath With Better Soak

Watco Innovator Snap On Bathtub Overflow Plate Kit In Oil Rubbed Broe 18009 Bz The Home Depot

Bathtub Overflow Cover Replacement