Replace Bathtub Faucet Single Handle: A Comprehensive Guide
Replacing a bathtub faucet with a single handle may seem daunting, but it's a task that can be accomplished with some basic tools and a bit of know-how. This guide will provide you with all the steps you need to successfully replace your faucet.
Tools and Materials
Before you begin, gather the necessary tools and materials:
- Adjustable wrench
- Phillips head screwdriver
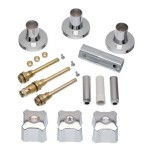
- New bathtub faucet
- Plumber's putty
- Teflon tape
Step 1: Turn Off the Water Supply
Locate the shut-off valves beneath the sink or in the basement. Turn the handles clockwise to close the valves and stop the water flow.
Step 2: Remove the Old Faucet
Use the adjustable wrench to loosen the nuts that hold the faucet in place. Grip the faucet with your hands and gently wiggle it side-to-side as you pull it upwards to detach it from the base.
Step 3: Clean the Area
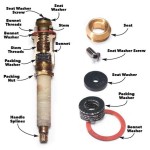
Remove any old sealant or debris from the faucet base using a rag or sponge. Apply a thin layer of plumber's putty around the base.
Step 4: Install the New Faucet
Align the new faucet with the base and press it firmly into place over the plumber's putty. Tighten the nuts with the adjustable wrench, but do not overtighten.
Step 5: Connect the Water Lines
Locate the water supply lines (hot and cold) and connect them to the new faucet. Use Teflon tape to seal the threads of the connections to prevent leaks.
Step 6: Secure the Handle
Insert the handle into the faucet and secure it with the screw provided. Tighten the screw with a Phillips head screwdriver.
Step 7: Test the Faucet
Turn on the shut-off valves and slowly turn the handle to allow water to flow. Check for any leaks at the base of the faucet or around the connections. If any leaks occur, tighten the nuts or redo the connections as necessary.
Tips
- Choose a faucet that is compatible with your sink and plumbing.
- If the faucet has aerators, remove them and clean them before installing the new faucet.
- If the nuts on the faucet base are rusted, use a penetrating lubricant to loosen them.
- Test the faucet thoroughly before using it regularly.

How To Fix A Leaky Single Handle Tub Shower Faucet Danco

How To Fix A Leaking Single Handle Bathtub Faucet Quick And Easy Tub Repair Shower

How To Replace A Bathtub Faucet

How To Fix A Leaky Tub Shower Faucet

Installing A Tub Faucet Fine Homebuilding

Replace A Bathtub Faucet Handle Longer Version

Replace A Bathtub Faucet Handle Longer Version

How To Replace A Two Handle Shower Valve With Single Unit Diy

Convert A Two Or Three Handle Tub Shower Valve To Single With No Tile Repair Wrench Re Pipe Riverside Corona Norco Eastvale 951 780 7283

Fixing Faucets How To Replace A Difficult Tub Faucet Cartridge
Related Posts