Replacing Bathtub Faucet Handles: A Comprehensive Guide
Replacing bathtub faucet handles is a common home improvement task that can significantly improve the aesthetics and functionality of a bathroom. Worn, damaged, or outdated handles can detract from the overall appearance of the space and may even lead to leaks or difficulty controlling water flow. This article provides a comprehensive guide to understanding the different types of faucet handles, identifying the correct replacements, and outlining the steps involved in the replacement process.
Understanding Different Types of Bathtub Faucet Handles
Bathtub faucet handles come in various styles and configurations, and understanding the different types is crucial for selecting the appropriate replacements. The most common types include:
Knob Handles: These are typically round and often feature a raised surface for grip. They are commonly found in older homes and are relatively simple to install and replace. Knob handles often connect directly to the faucet stem.
Lever Handles: Lever handles offer a more modern aesthetic and are often preferred for their ease of use, especially for individuals with limited hand strength. These handles rotate on an axis and provide precise control over water temperature and flow.
Cross Handles: Cross handles, also known as four-arm handles, are characterized by their distinctive cross shape. They offer a classic or vintage look and are often found in traditional bathroom designs. These handles usually require a slightly more involved installation process.
Single-Handle Faucets: While not strictly "handles," these faucets feature a single lever or joystick that controls both water temperature and flow. Replacing a single-handle faucet often involves replacing the entire faucet assembly, although individual components within the handle mechanism may be replaceable.
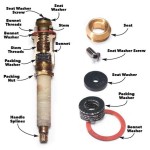
The internal mechanisms connecting the handle to the valve stem can also vary. Some handles are attached with screws, while others use a spline connection, where the handle slides onto a grooved stem. Identifying the connection type is essential for selecting the correct replacement handle.
Identifying the Correct Replacement Bathtub Faucet Handles
Before embarking on the replacement process, accurately identifying the correct replacement handles is paramount. Replacing handles requires attention to detail ensuring compatibility with the existing faucet hardware and plumbing infrastructure.
Determine the Faucet Brand and Model: The easiest way to ensure a perfect fit is to identify the faucet's brand and model number. This information is often found etched or printed on the faucet body, under the handles, or in the original documentation. Contacting the faucet manufacturer or searching their website with the model number can help locate compatible replacement handles.
Measure the Handle Dimensions: If the brand and model are unknown, measuring the existing handles is crucial. This includes measuring the handle diameter, the length of the handle, and the diameter of the hole that connects to the faucet stem. Precise measurements are essential for finding handles that will fit properly.
Identify the Stem Type: The stem is the part of the faucet that the handle attaches to. Common stem types include broach stems (with multiple vertical splines or grooves) and square stems. Determining the stem type is crucial for selecting handles with the correct internal shape for a secure connection. Some handles may come with adapters to accommodate different stem types.
Consider the Finish: The replacement handles should match the existing faucet finish to maintain a cohesive look. Common finishes include chrome, brushed nickel, oil-rubbed bronze, and polished brass. Different finishes have unique visual characteristics and varying levels of durability.
Check for Universal Compatibility: Some replacement handles are designed to be "universal" and can fit a wide range of faucet brands and models. These handles often come with multiple adapters and screws to accommodate different stem types and mounting mechanisms. However, it's still crucial to verify that the universal handle is compatible with the specific faucet type and stem.
Steps for Replacing Bathtub Faucet Handles
Replacing bathtub faucet handles is a straightforward process that can be accomplished with basic tools and careful attention to detail. Safety precautions and proper technique are essential for a successful outcome.
Gather Necessary Tools and Materials: Before starting, gather the necessary tools and materials, including:
- New replacement handles
- Screwdriver (Phillips head or flathead depending on the screw type)
- Adjustable wrench or pliers
- Penetrating oil (if the handles are stuck)
- Clean cloth or towel
- Plumber's tape (optional)
Shut Off the Water Supply: The most crucial step is to shut off the water supply to the bathtub faucet. This is typically done by turning off the shut-off valves located under the sink or in the basement. If individual shut-off valves are not available, the main water supply to the house must be turned off. Testing the faucet after shutting off the water confirms the flow is completely stopped.
Remove the Old Handles: Locate the set screw on the old handle. This screw is usually hidden under a decorative cap or cover. Use a screwdriver to loosen the set screw and remove the handle. If the handle is stuck, apply penetrating oil and let it soak for a few minutes before attempting to remove it again. For handles that do not have set screws, they may simply pull off the stem. Gently wiggle the handle back and forth while pulling outward.
Clean the Faucet Stem: Once the old handle is removed, clean the faucet stem with a clean cloth to remove any dirt, debris, or corrosion. This ensures a clean and secure connection for the new handle. Inspect the stem for any signs of damage, such as cracks or corrosion. If the stem is damaged, it may need to be replaced, which is a more complex repair.
Install the New Handles: Place the new handle onto the faucet stem, aligning it correctly. If the handle has a set screw, tighten it securely to hold the handle in place. If the handle uses a spline connection, ensure that it is fully seated on the stem. Test the handle to make sure it turns smoothly and controls the water flow properly. If the handle feels loose or wobbly, re-tighten the set screw or adjust the adapter (if applicable).
Check for Leaks: After installing the new handles, turn the water supply back on slowly. Carefully inspect the handles and faucet body for any leaks. If leaks are present, turn off the water supply again and tighten the connections. If the leaks persist, plumber's tape can be applied to the faucet stem threads to create a tighter seal. Wrap the tape clockwise around the threads, overlapping each layer slightly.
Test the Water Temperature and Flow: Once you've confirmed there are no leaks, test the water temperature and flow to ensure that the new handles are functioning correctly. Adjust the handles to achieve the desired water temperature and flow rate. Observe the faucet for several minutes to ensure no leaks develop over time.
Dispose of Old Handles Properly: After the new handles are installed and functioning properly, dispose of the old handles responsibly. Metal handles can often be recycled at local recycling centers. Check with local waste management guidelines for proper disposal procedures.
Troubleshooting Common Issues: Several potential issues can arise during the handle replacement process. Troubleshooting these issues effectively can prevent further complications.
Stuck Handles: If the old handles are stuck, apply penetrating oil and let it soak for several minutes. Gently tap the handles with a rubber mallet to help loosen them. Avoid using excessive force, which could damage the faucet or plumbing.
Mismatched Stem Size: If the new handles don't fit the faucet stem, double-check the measurements. Some handles come with adapters to accommodate different stem sizes. If an adapter is not included, you may need to purchase one separately.
Leaking Faucet: If the faucet is leaking after replacing the handles, ensure that all connections are tight. Apply plumber's tape to the faucet stem threads to create a tighter seal. If the leak persists, the faucet cartridge or valve seat may need to be replaced, which is a more complex repair.
Handle Rotation Issues: If the handle rotates too freely or is difficult to turn, check for proper alignment and secure attachment. Ensure that the set screw is tightened properly or that the spline connection is fully seated. If the issue persists, the internal components of the faucet may need to be inspected and repaired.
Replacing bathtub faucet handles can be a rewarding DIY project that enhances the look and functionality of a bathroom. By understanding the different types of handles, accurately identifying the correct replacements, and following the steps outlined in this guide, homeowners can successfully complete this task and enjoy the benefits of improved faucet performance.

How To Fix A Leaking Bathtub Faucet Diy Family Handyman

How To Replace A Bathtub Faucet

How To Replace Bathtub Faucet Knob Easy Simple

How To Change A Bathtub Faucet 14 Steps With Pictures Wikihow

How To Replace Shower Faucet Trim

How To Replace Bathtub Faucet Handles

Replace Upgrade Your Shower And Bath Handle

Replace Faucet Handles In Existing Bathtub Home Improvement Stack Exchange

Diy Bathtub Faucet Repair

How To Change A Bathtub Faucet 14 Steps With Pictures Wikihow
Related Posts