Replacing a Double-Handle Bathtub Faucet: A Comprehensive Guide
Replacing a double-handle bathtub faucet can significantly improve the aesthetics and functionality of a bathroom. Whether upgrading for style, repairing a leak, or addressing corrosion, understanding the process is crucial for a successful installation. This article provides a step-by-step guide to replacing a double-handle bathtub faucet, outlining the necessary tools, safety precautions, and procedures involved.
Understanding Double-Handle Bathtub Faucets
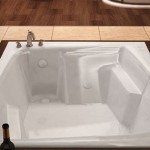
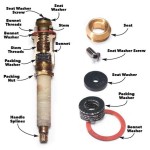
Double-handle bathtub faucets control water flow and temperature through separate handles for hot and cold water. They typically consist of the faucet body, handles, valve stems, and a spout. The valve stems control the flow of water from the supply lines to the spout. Understanding the components is vital for proper removal and installation. These faucets come in various styles, including widespread, centerset, and wall-mounted, each requiring slightly different installation techniques.
Before beginning any faucet replacement, it's essential to identify the existing faucet type. This identification will influence the selection of a replacement faucet that matches the existing plumbing configuration. A mismatch can lead to significant plumbing modifications, potentially increasing the project's complexity and cost. Furthermore, understanding the faucet's age and the type of connections used (e.g., threaded, compression) can help anticipate potential challenges during removal.
Leaks are a common reason for replacing bathtub faucets. Over time, the valve seats and stems within the faucet can wear down, leading to drips and leaks. Identifying the source of the leak can help determine if a simple repair is possible (e.g., replacing washers or O-rings) or if a full faucet replacement is necessary. Ignoring leaks can lead to water wastage, increased water bills, and potential water damage to the surrounding area.
Preparation and Safety Measures
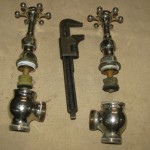
Prior to commencing the replacement process, gathering the necessary tools and materials is essential. These typically include: a new double-handle bathtub faucet set, adjustable wrench, basin wrench, plumber's tape, putty knife or scraper, towels or cloths, screwdriver (Phillips and flathead), safety glasses, and a work light. Having these items readily available will streamline the process and minimize delays.
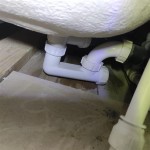
Safety should be a paramount concern throughout the faucet replacement. The first step is to shut off the water supply to the bathtub. This is usually accomplished by locating the shut-off valves for the hot and cold water lines leading to the faucet. If individual shut-off valves are not present, the main water supply to the entire house must be shut off. After shutting off the water supply, open the existing faucet to relieve any residual pressure in the pipes. Place towels or a bucket beneath the faucet to catch any remaining water.
Protecting the surrounding area from damage is also important. Use towels or cloths to cover the bathtub surface and any nearby fixtures. This will prevent scratches or other damage from dropped tools or faucet components. Wearing safety glasses will protect against debris or water splashing into the eyes during the removal and installation process. Additionally, using a work light will improve visibility, especially in dimly lit bathrooms.
Removing the Old Faucet
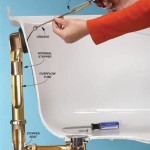
The initial step in removing the old faucet involves detaching the handles. The handles are typically secured with screws, which may be concealed under decorative caps or buttons. Use a small screwdriver or putty knife to carefully remove the caps and access the screws. Once the screws are removed, the handles should pull directly off the valve stems.
Next, the valve stems must be removed. These are usually threaded into the faucet body. Use a basin wrench or adjustable wrench to loosen and unscrew the valve stems. Be prepared for some resistance, especially if the faucet is old or corroded. In some cases, penetrating oil may be needed to loosen stubborn valve stems. Once the valve stems are removed, inspect the valve seats for damage or corrosion. If the valve seats are damaged, they may need to be replaced or reamed out.
The final step in removing the old faucet is detaching the spout. The spout may be connected to the faucet body with threaded connections, compression fittings, or a slip-fit connection. Use the appropriate wrench or tool to loosen and disconnect the spout. Be careful not to damage the surrounding pipes or connections during this process. Once the spout is disconnected, clean the area around the faucet connections to remove any old putty, sealant, or debris. A putty knife or scraper can be helpful for this task.
Installing the New Faucet
Before installing the new faucet, inspect it for any defects or missing parts. Refer to the manufacturer's instructions for specific installation guidelines. Apply plumber's tape to the threads of the valve stems and spout connections. This will help create a watertight seal and prevent leaks. Wrap the tape clockwise around the threads, overlapping each layer slightly.
Begin the installation by inserting the new valve stems into the faucet body. Tighten them securely with an adjustable wrench, but avoid over-tightening, which can damage the threads. Ensure that the valve stems are properly aligned with the hot and cold water supply lines. Next, connect the spout to the faucet body. Tighten the connections securely, using the appropriate wrench or tool. Be careful not to cross-thread the connections, which can damage the threads and cause leaks.
Once the valve stems and spout are connected, install the handles. Align the handles with the valve stems and secure them with the screws. Replace the decorative caps or buttons over the screws. Finally, turn on the water supply slowly and check for leaks around the faucet connections. If any leaks are detected, tighten the connections further or reapply plumber's tape. Ensure that the hot and cold water flow properly and that the faucet handles operate smoothly.
Troubleshooting Common Issues
One common issue encountered during faucet replacement is difficulty removing old, corroded parts. Penetrating oil can be applied to the affected areas to help loosen the connections. Allow the oil to soak for several minutes before attempting to remove the parts. If the parts are still stubborn, a specialized tool, such as a pipe wrench or torch (used with extreme caution and appropriate safety measures), may be needed.
Another common issue is leaks after installation. Identifying the source of the leak is crucial for effective troubleshooting. Leaks around the valve stem connections may be resolved by tightening the connections further or reapplying plumber's tape. Leaks around the spout connection may require replacing the O-ring or tightening the connection. If the leak persists, inspect the faucet for any defects or damage.
Cross-threading connections during installation can also cause problems. Cross-threading occurs when the threads of two connecting parts are not aligned properly, resulting in damage to the threads and potential leaks. To avoid cross-threading, carefully align the threads before tightening the connections. If cross-threading occurs, the damaged parts may need to be replaced.
Finally, low water pressure after installation can indicate a problem with the water supply or the faucet itself. Check the shut-off valves to ensure they are fully open. Inspect the faucet for any debris or obstructions that may be restricting water flow. If the problem persists, consult a plumber to diagnose and resolve the issue.
Replacing a double-handle bathtub faucet requires careful planning, attention to detail, and adherence to safety precautions. By following the steps outlined in this guide, individuals can successfully complete the replacement process and improve the functionality and aesthetics of their bathroom.

How To Fix A Leaking Bathtub Faucet Diy Family Handyman

2 Handle Shower Faucet Replacement You Ready For This

Repairing A Leaky Two Three Handle Tub Shower Faucet

Fast Way To Replace Or Retrofit A Two Handle Shower System With One

How To Replace Bathtub Faucet Handles

How To Replace A Bathtub Faucet

How To Replace A Bathtub Faucet

Plumbing How To Replace A Jacuzzi Bathtub Faucet Home Improvement Stack Exchange

Juno Wall Mount Easy Install Dual Handle Chrome Bathroom Bathtub Faucet

Longer Version Replace A Bathtub Faucet Handle Handles