Replacing a Stuck Bathtub Drain Ring: A Comprehensive Guide
A common household plumbing issue involves a bathtub drain ring that is stuck or difficult to remove. This ring, often referred to as a drain flange, is the metal component securing the drain stopper and connecting the drainpipe to the bathtub. Over time, mineral deposits, soap scum, and rust can accumulate, causing the ring to corrode and become firmly lodged in place. Attempting to force its removal without proper technique can damage the bathtub, the drain itself, or existing plumbing. This article provides a detailed, step-by-step guide on how to safely and effectively remove a stuck bathtub drain ring.
Understanding the Anatomy of a Bathtub Drain
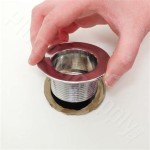
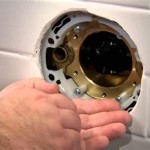
Before attempting removal, it is crucial to understand the structure of a bathtub drain system. The visible portion within the tub is the drain flange, the ring we are focusing on. Beneath the flange is the drain strainer or stopper mechanism. This mechanism connects to the drainpipe using a series of threads. Underneath the bathtub, the drainpipe connects to the P-trap, a curved section designed to trap debris and prevent sewer gases from entering the home. When trying to remove the drain ring, knowing how these components interact is essential to avoid damaging other plumbing elements.
The materials commonly used for bathtub drain rings include brass, chrome-plated brass, and stainless steel. Each material has varying degrees of resistance to corrosion and wear. Brass is durable but can tarnish. Chrome plating offers an aesthetic appeal but can chip and peel over time. Stainless steel provides superior corrosion resistance. Knowing the material of the drain ring can influence the choice of removal methods and tools.
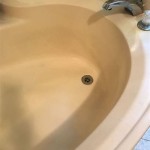
The primary reason a drain ring becomes stuck is the accumulation of residue and corrosion. Hard water, containing minerals like calcium and magnesium, contributes to scale buildup. Soap scum, a byproduct of soap reacting with hard water, forms a sticky film that can solidify over time. Rust, a form of iron oxide, develops when iron or steel components are exposed to moisture and oxygen. These factors combined create a tenacious bond that makes removing the drain ring challenging.
Preparing for Removal: Tools and Safety Precautions
Before commencing the removal process, gathering the necessary tools and taking appropriate safety precautions is essential. A well-prepared workspace minimizes the risk of damage and injury.
Essential tools for removing a stuck drain ring generally include:
- Flathead screwdriver: Used for prying, scraping, and potentially engaging with specific drain removal tools.
- Needle-nose pliers: Helpful for gripping small parts and removing debris.
- Adjustable wrench: Provides leverage for turning stubborn parts.
- Drain removal tool (e.g., drain key, internal pipe wrench): Specifically designed for gripping and turning drain flanges. Several designs are available to accommodate different drain configurations.
- Penetrating oil (e.g., WD-40, Liquid Wrench): Helps to loosen corrosion and dissolve mineral deposits.
- Heat gun or hair dryer: Applying heat can expand the metal and help break the bond.
- Hammer: Used gently with a tool handle to tap and loosen the ring.
- Putty knife or scraper: For removing old plumber's putty or caulk.
- Gloves: Protect hands from sharp edges and cleaning solutions.
- Safety glasses: Prevent debris and chemicals from entering the eyes.
- Rags or towels: For cleaning up spills and protecting the bathtub surface.
Safety precautions are paramount throughout the process. First, ensure the work area is well-ventilated, particularly when using penetrating oils. These products can emit fumes that may be irritating. Second, wear gloves and safety glasses to protect against chemicals and debris. Third, be mindful of the sharp edges of the drain components and tools. Sharp edges can cause cuts. Fourth, avoid excessive force, which can damage the bathtub or plumbing. Finally, if working on plumbing connected to electrical components (e.g., a whirlpool tub), ensure the power is turned off at the breaker.
Step-by-Step Guide to Removing a Stuck Drain Ring
The following steps outline a methodical approach to removing a stuck bathtub drain ring, progressing from the least invasive to the most forceful methods. It's important to exercise caution and patience throughout the process.
Step 1: Initial Inspection and Cleaning. Begin by thoroughly inspecting the drain ring and the surrounding area. Remove any visible debris, hair, or soap scum using a small tool like a bent wire or needle-nose pliers. A clean surface allows for better penetration of solvents and a firmer grip for tools.
Step 2: Applying Penetrating Oil. Generously apply penetrating oil to the seam between the drain ring and the bathtub surface. Allow the oil to soak for at least 15-30 minutes, or preferably longer. The oil will seep into the threads and dissolve some of the corrosion. Reapply the oil periodically during the soaking period. For particularly stubborn cases, allowing the oil to soak overnight can be beneficial.
Step 3: Using Heat. Carefully apply heat to the drain ring using a heat gun or hair dryer. The heat will cause the metal to expand slightly, potentially breaking the bond between the ring and the tub. Avoid overheating the area, as excessive heat can damage the bathtub finish. Apply the heat in short bursts, testing the ring's movement periodically.
Step 4: Attempting to Turn the Ring. Insert a drain removal tool into the drain opening. There are several types of drain removal tools available, each designed for specific drain configurations. A common type is a drain key, which has a cross-shaped design with notches that engage with the drain ring. Another type is an internal pipe wrench, which expands inside the drain and grips the inner surface. Apply steady pressure to the tool, attempting to turn the drain ring counterclockwise. If the ring doesn't budge, do not force it. Repeat steps 2 and 3, reapplying penetrating oil and heat, before attempting to turn the ring again.
Step 5: Tapping with a Hammer. If the drain ring remains stuck, gently tap around the perimeter of the ring with a hammer and a tool handle (such as the handle of a screwdriver). The vibrations can help to loosen the corrosion. Be extremely careful not to strike the bathtub surface directly, as this can cause damage. After tapping, reapply penetrating oil and attempt to turn the ring again with the drain removal tool.
Step 6: Using a Screwdriver for Leverage. If the drain ring has small notches or ridges, a flathead screwdriver can be used for leverage. Insert the screwdriver into one of the notches and gently tap the handle with a hammer to try to rotate the ring. Again, avoid applying excessive force, which can damage the bathtub or the screwdriver. Repeat the process on multiple notches around the ring.
Step 7: Cutting the Ring (Last Resort). If all other methods fail, cutting the drain ring may be necessary. This is a more drastic measure and should only be attempted if you are comfortable using cutting tools. Use a rotary tool (such as a Dremel) with a metal cutting disc to carefully cut a slit in the drain ring. Be extremely cautious not to damage the bathtub surface. Once a slit is cut, use a flathead screwdriver to pry the ring apart. This weakens the ring's structure and should facilitate removal. After cutting, there might be some sharp edges, use tools like pliers to remove these.
Step 8: Cleaning and Inspection After Removal. Once the drain ring is removed, thoroughly clean the drain opening and the surrounding bathtub surface. Remove any remaining debris, corrosion, or old plumber's putty. Inspect the drainpipe for any damage or corrosion. If damage is present, the drainpipe may need to be repaired or replaced by a qualified plumber.
It's important to correctly dispose of the old drain ring and any used cleaning materials. For instance, penetrating oils are sometimes considerred HAZMAT therefore should be deposed properly in a local HAZMAT facility.
When installing the new drain ring, apply a fresh bead of plumber's putty around the underside of the ring. This creates a watertight seal between the ring and the bathtub surface. Tighten the drain ring securely, but avoid over-tightening, which can crack the bathtub. Test the drain for leaks by filling the bathtub with water and observing the drain area for any signs of leakage.
Removing a stuck bathtub drain ring can be a challenging task, but with the right tools, techniques, and patience, it is often achievable. By following these steps and exercising caution, one can safely and effectively remove the drain ring and replace it with a new one, restoring the functionality of the bathtub drain.

Replacing Tub Drain With Broken T

Remove A Stuck Bathtub Drain

How To Remove A Bathtub Drain Forbes Home

Remove A Stuck Bathtub Drain

How To Remove A Bathtub Drain Thread That Is Tuck My I Tried Tub With Broken Cross Members But The Cap Came Off And Tread

Remove A Stuck Bathtub Drain

How To Remove A Bathtub Drain The Home Depot

Below Bathtube Drain Came Loose Diy Home Improvement Forum

How To Replace A Bathtub Drain

How To Take Out The Ring Stuck In Sink Drain