Replacing a Bathtub Drain Ring: A Comprehensive Guide
The bathtub drain ring, also known as a flange, is a crucial component of the bathtub drain assembly. It sits flush with the tub surface, providing a water-tight seal where the drainpipe connects to the tub. Over time, drain rings can become corroded, damaged, or simply aesthetically unappealing. Replacing a bathtub drain ring can address these issues and prevent potential water leaks, thereby protecting the surrounding structure from water damage. This article provides a comprehensive guide to replacing a bathtub drain ring, covering the necessary tools, preparation steps, and detailed instructions for a successful replacement.
The bathtub drain assembly comprises several interconnected parts. Understanding these components is essential for properly replacing the drain ring. The main components include the drain ring (flange), the drain shoe (the body of the drain that connects to the drainpipe underneath the tub), the strainer (which prevents hair and debris from clogging the drain), and the stopper mechanism (which allows the user to close and open the drain). The drain ring is typically secured to the drain shoe with a thread engagement, with a pliable plumber’s putty forming a watertight seal between the ring and the tub surface.
Key Considerations Before Starting
Before embarking on the replacement process, several factors should be considered to ensure a smooth and efficient project. The first crucial step is identifying the type of drain ring and the corresponding stopper mechanism. There are various types of stoppers, including lift-and-turn, push-and-pull, toe-touch, and pop-up mechanisms. Each type may require a slightly different approach when removing and installing the drain ring. Understanding the specific type present in the bathtub is thus crucial. Secondly, it is essential to assess the condition of the existing drain assembly. If the drain shoe or the drainpipe is significantly corroded or damaged, replacing the entire drain assembly might be a more practical and cost-effective solution than simply replacing the drain ring. This assessment can often be performed by inspecting the drain assembly from underneath the bathtub.
Gathering the necessary tools and materials is also a prerequisite. Essential tools include a flathead screwdriver, a drain wrench (also known as a dumbbell wrench or a spider wrench), pliers, a putty knife, a rag, and a bucket. The required materials include a new drain ring assembly (matching the existing type), plumber's putty, and potentially Teflon tape, depending on the specific installation requirements. Ensuring access to the underside of the bathtub, either through an access panel or by removing an adjacent wall panel, is another essential preparation step. Adequate lighting is also crucial for clearly viewing the drain assembly and facilitating the replacement process.
Step-by-Step Replacement Procedure
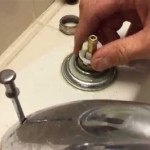
The replacement procedure involves several sequential steps, each requiring careful execution. The initial step involves removing the old drain ring. Begin by removing the stopper mechanism. The process for removing the stopper depends on its type. For a lift-and-turn stopper, the retaining screw typically needs to be loosened. For a push-and-pull stopper, it may need to be unscrewed. Toe-touch and pop-up stoppers usually involve a similar mechanism involving loosening or unscrewing the stopper.
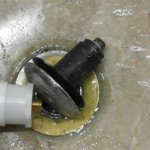
Once the stopper is removed, the next step is to loosen the existing drain ring. Insert the drain wrench into the drain opening, ensuring that the prongs engage with the crossbars inside the drain ring. Turn the wrench counterclockwise to loosen the ring. If the ring is heavily corroded and difficult to turn, applying penetrating oil to the threads may help loosen it. In some cases, gentle tapping with a hammer on the drain wrench may also assist in breaking the corrosion bond. After loosening the drain ring, carefully unscrew it completely and remove it from the bathtub drain.
With the old drain ring removed, thoroughly clean the drain opening. Use a putty knife to scrape away any old plumber's putty or sealant residue from the tub surface. Ensure the surface is clean and dry before proceeding. Applying a solvent, such as mineral spirits, can help remove stubborn residue. Inspect the drain shoe for any signs of damage or corrosion. If necessary, clean the threads of the drain shoe to ensure a secure engagement with the new drain ring.
Preparing the new drain ring for installation is the next critical step. Roll a rope of plumber's putty in your hands to create a ¼-inch thick bead. Apply the putty evenly around the underside of the new drain ring flange. Ensure that the putty forms a continuous seal to prevent water leakage. Do not apply excessive putty, as this can squeeze out during installation and create a mess. Align the new drain ring with the drain opening and carefully thread it into the drain shoe. Turn the drain ring clockwise to tighten it, using the drain wrench to ensure a secure fit. Avoid overtightening, as this can damage the threads or crack the bathtub. As the drain ring is tightened, excess plumber's putty will squeeze out. Remove this excess putty with a putty knife, creating a smooth and clean seal around the drain ring.
After installing the new drain ring, reassemble the stopper mechanism according to the manufacturer's instructions. Ensure that the stopper functions correctly and seals the drain effectively. This may involve adjusting the stopper height or tightening retaining screws. Fill the bathtub with a small amount of water to test for leaks. Observe the drain ring and the surrounding area for any signs of water leakage. If leaks are detected, the drain ring may need to be tightened further, or additional plumber's putty may be required. If leaks persist, the drain shoe or the drainpipe may need to be inspected and repaired or replaced. Following the completion of these steps, the bathtub is ready for use.
Troubleshooting Common Issues
Several common issues may arise during the drain ring replacement process. One frequent problem is difficulty in removing the old drain ring due to corrosion. Applying penetrating oil liberally and allowing it to soak for several hours can often help loosen the corroded threads. Additionally, using a larger drain wrench or applying leverage with a pipe wrench (while protecting the tub surface) may provide increased torque. In extreme cases, carefully cutting the old drain ring with a hacksaw may be necessary, but this requires caution to avoid damaging the bathtub or the drain shoe.
Another common issue is water leakage after installing the new drain ring. This is often caused by insufficient plumber's putty or an uneven seal. Removing the drain ring, applying fresh plumber's putty, and ensuring an even distribution can typically resolve this issue. Checking the threads of the drain shoe for damage is also important, as damaged threads can prevent a proper seal. Using Teflon tape on the threads of the drain ring can provide an additional layer of protection against leaks. If the drain shoe itself is damaged, replacing the entire drain assembly is usually the best course of action.
Stripped crossbars inside the old drain ring can hinder the use of a drain wrench. In such situations, a specialized drain removal tool, such as an internal pipe wrench or a screw extractor, may be used. These tools grip the inner surface of the drain ring and provide leverage for removal. When dealing with particularly stubborn or damaged drain rings, consulting a professional plumber may be the safest and most effective option. A plumber has the expertise and specialized tools to handle challenging drain ring replacements and ensure a watertight seal.
Proper disposal of the old drain ring and used materials is also important. Dispose of the old drain ring according to local regulations for metal waste. Used plumber’s putty and rags contaminated with solvents should be disposed of in a sealed container. Following these guidelines ensures an environmentally responsible cleanup after the replacement process.

Diy Bathtub Drain Removal And Or Installation Tool Procedure

How To Replace A Bathtub Drain

How To Replace Bathtub Drain Stopper With A Lift And Turn Diy

How To Replace A Bathtub Drain

How To Remove A Bathtub Drain Forbes Home

How To Replace A Bathtub Drain

Bathtub Drain Replacement How To Replace Or Install A Homeserve Usa

Replacing A Tub Drain Bathtub Removal And Replacement

Guide To Removing A Bathtub Drain Family Handyman

How To Install A Tub Drain 10 Steps With Pictures Wikihow
Related Posts