Replacing a Bathtub Drain Pipe: A Comprehensive Guide
The bathtub drain pipe, often overlooked, plays a crucial role in efficiently removing water from the tub and preventing leaks and water damage. Over time, these pipes can corrode, crack, or become clogged, necessitating replacement. This article provides a comprehensive guide to replacing a bathtub drain pipe, covering necessary tools, step-by-step instructions, and essential considerations for a successful repair.
Understanding Bathtub Drain Components
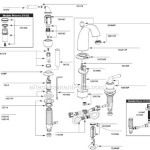
Before embarking on the replacement process, it is essential to understand the different components of a typical bathtub drain system. The key elements include:
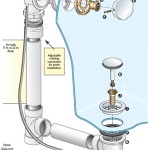
*Drain Flange:
The visible metal ring at the bottom of the bathtub. It sits flush with the tub's surface and has a strainer to prevent large debris from entering the drain. *Drain Body:
Located beneath the bathtub, it houses the drain mechanism (e.g., pop-up, lift-and-turn, toe-touch). It connects the drain flange to the drain tailpiece. *Drain Tailpiece:
A vertical pipe extending downwards from the drain body. It connects to the trap. *Trap:
A U-shaped pipe designed to hold water, preventing sewer gases from entering the bathroom. *Waste and Overflow (W&O) Pipe:
This system allows excess water to overflow from the bathtub without flooding the bathroom. It consists of an overflow tube connected to the drain body.Knowing how these components fit together will greatly aid the removal and replacement process.
Gathering Necessary Tools and Materials
Having the right tools and materials readily available is crucial for a smooth and efficient replacement. It is advisable to gather everything before starting the project. The following list includes essential items:
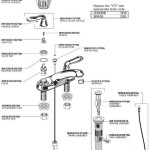
*New Bathtub Drain Assembly:
Purchase a replacement assembly that matches the existing drain type and dimensions. *Adjustable Wrench:
Needed for loosening and tightening drain components. *Channel-Lock Pliers:
Useful for gripping and turning pipes and fittings. *Screwdrivers (Phillips and Flathead):
Required for removing screws securing the drain flange and overflow plate. *Putty Knife:
Used to scrape away old plumber's putty. *Plumber's Putty:
Creates a watertight seal between the drain flange and the bathtub. *Penetrating Oil:
Helps to loosen corroded or stuck drain parts. *Rag or Sponge:
For cleaning and mopping up spills. *Bucket:
Used to catch water during the disassembly process. *Hacksaw or Pipe Cutter (Optional):
May be necessary if the existing pipes are severely corroded or need to be cut to fit. *Gloves:
Protect hands from dirt and sharp edges. *Safety Glasses:
Protect eyes from debris. *Flashlight:
To illuminate the work area under the bathtub.The specific types of tools required might vary slightly depending on the type of drain assembly and the plumbing configuration.
Step-by-Step Instructions for Bathtub Drain Pipe Replacement
This section provides detailed instructions for replacing a bathtub drain pipe. Safety precautions should always be prioritized. Turn off the water supply to the bathroom before beginning.
Step 1: Accessing the Drain Pipe
Accessing the drain pipe typically requires access from below the bathtub. This could involve entering a crawl space, basement, or removing an access panel. Ensure adequate lighting and ventilation in the work area.
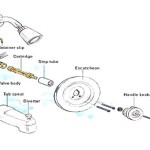
Step 2: Removing the Overflow Plate
Locate the overflow plate, usually positioned near the top of the bathtub wall. Use a screwdriver to remove the screws securing the overflow plate. Carefully pull out the overflow linkage. Some linkages might be connected to the drain stopper mechanism. In such instances, note its configuration for reassembly.
Step 3: Loosening the Drain Flange
The primary challenge often lies in removing the drain flange, which can be corroded and tightly sealed with old plumber’s putty. Apply penetrating oil to the drain flange and let it sit for several minutes to loosen any corrosion or buildup.
Step 4: Removing the Drain Flange (Two Common Methods)
There are two common methods for removing a bathtub drain flange, depending on the tool availability and the drain's condition.
*Method 1: Using a Bathtub Drain Wrench (Also Known as a Dumbbell Wrench):
This specialized tool is designed specifically for removing bathtub drains. Insert the wrench into the drain opening and turn counterclockwise to loosen the drain flange. This method is generally preferred as it provides the most leverage and minimizes the risk of damaging the bathtub. *Method 2: Using Channel-Lock Pliers (If a Bathtub Drain Wrench is Unavailable):
If a bathtub drain wrench is not available, carefully use channel-lock pliers to grip the inside of the drain flange. Turn counterclockwise to loosen the flange. Exercise caution to avoid scratching or damaging the bathtub surface. Covering the plier jaws with tape can provide some protection.Step 5: Disconnecting the Drain Tailpiece and Trap
Once the drain flange is loose, work from underneath the bathtub. Use an adjustable wrench or channel-lock pliers to loosen the connections between the drain tailpiece and the trap. Have a bucket ready to catch any remaining water in the trap. Carefully disconnect the drain tailpiece from the drain body and the trap.
Step 6: Removing the Old Plumber's Putty
Use a putty knife to carefully scrape away all traces of old plumber's putty from the bathtub surface around the drain opening. Ensure the surface is clean and smooth for the new plumber's putty.
Step 7: Installing the New Drain Flange
Roll a rope of plumber's putty and apply it evenly around the underside of the new drain flange. Press the drain flange firmly into the drain opening from above the bathtub. Excess putty will squeeze out from under the flange. Remove the excess putty with a putty knife, leaving a clean, smooth seal.
Step 8: Connecting the New Drain Tailpiece and Trap
From underneath the bathtub, connect the new drain tailpiece to the drain body. Ensure the connections are tight and secure. Reconnect the trap to the drain tailpiece. Tighten all connections using an adjustable wrench or channel-lock pliers. Avoid overtightening, which can damage the fittings.
Step 9: Reinstalling the Overflow Plate and Linkage
Reinstall the overflow linkage through the overflow opening and connect it to the drain stopper mechanism (if applicable). Secure the overflow plate with screws. Ensure the overflow mechanism functions correctly.
Step 10: Testing for Leaks
After completing the installation, test for leaks. Plug the drain and fill the bathtub with a few inches of water. Check all connections under the bathtub for any signs of leaks. If leaks are detected, tighten the connections or reapply plumber's putty as needed. It is recommended to progressively fill the tub, checking for leaks at each stage, to ensure complete sealing.
Common Challenges and Troubleshooting
Several challenges may arise during the bathtub drain pipe replacement process. Addressing these proactively can prevent frustration and delays.
*Corroded Drain Components:
Severely corroded drain components can be difficult to remove. Applying penetrating oil repeatedly over several hours or even days can help loosen them. Heat from a heat gun (used cautiously) can also aid in loosening corroded joints. *Stripped Screws:
Stripped screws on the overflow plate or drain flange can be challenging to remove. A screw extractor tool can be used to remove stripped screws. Alternatively, carefully drilling out the screw head may be necessary. *Incorrectly Sized Replacement Parts:
Ensure the replacement drain assembly is compatible with the existing plumbing configuration and bathtub dimensions. Measure the existing drain components carefully before purchasing replacement parts. It is often helpful to take the old drain assembly to the hardware store to ensure proper matching. *Leaks After Installation:
Leaks after installation can indicate improperly tightened connections or insufficient plumber's putty. Double-check all connections and reapply plumber's putty if necessary. Ensure the plumber's putty forms a complete and uniform seal around the drain flange.Maintaining and Preventing Future Problems
Proper maintenance can extend the lifespan of the bathtub drain pipe and prevent future problems. Consider the following tips:
*Regularly Clean the Drain Strainer:
Remove hair and debris from the drain strainer regularly to prevent clogs. *Avoid Harsh Chemical Drain Cleaners:
Harsh chemical drain cleaners can corrode pipes over time. Consider using enzymatic drain cleaners or a drain snake to remove clogs. *Flush the Drain with Hot Water:
Periodically flush the drain with hot water to help prevent buildup of soap scum and grease. *Address Leaks Promptly:
Address any leaks immediately to prevent water damage and further corrosion. *Consider Replacing Old Pipes:
If the plumbing system is old, consider replacing all of the pipes to prevent future problems.
How To Replace A Bathtub Drain

Tub Drain Pipe Leaks How To Replace

How To Remove A Bathtub Drain Forbes Home

Tub Drain How To Seal And Unclog A Bathtub Knoxville Plumbing

Bathtub Drain Replacement How To Replace Or Install A Homeserve Usa

Diy Bathtub Drain Removal And Or Installation Tool Procedure

Replacing A Bathtub Fine Homebuilding

Bathtub Drain Tube Plastic Waste Pipe Home Bathroom Kit Replacement Retractable

How To Install A Tub Drain 10 Steps With Pictures Wikihow

7 Bathtub Plumbing Installation Drain Diagrams
Related Posts