Replacing a Bathtub Drain Handle: A Comprehensive Guide
A malfunctioning bathtub drain handle can be a source of considerable frustration. Whether the handle is stripped, corroded, broken, or simply aesthetically unappealing, replacing it is a common home improvement task. This article provides a comprehensive guide to understanding the various types of bathtub drain handles and the process of replacing them. Proper identification of the existing handle and careful execution of the replacement steps are crucial for a successful outcome.
Before beginning the replacement process, it is essential to understand the different types of bathtub drain systems and their corresponding handle mechanisms. The most common types include trip lever drains, pop-up drains, and lift-and-turn drains, each with its unique actuation method. Understanding these differences will ensure the correct replacement handle is chosen and the installation process is executed appropriately.
Identifying Your Bathtub Drain Type
Accurately identifying the type of bathtub drain is the first step in replacing the handle. Each type operates differently, requiring a specific replacement handle and corresponding installation procedure.
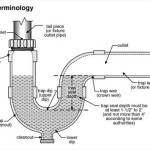
Trip Lever Drain: The trip lever drain utilizes a lever, typically located on the overflow plate below the faucet, to control the drain stopper. When the lever is tripped, it pulls a linkage mechanism that lifts the stopper, allowing water to drain. The lever itself is the primary handle and is directly connected to the drain mechanism.
Pop-Up Drain: A pop-up drain features a stopper that is activated by a handle, usually located on the overflow plate. This handle operates a linkage mechanism that raises and lowers the stopper. The handle's movement directly controls the stopper's position, allowing for easy opening and closing of the drain.
Lift-and-Turn Drain: This type of drain utilizes a stopper that is directly manipulated by hand. The stopper is typically slightly larger than the drain opening and features a knob or handle on top. To open or close the drain, the user must lift and turn the stopper, which engages or disengages a locking mechanism. This is often the simplest drain type to replace, as it often only requires unscrewing and replacing the stopper itself.
Toe-Touch Drain: A toe-touch drain features a stopper that is activated by pressing it with your toe. Pressing once seals the drain, and pressing again releases it. This type can be more complex to repair or replace as the mechanism is fully internal to the drain assembly.
After identifying the type of drain, examine the existing handle carefully. Note its shape, size, and how it is connected to the drain mechanism. Taking photographs can be helpful for comparison when selecting a replacement.
Gathering the Necessary Tools and Materials
A successful bathtub drain handle replacement requires the right tools and materials. Preparing in advance will streamline the process and minimize potential delays.
Replacement Handle: Select a replacement handle that is compatible with the existing drain type. Ensure it matches the dimensions and style of the original handle for a seamless fit. Consider purchasing a direct replacement from the original manufacturer for guaranteed compatibility.
Screwdrivers: A set of screwdrivers, including Phillips head and flathead, will be necessary for removing and installing screws. The specific size and type of screwdriver will depend on the screws used in the drain handle assembly.
Pliers: Pliers can be useful for gripping and manipulating small parts or loosening stubborn connections. Needle-nose pliers may be particularly helpful for accessing tight spaces.
Adjustable Wrench: An adjustable wrench may be required for loosening or tightening nuts and bolts associated with the drain mechanism, particularly in trip lever or pop-up drain systems.
Penetrating Oil: Applying penetrating oil to corroded screws or connections can help loosen them, making removal easier. Allow the oil to soak for several minutes before attempting to remove the fastener.
Clean Rag: A clean rag will be needed to wipe away any dirt, debris, or excess oil during the replacement process.
Plumber's Putty or Silicone Caulk: Depending on the drain type and manufacturer's instructions, plumber's putty or silicone caulk may be needed to create a watertight seal around the drain stopper or handle base.
Step-by-Step Replacement Procedure
The following steps provide a general guideline for replacing a bathtub drain handle. However, it is crucial to consult the manufacturer's instructions for the specific replacement handle being installed, as procedures may vary slightly depending on the model.
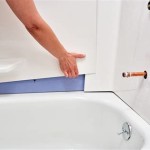
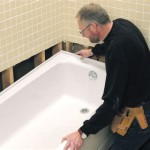
Step 1: Preparation: Begin by closing the bathtub drain to prevent any tools or small parts from falling into the drainpipe. Protect the bathtub surface with a towel or drop cloth to prevent scratches or damage.
Step 2: Removing the Old Handle: The method for removing the old handle depends on the drain type. For trip lever drains, this usually involves unscrewing the overflow plate and detaching the lever from the linkage mechanism. For pop-up drains, the handle is typically connected to a linkage mechanism behind the overflow plate and needs to be disengaged. Lift-and-turn drains usually require simply unscrewing the stopper itself.
Step 3: Cleaning the Area: Once the old handle is removed, thoroughly clean the area around the drain opening and overflow plate. Remove any old sealant, debris, or corrosion. A clean surface will ensure a proper seal with the new handle.
Step 4: Installing the New Handle: Install the new handle according to the manufacturer's instructions. For trip lever and pop-up drains, this typically involves connecting the handle to the linkage mechanism and securing the overflow plate. Ensure that all connections are tight and secure.
Step 5: Applying Sealant (if required): If the manufacturer's instructions specify the use of plumber's putty or silicone caulk, apply a bead of sealant around the base of the drain stopper or handle base before installation. This will create a watertight seal and prevent leaks.
Step 6: Testing the New Handle: After installing the new handle, test it thoroughly to ensure that it operates smoothly and correctly. Fill the bathtub with a small amount of water and check for leaks around the drain stopper and overflow plate. If any leaks are detected, tighten the connections or reapply sealant as necessary.
Step 7: Final Adjustments: Make any final adjustments to the handle or linkage mechanism to ensure proper drain operation. Adjust the length of the linkage rod if necessary to achieve a tight seal and proper drain opening and closing.
Step 8: Cleaning Up: Once the replacement is complete and the handle is functioning properly, clean up any debris or spills. Discard the old handle and packaging materials responsibly.
It is imperative to remember that improper installation can lead to leaks and potential water damage. If uncertain about any step of the process, consulting a qualified plumber is advised.
Regular maintenance of the bathtub drain handle can extend its lifespan and prevent future problems. This includes cleaning the handle and surrounding area periodically to remove soap scum, mineral deposits, and other debris. Applying a lubricant to the moving parts of the drain mechanism can also help to keep it operating smoothly.
By carefully identifying the drain type, gathering the necessary tools and materials, and following a systematic replacement procedure, homeowners can successfully replace a bathtub drain handle and restore proper function to their bathtub drain.

How To Replace Bathtub Drain Stopper With A Lift And Turn Diy

How To Replace Bathtub Overflow Plate With Trip Lever Easy Simple

How To Replace Bathtub Drain Stopper With A Lift And Turn Diy

How To Remove A Bathtub Drain The Home Depot

How To Replace A Trip Lever Tub Stopper Eagle Mountain Woodford Watco Blog

Easy Replacement Of A Bathtub Drain

Danco Lift And Turn Drain Stopper In Chrome 88599 At Com

How To Replace Bathtub Drain Stopper With A Lift And Turn Diy

Bath Tub Trip Lever Stopper Replacement Or Adjustnment

Bathtub How Can I Remove A Stuck Bath Stopper Assembly Home Improvement Stack Exchange
Related Posts