Replacing a Bathtub Drain Cover: A Comprehensive Guide
The bathtub drain cover, often overlooked, plays a crucial role in the functionality and safety of a bathroom. It prevents large objects from entering and clogging the drainpipe, maintains a clean aesthetic, and in some cases, even contributes to the proper sealing of the bathtub during bathing. Over time, drain covers can become damaged, corroded, stained, or simply outdated. Replacing a bathtub drain cover is a relatively straightforward DIY project that can improve the appearance and functionality of the bathtub. This article provides a detailed guide on how to replace various types of bathtub drain covers.
Identifying the Type of Bathtub Drain Cover
Before beginning the replacement process, it is essential to identify the type of drain cover currently installed. Different drain cover mechanisms require different removal and installation techniques. Common types include grid drain covers, pop-up drain covers, toe-touch drain covers, and lift-and-turn drain covers. Failure to correctly identify the type can lead to damage to the drain assembly or the bathtub itself.
Grid Drain Covers: These are the simplest type, typically consisting of a metal or plastic grid secured to the drain opening. They are usually held in place by screws or friction. Grid drains are often found in older bathtubs.
Pop-Up Drain Covers: These drain covers feature a plunger mechanism that is activated by a lever located near the overflow plate or on the drain cover itself. When the lever is activated, the plunger moves up or down to open or close the drain.
Toe-Touch Drain Covers: These types of drain covers operate with a mechanism that is activated by pressing down on the drain cover with a toe. A second press typically pops the cover open. The internal mechanism is usually spring-loaded.
Lift-and-Turn Drain Covers: These drain covers feature a knob that needs to be lifted and turned to either lock the drain closed or release it, allowing water to flow. The mechanism involves a stopper being rotated into or out of the drain opening.
Identifying the drain cover is the first and most important step. Observe the mechanism carefully and consult online resources or plumbing professionals if uncertain about the type.
Tools and Materials Required
Once the type of drain cover is identified, gather the necessary tools and materials. Having everything on hand before starting the project will streamline the process and prevent unnecessary delays. Essential tools and materials include:
New Drain Cover: Purchase a replacement drain cover that matches the type and size of the existing one. Ensure it is compatible with the bathtub drain assembly. Measure the diameter of the drain opening and note the type of activation mechanism (e.g., pop-up, toe-touch) before purchasing.
Screwdrivers: A set of screwdrivers (both Phillips and flathead) is essential for removing and installing screws that secure the drain cover.
Pliers: Pliers, preferably tongue and groove pliers, may be needed to grip and loosen stubborn parts of the drain assembly.
Drain Key (Drain Wrench): This specialized tool is designed to remove and install certain types of bathtub drain flanges. It is particularly useful for stubborn or corroded drain flanges. If you are dealing with a pop-up drain, a specific pop-up drain wrench might be the best choice.
Penetrating Oil: Applying penetrating oil to corroded parts can help loosen them and make removal easier. Allow the oil to soak for several minutes before attempting to remove the parts.
Rag or Sponge: A rag or sponge is useful for cleaning the drain area and wiping up any spills.
Plumber's Putty or Silicone Caulk: These materials are used to create a watertight seal between the drain flange and the bathtub. The choice depends on the drain cover and the manufacturer's recommendations.
Gloves: Wearing gloves protects hands from dirt, grime, and sharp edges.
Safety Glasses: Safety glasses protect eyes from debris that may be dislodged during the removal process.
Step-by-Step Removal and Installation Procedures
The removal and installation procedures vary depending on the type of drain cover. The following provides detailed instructions for common types:
Removing and Installing a Grid Drain Cover:
Removal: Locate the screws holding the grid in place. Use a screwdriver to remove the screws. If the screws are corroded, apply penetrating oil and allow it to soak before attempting removal. Once the screws are removed, carefully lift the grid cover out of the drain opening. If the grid is stuck, gently pry it loose with a flathead screwdriver, being careful not to damage the bathtub surface.
Installation: Clean the drain opening thoroughly, removing any debris or old sealant. Apply a small bead of plumber's putty or silicone caulk around the underside of the new grid drain cover. Position the new grid drain cover over the drain opening and align the screw holes. Insert the screws and tighten them securely. Wipe away any excess plumber's putty or silicone caulk.
Removing and Installing a Pop-Up Drain Cover:
Removal: Locate the pop-up drain lever near the overflow plate. Remove the overflow plate by unscrewing it. This will expose the linkage that connects the lever to the drain plunger. Carefully pull out the linkage rod. The drain plunger should now be free. In some cases, you may need to remove the drain stopper itself by unscrewing it from above.
Installation: Insert the new drain plunger into the drain opening. Reattach the linkage rod to the plunger and the overflow plate lever. Secure the overflow plate with screws. Test the pop-up mechanism to ensure it is functioning correctly. The lever should smoothly open and close the drain.
Removing and Installing a Toe-Touch Drain Cover:
Removal: The toe-touch drain is usually screwed into the drain flange. Hold the base of the drain cover to keep it from spinning, then unscrew the top portion of the drain cover. If it's stuck, try using a rubber glove for extra grip or gently use pliers. Once the top part is removed, you can usually lift out the entire mechanism. There might be some resistance if there's accumulated hair or debris.
Installation: Clean the drain opening and the threads inside. Insert the new toe-touch drain mechanism into the drain opening. Screw the top portion of the drain cover back onto the base, ensuring it is snug but not overtightened. Test the mechanism by pressing down on the drain cover to open and close the drain.
Removing and Installing a Lift-and-Turn Drain Cover:
Removal: These drain covers usually have a setscrew located on the side of the knob. Loosen the setscrew with an Allen wrench. Once the setscrew is loose, the knob should pull straight up and off. With the knob removed, the stopper can be lifted out of the drain. Sometimes, the stopper can be corroded or have debris preventing easy removal. In this case, gently wiggle it or use pliers to assist.
Installation: Clean the drain opening and the stopper. Insert the new stopper into the drain. Align the knob with the stopper mechanism and slide it in place. Tighten the setscrew to secure the knob. Test the lift-and-turn mechanism to ensure it opens and closes the drain properly.
Addressing Common Problems
During the drain cover replacement process, several common problems may arise. This section addresses these issues and provides potential solutions:
Stuck Screws: Corroded screws can be difficult to remove. Apply penetrating oil and allow it to soak for several minutes. Use a screwdriver that fits the screw head snugly to avoid stripping the screw. If the screw head is already stripped, use a screw extractor or a rubber band between the screwdriver and the screw head for added grip. As a last resort, carefully drill out the screw head.
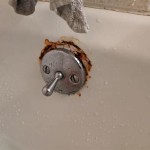
Difficult Drain Flange Removal: The drain flange, the part that connects the drainpipe to the bathtub, can be difficult to remove if it is corroded or tightly sealed. Use a drain key (drain wrench) to loosen the flange. Apply penetrating oil and allow it to soak before attempting removal. If the flange is still stuck, carefully heat it with a heat gun to soften the sealant. Be careful not to overheat the flange or damage the bathtub.
Leaks: Leaks can occur if the drain flange is not properly sealed to the bathtub. Ensure that the drain flange is clean and free of debris. Apply a generous bead of plumber's putty or silicone caulk around the underside of the flange. Tighten the flange securely and wipe away any excess sealant. Allow the sealant to cure completely before using the bathtub.
Incorrect Drain Cover Size: Ensure the replacement drain cover is the correct size for the drain opening. Measure the diameter of the drain opening before purchasing a new drain cover. If the drain cover is too small, it will not properly cover the drain opening. If the drain cover is too large, it will not fit into the drain opening.
Incompatible Drain Cover Type: Using the wrong type of drain cover can damage the drain assembly or prevent the drain from functioning properly. Ensure the replacement drain cover is compatible with the existing drain assembly. If unsure, consult a plumbing professional.
Successfully replacing a bathtub drain cover requires patience, attention to detail, and the correct tools and materials. By following the steps outlined in this guide, most homeowners can complete this project without the need for professional assistance. However, it is important to prioritize safety and to consult a plumbing professional if encountering complex problems or uncertainties.

Easy Replacement Of A Bathtub Drain

Remove Bathtub Drain Stopper

Replace Your Bathtub Drain Like A Pro Using The Right Tools

How To Remove A Bathtub Drain The Home Depot

How To Remove A Bathtub Drain Stopper

How To Replace Bathtub Drain Stopper With A Lift And Turn Diy

How To Replace A Bathtub Drain

How To Replace Bathtub Drain Stopper With A Lift And Turn Diy

How To Replace Bathtub Drain Grate Bunnings Work Community

Bathtub Drain Replacement How To Replace Or Install A Homeserve Usa
Related Posts