Replacing a Bathtub Drain Pipe and Overflow Tube: A Comprehensive Guide
A bathtub drain pipe and overflow tube are critical components of a plumbing system, responsible for efficiently channeling water away from the tub and preventing overflows. Over time, these parts can corrode, become clogged, or develop leaks, necessitating replacement. This article provides a comprehensive guide to replacing a bathtub drain pipe and overflow tube, encompassing preparation, disassembly, and installation procedures.
Before commencing any plumbing work, safety precautions are paramount. Ensure the water supply to the bathroom is shut off, usually at the main water valve or a localized shut-off valve serving the bathroom. Place towels or drop cloths around the work area to protect the floor from water damage. Wear appropriate safety gear, including eye protection and gloves. Confirm familiarity with local plumbing codes and regulations.
Identifying the Appropriate Replacement Parts
Accuracy in selecting replacement parts is essential for a successful installation. The first step involves identifying the type of drain and overflow assembly currently in use. Common types include trip-lever drains, pop-up drains, and push-and-seal drains. Each type has distinct mechanisms and corresponding replacement parts. Measure the length of the existing overflow tube and drain pipe to ensure the new components are the correct size. Note the diameter of the drain pipe, typically 1 1/2 inches. When purchasing replacement parts, consider the material. Brass and PVC are common choices, each offering different advantages in terms of durability and cost. Brass offers superior corrosion resistance, while PVC is more affordable and easier to work with. Verify that the replacement parts are compatible with the existing bathtub and plumbing system.
It is advisable to purchase a complete drain and overflow kit rather than individual components. These kits typically include all the necessary hardware, such as gaskets, washers, and screws, ensuring a proper fit and simplifying the installation process. When selecting a kit, pay attention to the finish, ensuring it complements the existing bathroom fixtures. Chrome, brushed nickel, and oil-rubbed bronze are common options.
Documenting the existing drain assembly before disassembly can be helpful. Taking photographs of the drain and overflow mechanism from different angles can serve as a reference during reassembly, particularly if the configuration is complex. Note the orientation of each component and the order in which they are installed.
Disassembly of the Existing Drain Assembly
Disassembly requires careful execution to avoid damaging the bathtub or surrounding plumbing. Begin by removing the drain stopper. The method for removing the stopper varies depending on the type of drain. For a trip-lever drain, unscrew the faceplate on the overflow tube and gently pull out the linkage mechanism. For a pop-up drain, typically there is a small screw or retaining clip accessible from inside the drain opening that must be loosened or removed. Push-and-seal drains often require a specialized tool or pliers to grip and twist the drain stopper for removal.
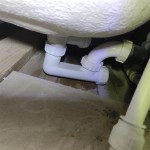
Once the drain stopper is removed, access the drain pipe underneath the bathtub. This may require removing an access panel in the adjacent wall or working in a confined space. Place a bucket under the drain pipe to catch any residual water. Using channel-lock pliers or a pipe wrench, loosen the slip nuts connecting the drain pipe to the bathtub drain flange and the waste pipe. Be prepared for water to drain out as these connections are loosened. If the slip nuts are corroded or difficult to loosen, apply penetrating oil and allow it to soak for several minutes before attempting to loosen them again.
After disconnecting the drain pipe, remove the overflow tube. Loosen the screws holding the overflow faceplate to the bathtub. Gently pull out the overflow tube, taking care not to damage the bathtub. Inspect the overflow gasket for damage or wear. This gasket should also be replaced during the installation process. Once the overflow tube and drain pipe are removed, clean the bathtub drain flange and overflow opening thoroughly to remove any old sealant or debris. Use a putty knife or scraper to remove stubborn residue.
Inspection of the removed parts is crucial to determine the cause of the drain problem. Look for signs of corrosion, cracks, or clogs. If the drain pipe is clogged, attempt to clear the blockage using a drain snake or a plumbing auger. This can provide valuable insight into the condition of the plumbing system and help prevent future problems.
Installation of the New Drain Assembly
Before installing the new drain assembly, ensure all surfaces are clean and dry. Apply plumber's putty to the underside of the bathtub drain flange. Roll the putty into a rope approximately 1/2 inch thick and press it firmly against the flange. This will create a watertight seal between the flange and the bathtub. Insert the drain flange into the drain opening from inside the bathtub.
From underneath the bathtub, attach the new drain pipe to the drain flange. Ensure the slip nuts are properly aligned and tighten them by hand. Then, using channel-lock pliers or a pipe wrench, tighten the slip nuts another quarter-turn, being careful not to overtighten them. Overtightening can damage the plastic or brass components. Connect the other end of the drain pipe to the waste pipe, again ensuring proper alignment and tightening the slip nuts securely.
Next, install the new overflow tube. Apply plumber's putty or a new gasket to the back of the overflow faceplate. Insert the overflow tube into the overflow opening from inside the bathtub. Attach the overflow faceplate to the bathtub using the provided screws. Tighten the screws evenly to ensure a uniform seal. Connect the overflow tube to the drain pipe using the appropriate fittings and slip nuts. Ensure all connections are tight and secure.
Once the drain pipe and overflow tube are installed, test the drain for leaks. Plug the drain opening and fill the bathtub with a few inches of water. Check all connections under the bathtub for leaks. If leaks are detected, tighten the slip nuts or reapply plumber's putty as needed. Also, check the overflow tube for leaks by filling the bathtub until the water level reaches the overflow opening. Repeat the inspection and make any necessary adjustments.
After verifying that the drain is leak-free, install the drain stopper. The installation method varies depending on the type of drain. For a trip-lever drain, reinsert the linkage mechanism into the overflow tube and attach the faceplate. Adjust the linkage as needed to ensure the drain stopper seals properly. For a pop-up drain, insert the drain stopper into the drain opening and secure it with the screw or retaining clip. For a push-and-seal drain, simply insert the drain stopper into the drain opening and test its operation.
Following the installation of the drain stopper, conduct a final test to ensure the drain functions correctly. Fill the bathtub with water and observe how quickly the water drains. Check for any unusual noises or slow drainage, which could indicate a partial blockage. Monitor the drain connections for any signs of leakage for several hours after the installation is complete. After successfully replacing the bathtub drain pipe and overflow tube, clean the work area and dispose of any old parts or materials properly.
Troubleshooting Common Issues
Despite careful installation, certain issues may arise after replacing a bathtub drain pipe and overflow tube. One common problem is a slow draining bathtub. This can be caused by a partial blockage in the drain pipe or a malfunctioning drain stopper. Attempt to clear the blockage using a drain snake or a plumbing auger. Adjust the drain stopper as needed to ensure a proper seal. Another issue is leaks around the drain flange or overflow tube. This can be caused by improper sealing or loose connections. Tighten the slip nuts or reapply plumber's putty or a new gasket as needed. If leaks persist, consider replacing the drain flange or overflow tube. A third issue is unusual noises coming from the drain. This can be caused by loose pipes or vibrations. Secure the drain pipes with pipe clamps or foam insulation to reduce noise. If these troubleshooting steps do not resolve the issue, consult a qualified plumber.

How To Replace A Bathtub Drain

How To Replace A Tub Drain Ask This Old House

Limited Offer Deal Flexible Bathtub Drains Cable Operated Waste And Overflow Kits Tub Drain

Drain Overflow Assemblies Fine Homebuilding

Bathtub Drain Tube Plastic Waste Pipe Home Bathroom Kit Replacement Retractable

Replacing Tub Drain No Crossbars Doityourself Com Community Forums

Satisfied Ping Flexible Bathtub Drains Cable Operated Waste And Overflow Kits Tub Drain

How To Fix A Bathtub Or Sink Pop Up Stopper Bathroom Drain

Bathtub Drain Replacement How To Replace Or Install A Homeserve Usa

Drain Overflow Assemblies Fine Homebuilding
Related Posts