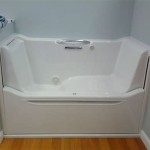
Replace A Bathtub Drain, A Step-by-Step Guide
A leaky or clogged bathtub drain can be a major inconvenience. If you're experiencing these problems, it's time to replace the drain. Replacing a bathtub drain is a relatively simple plumbing repair that can be completed in a few hours. Here's a step-by-step guide to help you get the job done.
Tools and Materials You'll Need
- Adjustable wrench
- Phillips screwdriver
- Flathead screwdriver
- New bathtub drain assembly
- Plumber's putty
- Teflon tape
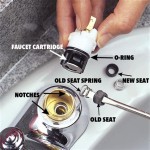
Step 1: Remove the Old Drain Assembly
Start by turning off the water supply to the bathtub. Then, use an adjustable wrench to loosen the drain flange. Once the flange is loose, you can use a screwdriver to remove the drain assembly.
Step 2: Clean the Drain Opening
Once the old drain assembly is removed, take some time to clean the drain opening. Remove any debris or old sealant that may be present. This will help ensure that the new drain assembly fits properly.
Step 3: Apply Plumber's Putty
Apply a bead of plumber's putty around the base of the new drain assembly. The putty will help seal the drain and prevent leaks.
Step 4: Install the New Drain Assembly
Insert the new drain assembly into the drain opening. Hand-tighten the flange until it is snug. Then, use an adjustable wrench to tighten the flange further. Be careful not to overtighten the flange, as this could damage the drain.
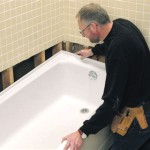
Step 5: Install the Overflow Plate
The overflow plate is the small plate that covers the overflow hole in the bathtub. Install the overflow plate by screwing it into place. Be sure to use Teflon tape on the threads to help prevent leaks.
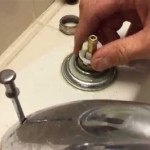
Step 6: Reinstall the Drain Stopper
Reinstall the drain stopper by inserting it into the drain opening. The stopper should fit snugly into the drain.
Step 7: Turn on the Water Supply
Turn on the water supply to the bathtub and check for leaks. If there are any leaks, tighten the drain assembly or overflow plate until the leaks stop.
Congratulations!
You have now successfully replaced your bathtub drain. Enjoy your new leak-free drain.

How To Replace Bathtub Drain Stopper With A Lift And Turn Diy

How To Replace A Bathtub Drain

How To Replace A Bathtub Drain

How To Remove A Bathtub Drain Forbes Home

How To Replace A Bathtub Drain

How To Replace A Bathtub Drain

How To Remove A Bathtub Drain The Home Depot

How To Replace Bathtub Drain Stopper With A Lift And Turn Diy

How To Remove 6 Diffe Bath Drain Types

How To Replace A Bathtub Drain
Related Posts