Repairing A Leaky Bathtub Faucet: Single Handle
A leaky bathtub faucet, particularly a single-handle model, can be a persistent source of annoyance and unnecessary expense. The constant dripping wastes water, leading to higher utility bills and potentially causing damage to the surrounding area through mold and mildew growth. Addressing a leaky faucet promptly is therefore crucial for both financial and practical reasons. While calling a plumber is always an option, many individuals find that repairing a single-handle bathtub faucet is a manageable DIY project requiring basic tools and a systematic approach.
Before embarking on the repair, it is essential to understand the basic anatomy of a single-handle bathtub faucet. These faucets typically consist of a handle, a decorative escutcheon (the plate behind the handle), a cartridge (the core component controlling water flow), and various O-rings and seals. The cartridge is the most common culprit behind leaks, as its internal components can wear down over time due to mineral buildup and constant use. Understanding the function of each part will aid in troubleshooting and ultimately contribute to a successful repair.
This article will provide a comprehensive guide to repairing a leaky single-handle bathtub faucet, outlining the necessary tools, step-by-step instructions, and potential pitfalls to avoid. It will primarily focus on cartridge-style faucets, which are the most prevalent type. However, the principles discussed can be adapted to other single-handle faucet designs.
Identifying the Faucet Type and Gathering Supplies
The first critical step in repairing a leaky single-handle bathtub faucet is correctly identifying the faucet type and acquiring the necessary tools and replacement parts. While cartridge-style faucets are common, other types, such as ball-type or ceramic disc faucets, exist. The faucet's manufacturer and model number are usually printed on the fixture itself, often hidden beneath the handle or escutcheon. Obtaining this information is crucial for purchasing the correct replacement cartridge.
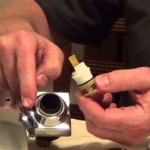
If the model number is not readily available, a visual inspection of the faucet's internal components after disassembly may be necessary to determine the cartridge type. Take careful photographs of the existing cartridge before removing it to aid in identifying the correct replacement. Bring the old cartridge to a local hardware store or plumbing supply shop for comparison, ensuring that the replacement matches in size, shape, and function.
The following tools are typically required for this type of repair:
- Screwdrivers (both flathead and Phillips head)
- Adjustable wrench
- Penetrating oil
- Plumbing pliers
- Allen wrench (various sizes)
- Clean rags or towels
- Flashlight or work light
- Replacement cartridge (appropriate for the faucet model)
- Plumber's grease (silicone-based)
Having all the necessary tools and replacement parts readily available will streamline the repair process and minimize potential delays.
Step-by-Step Disassembly and Cartridge Replacement
Once the faucet type is identified and the supplies are gathered, the primary step is the disassembly of the faucet and replacement of the cartridge. This process needs careful attention to detail to ensure no damage occurs and that all parts are reassembled correctly.
1. Turn Off the Water Supply: This is the most crucial step. Locate the water shut-off valves for the bathtub, typically found in the basement, a utility closet, or near the water meter. Turn both the hot and cold water valves clockwise to shut off the water supply. After turning off the water, turn on the faucet to relieve any residual pressure in the pipes.
2. Protect the Tub Surface: Place a towel or drop cloth over the bathtub surface to protect it from scratches or damage during the repair process.
3. Remove the Handle: Locate the setscrew on the handle, usually hidden behind a small cap or cover. Use an Allen wrench or screwdriver to loosen and remove the setscrew. Once the setscrew is removed, gently pull the handle away from the faucet body. If the handle is stuck, apply a small amount of penetrating oil to the base of the handle and allow it to sit for a few minutes before attempting to remove it again.
4. Remove the Escutcheon: The escutcheon is the decorative plate behind the handle. It may be held in place by screws or snap-fit connectors. If screws are present, unscrew them with a screwdriver. If the escutcheon is snap-fit, gently pry it away from the wall using a flathead screwdriver, being careful not to damage the surrounding tiles or faucet finish.
5. Remove the Retaining Clip or Nut: After removing the escutcheon, the retaining clip or nut securing the cartridge will be visible. The retaining clip is usually a small metal U-shaped clip that slides into slots on either side of the cartridge. Use pliers or a screwdriver to carefully remove the retaining clip. If a retaining nut is present, loosen it with an adjustable wrench.
6. Remove the Old Cartridge: With the retaining clip or nut removed, the old cartridge can be extracted. Some cartridges come out easily by hand, while others may require more force. Use pliers to grip the cartridge stem and gently twist and pull it out of the faucet body. If the cartridge is stuck, use a cartridge puller tool, which is specifically designed for this purpose. Avoid excessive force, as this could damage the faucet body.
7. Inspect the Faucet Body: Once the cartridge is removed, inspect the interior of the faucet body for any signs of corrosion, mineral buildup, or damage. Clean the interior of the faucet body with a clean rag or brush to remove any debris.
8. Install the New Cartridge: Before installing the new cartridge, apply a thin layer of plumber's grease to the O-rings and seals. This will help to ensure a proper seal and make future removal easier. Align the new cartridge with the faucet body, making sure that it is oriented correctly. Gently push the cartridge into place until it is fully seated. Reinstall the retaining clip or nut to secure the cartridge.
9. Reassemble the Faucet: Reinstall the escutcheon, handle, and setscrew in the reverse order of disassembly. Tighten the setscrew securely to hold the handle in place.
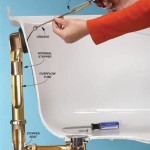
10. Test for Leaks: Turn the water supply back on slowly and check for leaks around the handle, escutcheon, and spout. If leaks are present, tighten the retaining nut or check the cartridge installation.
Troubleshooting Common Issues and Preventing Future Leaks
Despite careful execution, problems may still arise during the repair process. Knowing how to handle these potential setbacks contributes to a successful resolution. Furthermore, preventative measures can be taken to minimize the likelihood of future leaks.
1. Stuck Cartridge: If the old cartridge is stuck and difficult to remove, apply penetrating oil around the base of the cartridge and allow it to sit for several minutes. Use a cartridge puller tool if necessary. Avoid using excessive force, as this could damage the faucet body.
2. Stripped Screws: If the screws holding the escutcheon or handle are stripped, try using a screw extractor tool. Alternatively, you can try placing a rubber band or steel wool between the screwdriver tip and the screw head to provide better grip.
3. Leaks After Repair: If leaks persist after replacing the cartridge, double-check the cartridge installation. Ensure that the cartridge is fully seated and that the retaining clip or nut is properly tightened. Also, inspect the O-rings and seals on the new cartridge for any damage. If the leaks persist, it may be necessary to replace other faucet components, such as the valve seats or springs.
4. Preventing Future Leaks: Several preventive measures can reduce the chance of future leaks. Regularly cleaning the faucet aerator to remove mineral buildup can help maintain proper water flow and pressure. Periodically lubricating the faucet cartridge with plumber's grease can also help prevent wear and tear. Furthermore, installing a water softener can reduce the mineral content in the water, extending the life of faucet components.
5. Choosing the Right Cartridge: Ensuring the correct cartridge is selected is vital for preventing issues upon replacement. If the incorrect cartridge is inserted, water flow can be disrupted, preventing adequate hot or cold water flow or even causing leaks. It is essential to compare the old cartridge to the new one to ensure they match perfectly.
Repairing a leaky single-handle bathtub faucet is a task that, with careful preparation and execution, can be tackled by many homeowners. By following these steps and taking preventative measures, individuals can effectively address the issue of a leaky faucet, save water, and avoid unnecessary plumbing expenses. If the repair is beyond one's skill level or the faucet is severely damaged, consulting with a qualified plumber is always recommended.

How To Replace A Moen Cartridge And Fix Leaky Bathtub Faucet It Tutorials

How To Fix A Leaking Bathtub Faucet Diy Family Handyman

How To Fix A Leaking Single Handle Bathtub Faucet Quick And Easy

Repairing A Leaky Single Handle Tub Shower Ball Type Faucet

How To Fix A Leaky Bathtub Faucet 6 Ways Stop Drips

How To Fix A Leaking Bathtub Faucet The Home Depot

Fix A Leaky Delta Single Handle Shower Faucet For Under 2

How To Fix A Leaking Bathtub Faucet Diy Family Handyman

How To Fix A Leaking Bathtub Faucet The Home Depot

How To Fix A Leaking Bathtub Faucet The Home Depot