How to Repair Bathtub Faucet Handles: A Step-by-Step Guide
Introduction:
A leaky or malfunctioning bathtub faucet handle can be a persistent annoyance, leading to water wastage and higher utility bills. While it may seem like a daunting task, repairing bathtub faucet handles is a straightforward project that can be completed with minimal plumbing experience and a few basic tools. This step-by-step guide will walk you through the process of repairing your bathtub faucet handles, ensuring a smooth flow of water and a functional bathroom fixture.Step 1: Gather the Necessary Tools and Materials:
- Adjustable wrench - Phillips head screwdriver - Flathead screwdriver - Pliers - Allen wrench (if required) - New faucet handle(s) and/or cartridge(s) (if needed) - Plumber's tape - Lubricant (silicon-based or petroleum jelly) - Rags or towels - Safety glassesStep 2: Turn Off the Water Supply:
Locate the water shutoff valves underneath the sink or behind the bathtub. Turn both the hot and cold water valves clockwise to turn off the water supply. This will prevent water from flowing out of the faucet while you work.Step 3: Remove the Handle:
Using the appropriate screwdriver (Phillips head or flathead), loosen the screws securing the handle to the faucet body. Once the screws are removed, gently pull the handle straight off the stem. If the handle is particularly stubborn, you may need to use a pair of pliers to gently pry it off.Step 4: Remove the Cartridge (if Applicable):
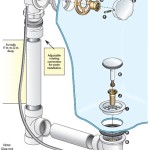
Some faucets utilize cartridges to control the flow of water. If your faucet has a cartridge, you will need to remove it before proceeding further. Use the adjustable wrench to loosen the packing nut located behind the handle, and then pull the cartridge out of the faucet body.Step 5: Inspect the Cartridge/Stem for Damage:
Examine the cartridge or stem for signs of damage or wear. Look for cracks, corrosion, or mineral deposits that may be hindering its proper operation. If the cartridge or stem is damaged, it will need to be replaced.Step 6: Clean the Faucet Body:
Use a damp rag to clean the faucet body and remove any dirt, debris, or mineral deposits that may have accumulated. This will help ensure a proper seal and prevent leaks.Step 7: Apply Lubricant:
Apply a small amount of lubricant to the new cartridge or stem. This will help prevent friction and wear, ensuring smooth operation of the faucet handle.Step 8: Insert the New Cartridge/Stem:
Insert the new cartridge or stem into the faucet body. Tighten the packing nut using the adjustable wrench until it is snug.Step 9: Reattach the Handle:
Align the handle with the stem and slide it back onto the faucet body. Secure the handle with the screws you removed earlier. Tighten the screws until they are snug, but do not overtighten them.Step 10: Turn On the Water Supply:
Turn the water shutoff valves counter-clockwise to turn on the water supply. Check for leaks around the faucet handle and tighten any loose screws if necessary.Step 11: Test the Faucet:
Turn on the faucet and check for proper water flow. Adjust the handle to ensure that the water temperature and flow rate are as desired.Conclusion:
By following these steps, you can successfully repair your bathtub faucet handles and restore them to optimal working condition. With the right tools and a little patience, you can save yourself the cost of hiring a plumber and enjoy a fully functional bathroom faucet. Remember to always turn off the water supply before starting any plumbing repairs, and if you encounter any unexpected issues, it's best to consult a qualified plumber for assistance.
How To Fix A Leaking Bathtub Faucet Diy Family Handyman

How To Fix A Leaking Bathtub Faucet Diy Family Handyman

How To Replace A Shower Valve Like Professional Plumber

How To Fix A Leaking Bathtub Faucet The Home Depot

Repairing A Leaky Two Three Handle Tub Shower Faucet

Longer Version Replace A Bathtub Faucet Handle Handles

Moen Bathtub Faucet Handle Repair

2 Handle Shower Faucet Replacement You Ready For This

How To Fix A Leaky Bathtub Faucet 6 Ways Stop Drips

Danco Metal Tub Shower Repair Kit Gerber In The Faucet Kits Components Department At Com