Removing Bathtub Faucet Handles: A Comprehensive Guide
Removing bathtub faucet handles is a common plumbing task that homeowners may encounter for various reasons. Whether it's for repair, replacement, or simply to improve the aesthetic appeal of the bathroom, understanding the process is crucial. Incorrect removal can lead to damage to the faucet itself or to the surrounding plumbing. This article provides a detailed guide to removing bathtub faucet handles, covering different types of handles and offering practical advice for a smooth and successful operation.
Before commencing any plumbing work, safety precautions are paramount. Always turn off the water supply to the bathtub. Typically, this can be achieved by closing the shut-off valves located beneath the sink or within the access panel behind the tub. If individual shut-off valves are not available, the main water supply to the entire house must be shut off. This measure prevents potential flooding and water damage during the removal process. Once the water is shut off, turn on the faucet to relieve any residual pressure in the pipes.
The tools required for removing bathtub faucet handles are typically basic and readily available. A screwdriver set (both flathead and Phillips head), a set of Allen wrenches (also known as hex keys), penetrating oil, pliers, and a utility knife are generally sufficient. A cloth or towel should also be on hand to protect the bathtub surface from scratches and to wipe up any water spills. It is advisable to keep a small container nearby to store any removed screws or small parts, preventing them from being lost.
Identifying the Faucet Handle Type
Bathtub faucet handles come in various designs, each with its own removal method. Recognizing the type of handle is the first step towards successful removal. The most common types include:
1. Screw-On Handles: These handles are attached directly to the valve stem with a visible screw, usually located on the front or side of the handle. The screw may be covered by a decorative cap or button.
2. Screwless Handles (Compression Fit): These handles are pressed onto the valve stem and held in place by friction. They typically do not have any visible screws or caps.
3. Set-Screw Handles: These handles are secured to the valve stem with a small set screw, usually located on the underside or side of the handle. The set screw is typically recessed and requires an Allen wrench to loosen.
4. Lever Handles: Lever handles may incorporate elements of the other types, often using a set screw or a hidden screw beneath a decorative cap.
Careful observation of the handle's design will reveal the mechanism used to secure it to the valve stem, guiding the removal process.
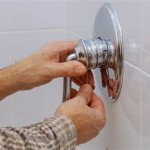
Removing Screw-On Handles
Screw-on handles are among the simplest to remove. The process involves the following steps:
1. Locate the Screw: Examine the handle for a visible screw. It may be located on the front, side, or top of the handle. Often, a decorative cap or button covers the screw. This cap can usually be pried off using a small flathead screwdriver or a utility knife. Exercise caution to avoid scratching the handle's finish.
2. Remove the Screw: Once the screw is exposed, use the appropriate screwdriver (either flathead or Phillips head) to loosen and remove it. Turn the screwdriver counterclockwise to loosen the screw. Be careful not to strip the screw head by applying excessive force or using the wrong size screwdriver.
3. Remove the Handle: After removing the screw, the handle should pull straight off the valve stem. If the handle is stuck, gently rock it back and forth while pulling. Avoid using excessive force, as this could damage the valve stem. If the handle remains stubborn, a small amount of penetrating oil applied around the base of the handle may help loosen it.
4. Inspect the Valve Stem: Once the handle is removed, inspect the valve stem for any signs of damage or corrosion. If necessary, clean the valve stem with a wire brush or sandpaper to remove any buildup.
Removing Screwless Handles (Compression Fit)
Screwless handles rely on a tight fit to stay in place, making their removal slightly more challenging. Here’s how to proceed:
1. Apply Penetrating Oil: Spray a small amount of penetrating oil around the base of the handle where it meets the valve stem. This helps to loosen any corrosion or buildup that may be holding the handle in place. Allow the penetrating oil to sit for a few minutes to work its way into the joint.
2. Gently Rock and Pull: Using both hands, gently rock the handle back and forth while simultaneously pulling it away from the valve stem. Avoid applying excessive force, as this could damage the valve stem or the handle itself. Gradual, controlled movements are key.
3. Use a Handle Puller (If Necessary): If the handle remains stuck after applying penetrating oil and rocking it, a handle puller may be necessary. A handle puller is a specialized tool designed to remove stubborn handles without causing damage. Follow the instructions provided with the handle puller for proper usage.
4. Protect the Tub Surface: When removing a stubborn handle, be mindful of the bathtub surface. Place a towel or cloth around the base of the faucet to protect it from accidental scratches or dents if the handle suddenly comes loose.
Removing Set-Screw Handles
Set-screw handles are secured by a small screw, typically recessed and often located on the underside or side of the handle. Removal involves these steps:
1. Locate the Set Screw: Carefully inspect the handle for a small, recessed screw. It is usually located on the underside or side of the handle, near the base. A flashlight may be helpful in locating the set screw.
2. Loosen the Set Screw: Use an Allen wrench (hex key) of the appropriate size to loosen the set screw. Insert the Allen wrench into the recess and turn it counterclockwise. The set screw may be tight, so apply firm, steady pressure. Be careful not to strip the Allen wrench head or the set screw socket.
3. Remove the Handle: Once the set screw is loosened, the handle should slide off the valve stem. If the handle is still stuck, gently rock it back and forth while pulling. A small amount of penetrating oil may be helpful if the handle is particularly stubborn.
4. Inspect the Set Screw: After removing the handle, inspect the set screw for any signs of damage or corrosion. If necessary, clean the set screw with a wire brush or replace it with a new one.
After removing any type of faucet handle, it’s vital to address any underlying issues that prompted the removal. This might involve replacing worn-out cartridges, repairing leaks, or cleaning mineral deposits from the valve components. Addressing these issues ensures the long-term functionality and efficiency of the faucet.
Proper storage of removed parts is also crucial. Screws, caps, and other small components should be kept in a labeled container to prevent loss or misplacement. This simplifies the reassembly process and ensures that all necessary parts are available when reinstalling the handles.
Reinstallation of the faucet handles typically involves the reverse of the removal process. Ensure that all components are clean and properly aligned before tightening any screws or set screws. Avoid over-tightening, as this can damage the handle or the valve stem. Once the handles are reinstalled, turn the water supply back on and check for any leaks. If leaks are present, tighten the connections or replace any worn-out parts as needed.

How To Replace Shower Faucet Trim

How To Fix A Leaking Bathtub Faucet Diy Family Handyman

How To Replace A Bathtub Faucet

Replace Upgrade Your Shower And Bath Handle

How To Change A Bathtub Faucet 14 Steps With Pictures Wikihow

Sometimes Stuck Shower Faucet Handles Get Their Own

Diy Bathtub Faucet Repair

How To Replace Shower Knobs Easy Step By Guide

How To Install A Shower Faucet Simple Guide With Pictures

How To Fix A Leaking Bathtub Faucet Diy Family Handyman
Related Posts