Removing a Bathtub Faucet Handle: A Comprehensive Guide
Bathtub faucet handles, while seemingly simple, are integral components of a functional plumbing system. Over time, these handles can degrade, become loose, or require removal for various maintenance and repair purposes. Understanding the process of removing a bathtub faucet handle is a crucial skill for homeowners and maintenance professionals alike. This article provides a detailed guide on how to safely and effectively remove different types of bathtub faucet handles, covering necessary tools, preparatory steps, and specific techniques for each handle style.
Before commencing any plumbing work, safety is paramount. It is essential to shut off the water supply to the bathtub faucet. This prevents potential flooding and water damage during the removal process. The shut-off valves are generally located near the water meter or under the sink if it is a separate shower. Identifying the correct valve and turning it clockwise until fully closed is crucial. After turning off the water supply, open the faucet to relieve any residual water pressure in the pipes. Having a small bucket or towel nearby to catch any remaining water is also advisable. Proper safety equipment, such as safety glasses and gloves, should be worn to protect against potential splashes or sharp edges.
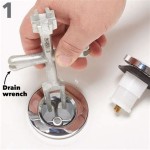
The specific tools required to remove a bathtub faucet handle will vary depending on the type of handle. However, some common tools are frequently needed. A screwdriver set, including both Phillips-head and flat-head screwdrivers, is essential for removing screws that secure the handle. A set of Allen wrenches (also known as hex keys) is required for handles secured with Allen screws. A pair of slip-joint pliers may be necessary for gripping and loosening stubborn components. A penetrating oil lubricant, such as WD-40 or similar product, can be useful for loosening corroded screws or handles. Additionally, a rag or soft cloth should be used to protect the faucet finish from scratches during the removal process. A flashlight can be helpful for illuminating tight spaces and identifying hidden screws or fasteners. Gather all necessary tools before starting the process to ensure a smooth and efficient removal.
Identifying the Faucet Handle Type
Different bathtub faucets utilize varying handle designs, each requiring a specific removal technique. The most common types include screw-on handles, screwless handles, and lever handles. Screw-on handles are typically secured with a visible screw located either on the front, side, or top of the handle. Screwless handles, also known as push-and-pull handles, are held in place by friction or a hidden retaining clip. Lever handles, commonly found in more modern bathrooms, may be secured with a set screw hidden beneath a decorative cap or with a more complex internal mechanism.
Carefully examining the handle for any visible screws or access points is the first step in identifying the type. Running a finger along the handle surface can help locate hidden screws or caps. Consulting the manufacturer's documentation or searching online for the faucet model can provide helpful information about the handle type and its specific removal instructions. Properly identifying the handle type is crucial for selecting the correct removal technique and avoiding damage to the faucet or surrounding plumbing.
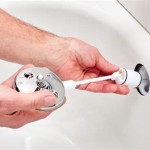
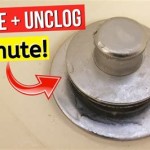
Removing Screw-On Handles
Screw-on faucet handles are generally the easiest type to remove. The process typically involves locating the screw securing the handle, loosening it with the appropriate screwdriver, and then gently pulling the handle off the faucet stem. The screw can be located in various positions, including directly on the front of the handle, concealed beneath a decorative cap on the handle's face, or on the side of the handle near the base. If the screw is concealed by a cap, use a small flat-head screwdriver or a thin knife to carefully pry the cap off. Be cautious not to scratch the handle finish during this step.
Once the screw is exposed, select the appropriate screwdriver size and type to match the screw head. Insert the screwdriver into the screw and turn it counterclockwise to loosen it. Avoid applying excessive force, as this can strip the screw head and make removal more difficult. If the screw is corroded or stuck, applying a small amount of penetrating oil lubricant can help loosen it. Allow the lubricant to sit for several minutes before attempting to loosen the screw again. After the screw is sufficiently loosened, gently pull the handle away from the faucet stem. If the handle is stuck, try wiggling it back and forth while pulling to break any corrosion or buildup that may be binding it.
If the handle remains resistant to removal, double-check that the screw is completely loosened and that there are no other hidden fasteners. Avoid using excessive force, as this can damage the faucet stem or the handle itself. Once the handle is removed, inspect the faucet stem and the internal components for any signs of wear or damage. This is a good opportunity to clean the stem and lubricate any moving parts to ensure smooth operation of the faucet.
Removing Screwless Handles
Screwless faucet handles, also known as push-and-pull handles, present a slightly different challenge for removal. These handles typically rely on friction or a hidden retaining clip to stay in place. Removing them usually involves either pulling the handle straight off the faucet stem with sufficient force or locating and disengaging the retaining clip.
Before attempting to pull the handle off, try wiggling it back and forth to loosen any corrosion or buildup that may be binding it. Applying a small amount of penetrating oil lubricant around the base of the handle can also help loosen it. Allow the lubricant to sit for several minutes before attempting to remove the handle. If the handle is still resistant to removal, try gently tapping it with a rubber mallet to break any stubborn bonds.
If the handle is held in place by a retaining clip, carefully examine the handle for any access points or slots where the clip might be located. Some handles have a small hole on the side or bottom where a small tool, such as a paperclip or Allen wrench, can be inserted to disengage the clip. Insert the tool into the access point and gently push or twist to release the clip. While disengaging the clip, simultaneously pull the handle away from the faucet stem. Be careful not to damage the clip or the surrounding components during this process.
If the handle requires substantial force to remove, double-check that there are no hidden screws or fasteners that may be preventing its removal. Avoid using excessive force, as this can damage the faucet stem or the handle itself. Once the handle is removed, inspect the faucet stem and the internal components for any signs of wear or damage. Clean and lubricate the stem before reassembling the faucet.
Removing Lever Handles
Lever handles, commonly used in modern bathrooms, often incorporate a more complex attachment mechanism compared to screw-on or screwless handles. These handles are typically secured with a set screw hidden beneath a decorative cap or with a more intricate internal locking system. The first step in removing a lever handle is to locate and remove any decorative caps that may be concealing the set screw.
The decorative cap can usually be pried off using a small flat-head screwdriver or a thin knife. Be cautious not to scratch the handle finish during this step. Once the cap is removed, the set screw will be exposed. Use the appropriate size Allen wrench to loosen the set screw by turning it counterclockwise. Ensure that the Allen wrench is fully seated in the screw head to prevent stripping. After the set screw is sufficiently loosened, gently pull the handle away from the faucet stem. If the handle is stuck, try wiggling it back and forth while pulling to break any corrosion or buildup that may be binding it.
Some lever handles may utilize a more complex internal locking system that requires a specific sequence of steps to disengage. In these cases, consulting the manufacturer's documentation or searching online for the faucet model can provide helpful information about the specific removal instructions. Look for any hidden levers or buttons that may need to be pressed or released to unlock the handle. If the handle remains resistant to removal, avoid using excessive force, as this can damage the internal locking mechanism or the handle itself. Once the handle is removed, inspect the faucet stem and the internal components for any signs of wear or damage. Clean and lubricate the stem before reassembling the faucet.
After successfully removing the bathtub faucet handle, it is important to properly store the removed components, especially any screws, caps, or retaining clips. Place these small parts in a secure container or bag to prevent them from being lost or misplaced. This is especially important if the faucet is being disassembled for repair or replacement of internal components. Taking a photograph of the faucet before disassembly can also be helpful for reassembling the parts in the correct order.
Once the necessary repairs or maintenance tasks have been completed, the faucet handle can be reinstalled. Follow the reverse steps of the removal process to reattach the handle securely. Ensure that all screws are tightened appropriately, but avoid over-tightening, which can damage the handle or the faucet stem. Test the faucet to ensure that it is functioning properly and that there are no leaks. If any leaks are detected, double-check the connections and tighten any loose fittings. If the problem persists, consult a qualified plumber.

Replace Upgrade Your Shower And Bath Handle
:max_bytes(150000):strip_icc()/how-to-replace-a-bathtub-faucet-5210836-08-dde7e85413a9421cb4414bb4655e49e3.jpg?strip=all "How To Replace A Bathtub Faucet")
How To Replace A Bathtub Faucet
:max_bytes(150000):strip_icc()/how-to-replace-a-bathtub-faucet-5210836-10-6825223c1e75442187d5ab09690510d4.jpg?strip=all "How To Replace A Bathtub Faucet")
How To Replace A Bathtub Faucet

How To Replace Bathtub Faucet Handles
:max_bytes(150000):strip_icc()/how-to-replace-a-bathtub-faucet-5210836-09-018c0bd035424eae9f9b55faff2d7605.jpg?strip=all "How To Replace A Bathtub Faucet")
How To Replace A Bathtub Faucet
:max_bytes(150000):strip_icc()/how-to-replace-a-bathtub-faucet-5210836-hero-dbea72550ab646829a3fb289eb4e9a65.jpg?strip=all "How To Replace A Bathtub Faucet")
How To Replace A Bathtub Faucet

Diy Bathtub Faucet Repair

How To Fix A Leaking Bathtub Faucet Diy Family Handyman
:max_bytes(150000):strip_icc()/how-to-replace-a-bathtub-faucet-5210836-04-7b7d953ade8141c1a4750f082aad38d4.jpg?strip=all "How To Replace A Bathtub Faucet")
How To Replace A Bathtub Faucet

3 Ways To Remove A Tub Faucet Wikihow
Related Posts