Essential Aspects of Removing a Bathtub Faucet Handle
Bathtub faucets are an essential part of any bathroom, providing a convenient and efficient way to control water flow. Over time, these faucets may require maintenance or replacement, which may involve removing the faucet handle. Removing a bathtub faucet handle can seem like a daunting task, but it is a relatively straightforward process if you have the right tools and knowledge.
In this comprehensive guide, we will walk you through the essential aspects of removing a bathtub faucet handle, ensuring a successful and hassle-free experience.
Step 1: Gather the Necessary Tools
Before you begin, ensure you have the following tools on hand:
- Adjustable wrench or Allen wrench
- Phillips head screwdriver
- Cloth or rag
- Bucket or bowl to catch water
Step 2: Turn Off the Water Supply
To prevent water from gushing out while removing the handle, it is crucial to turn off the water supply to the faucet. Typically, you will find two shut-off valves beneath the sink or behind the access panel in the bathtub. Turn both valves clockwise until they are fully closed.
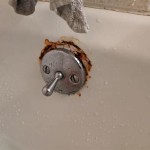
Step 3: Remove the Handle Cap (if applicable)
Some bathtub faucet handles have a decorative cap that conceals the screws holding the handle in place. If your handle has a cap, locate the small hole or notch on the cap, insert the tip of a screwdriver or Allen wrench, and gently pry the cap loose.
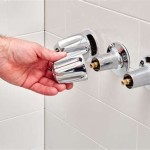
Step 4: Remove the Screws
Once the cap is removed, you will see the screws securing the faucet handle to the valve stem. Using the appropriate wrench, carefully unscrew the screws and remove them.
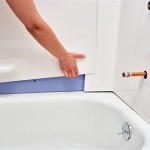
Step 5: Pull Off the Handle
With the screws removed, you can now gently pull the faucet handle straight towards you. It may be necessary to wiggle or twist the handle slightly to loosen it from the valve stem.
Additional Tips:
1. Place a cloth or rag beneath the handle to prevent any water from dripping onto the floor.
2. If the handle is stuck, try using a penetrating oil to loosen it. Apply a few drops to the base of the handle and let it sit for a few minutes before attempting to remove it.
3. Be careful not to overtighten the screws when reinstalling the handle, as this could damage the valve stem.
Removing a bathtub faucet handle is a straightforward task that can be easily accomplished with the right tools and a bit of patience. By following the steps outlined in this guide, you can ensure a successful and hassle-free experience.

How To Fix A Leaking Bathtub Faucet Diy Family Handyman

How To Fix A Leaking Single Handle Bathtub Faucet Quick And Easy

Can T Fixure Out How To Remove Bathtub Faucet Handle

Shower Handle Replacement

3 Ways To Remove A Tub Faucet Wikihow

Bathroom Ideas Replace Tub And Shower Faucet Trim Faucets Repair Handles

How To Fix A Leaking Bathtub Faucet Diy Family Handyman

Moen Bathtub Faucet Handle Repair

How To Change A Bathtub Faucet 14 Steps With Pictures Wikihow

How To Fix A Stripped Faucet Handle In 10 Minutes Or Less Ricks Plumbing