Reglazing a Bathtub: A Do-It-Yourself Guide
Reglazing a bathtub is a viable method to revitalize a worn, chipped, or discolored tub without the significant cost and disruption of a full replacement. The process involves applying a specialized coating that bonds to the existing surface, creating a smooth, durable, and aesthetically pleasing finish. While professional reglazing is often preferred for its expert application and warranty, undertaking the project as a DIY endeavor can offer substantial cost savings. However, it is crucial to understand the complexities involved and the necessary steps to achieve a satisfactory and long-lasting result. This article provides a comprehensive guide to reglazing a bathtub as a do-it-yourself project, outlining the necessary materials, preparation procedures, application techniques, and safety precautions.
The decision to reglaze a bathtub should be made after careful consideration of the tub's condition and the expected outcome. Reglazing is best suited for tubs with surface imperfections such as minor chips, scratches, or staining. It is not a suitable solution for tubs with structural damage, severe rust, or extensive water damage. In cases of significant deterioration, replacement is typically the more practical and cost-effective option. Before embarking on the project, it is essential to inspect the tub thoroughly to assess its suitability for reglazing and to determine the extent of preparation required. Furthermore, the individual undertaking the project should be comfortable with DIY projects involving chemicals and possess the necessary skills and patience. Imperfect preparation or application can lead to premature failure of the coating, rendering the effort and expense futile.
Key Point 1: Preparing the Bathtub Surface
The most critical aspect of a successful bathtub reglazing project is the meticulous preparation of the existing surface. A poorly prepared surface will compromise the adhesion of the new coating, leading to peeling, chipping, or blistering. This phase involves several key steps, each requiring careful attention to detail. These steps include cleaning, etching, and repairing the surface.
The initial step is thorough cleaning. All traces of soap scum, mildew, mineral deposits, and any other contaminants must be removed. This typically involves using a strong bathroom cleaner or a specialized degreaser specifically designed for bathtub surfaces. Stiff brushes, sponges, and scouring pads may be necessary to dislodge stubborn residues. After cleaning, the surface should be rinsed thoroughly with clean water and allowed to dry completely. Even minute amounts of remaining residue can interfere with the bonding of the reglazing coating.
Following cleaning, the next crucial step is etching the surface. Etching creates a slightly rough texture that promotes better adhesion of the new coating. This is typically achieved using an etching compound or a specialized acid solution. The etching compound should be applied evenly to the entire surface of the tub, following the manufacturer's instructions carefully. It is essential to wear appropriate protective gear, including gloves and eye protection, when working with etching chemicals. The etching process usually involves scrubbing the surface with the compound for a specified period, followed by a thorough rinsing with clean water. Again, complete drying is essential before proceeding further.
Any chips, cracks, or other imperfections in the tub's surface must be repaired before applying the reglazing coating. This typically involves using a two-part epoxy filler specifically designed for bathtub repair. The filler should be mixed according to the manufacturer's instructions and applied to the damaged areas using a putty knife or similar tool. The filler should be smoothed and feathered to blend seamlessly with the surrounding surface. Allow the filler to cure completely according to the manufacturer's recommendations before sanding it smooth. Sanding should be done with fine-grit sandpaper to avoid scratching the surrounding surface. The repaired areas should then be cleaned and etched along with the rest of the tub surface.
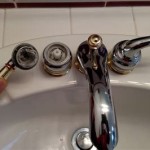
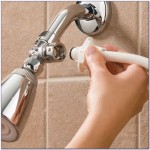
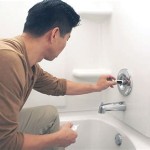
Masking is the final step in the preparation process. All areas surrounding the bathtub that are not to be reglazed, such as the walls, faucets, and drain, should be carefully masked off with painter's tape and plastic sheeting. This will protect these surfaces from overspray and accidental spills. It is important to use high-quality painter's tape that will not leave residue when removed. The masking should be applied neatly and securely to ensure a clean and professional finish.
Key Point 2: Applying the Reglazing Coating
The application of the reglazing coating requires careful attention to detail and adherence to the manufacturer's instructions. The coating typically consists of two or more components that must be mixed immediately before application. Incorrect mixing ratios or improper mixing techniques can result in a coating that does not cure properly or that lacks the desired durability and gloss.
Before mixing the coating components, it is essential to ensure that the work area is well-ventilated. Reglazing coatings typically contain volatile organic compounds (VOCs) that can be harmful if inhaled. Open windows, use fans, and wear a respirator specifically designed for VOC protection. It is also important to protect the surrounding surfaces from overspray by covering them with plastic sheeting. The plastic sheeting can adhere to any surface using masking tape.
The mixing process should be carried out according to the manufacturer's instructions. Typically, this involves combining the base component with a hardener or activator in a specific ratio. The components should be mixed thoroughly until a uniform consistency is achieved. Avoid introducing air bubbles into the mixture during the mixing process. Air bubbles can weaken the coating and create imperfections in the finished surface.
The reglazing coating is typically applied using a spray gun. This provides the most even and consistent coverage. Aerosol cans of reglazing coating are available, but they often produce a less professional finish and may not be as durable. If using a spray gun, it is important to adjust the spray pattern and pressure to achieve optimal results. Practice spraying on a piece of cardboard or other scrap material before applying the coating to the bathtub. This will allow time to refine the technique and ensure that the spray gun is working properly. Wear protective eyewear and gloves while spraying to prevent skin and eye contact with the reglaze material.
Apply the coating in thin, even coats, overlapping each stroke slightly. Avoid applying the coating too thickly, as this can lead to runs and drips. Allow each coat to dry completely according to the manufacturer's instructions before applying the next coat. Typically, two or three coats are required to achieve adequate coverage and durability. Allow ample time for the final coat to cure completely before using the bathtub. This can take several days, depending on the specific coating and environmental conditions.
Key Point 3: Safety Precautions and Post-Application Care
Reglazing a bathtub involves working with hazardous chemicals and requires strict adherence to safety precautions. Failure to follow these precautions can result in serious health risks. Furthermore, proper post-application care is essential to ensure the longevity and durability of the reglazed surface.
The most important safety precaution is to wear appropriate personal protective equipment (PPE). This includes a respirator specifically designed for VOC protection, as well as gloves and eye protection. The respirator will protect the lungs from inhaling harmful fumes, while the gloves and eye protection will prevent skin and eye contact with the chemicals. It is also important to wear clothing that covers the skin completely to minimize exposure. Safety glasses or goggles are mandatory while mixing and applying the coating.
Ensure adequate ventilation in the work area. Open windows and use fans to circulate the air and remove fumes. Avoid working in enclosed spaces where fumes can accumulate. If ventilation is inadequate, consider using a forced-air ventilation system to remove the fumes from the work area. Leave the work area during breaks and after the work is complete to breathe fresh air. Remove all the equipment, rags, and containers when the task is complete.
Dispose of used chemicals and materials properly. Follow local regulations for the disposal of hazardous waste. Do not pour chemicals down the drain or into the environment. Store unused chemicals in a safe place, away from children and pets. Store the unused coating components in their original containers, tightly sealed, and in a cool, dry place. Follow the manufacturer's instructions for storage and shelf life.
After the reglazed surface has fully cured, it is important to maintain it properly to ensure its longevity. Avoid using abrasive cleaners or scouring pads, as these can scratch and dull the finish. Use mild soap and water to clean the surface regularly. Rinse the surface thoroughly after each cleaning to remove all traces of soap. Avoid using harsh chemicals or solvents, as these can damage the coating. Repair any chips or scratches promptly to prevent further damage. Periodically, apply a specialized bathtub cleaner and polish to maintain the shine and luster of the surface. With proper care, a reglazed bathtub can provide years of satisfactory service.
It is also important to consider the long-term maintenance of the caulking around the bathtub. Caulking provides a watertight seal between the tub and the surrounding walls, preventing water damage. Inspect the caulking regularly for cracks or deterioration. Recaulk the tub as needed to maintain a watertight seal. This will help to prevent water damage and extend the life of the reglazed finish.
Finally, be aware that DIY reglazing, while cost-effective, may not offer the same level of durability or aesthetic appeal as professional reglazing. Professional application often involves specialized equipment and techniques that are not readily available to the average DIYer. Furthermore, professional reglazing typically comes with a warranty, providing added assurance of quality and durability. Weigh the pros and cons carefully before deciding to undertake the project as a DIY endeavor. If unsure, consultation with a professional is recommended.

How To Reglaze A Bathtub And Tile Surround Daly Digs

How To Reglaze A Bathtub

How To Fix A Poorly Refinished Bathtub Lazy Guy Diy

Tub Refinishing Tips For Beginners

Step By Tutorial On How To Diy Reglaze Resurface And Refinish A Bathtub Girlvshouseblog Blo Com Makeover Pink Tub Bathroom

Do Diy Bathtub Resurfacing Kits Really Work Todd S Bathtubs

Tub And Tile Refinishing Kit 35 Oz White Diy Bathtub Reglazing Refacing Bath

How To Paint A Tub With Rustoleum What Not Do

My Painted Bathtub 5 Years Later An Honest Review Of Refinished Jacuzzi Tub

How To Reglaze A Bathtub 3 Preparing Be Reglazed Painted
Related Posts