Pfister Bathtub Faucet Installation: A Comprehensive Guide
Installing a Pfister bathtub faucet can significantly enhance the aesthetic appeal and functionality of a bathroom. While professional plumbing services are always an option, a confident homeowner with basic plumbing knowledge and the right tools can successfully complete the installation independently. This article provides a detailed, step-by-step guide to installing a Pfister bathtub faucet, covering preparation, removal of the existing faucet, and installation of the new fixture.
Before commencing the installation process, it is crucial to gather all necessary tools and materials. These typically include:
- Adjustable Wrench
- Basin Wrench
- Pipe Wrench
- Plumber’s Tape (Teflon Tape)
- Plumber’s Putty
- Screwdrivers (Phillips and Flathead)
- Pliers
- Towels or Rags
- Bucket
- New Pfister Bathtub Faucet Set
- Optional: Penetrating Oil (for loosening old connections)
Ensuring the availability of these tools beforehand will streamline the installation and prevent unnecessary delays.
Key Point 1: Preparing for the Installation
Proper preparation is paramount to a successful faucet installation. This phase involves several crucial steps designed to protect the plumbing system and the surrounding bathroom area.
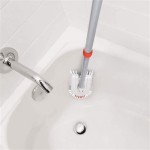
The first and most important step is to shut off the water supply to the bathtub. Locate the water shut-off valves for both hot and cold water lines serving the bathroom. These valves are typically located under the sink, in the basement, or near the water meter. Turn both valves clockwise until they are completely closed. To verify that the water is completely shut off, turn on the existing bathtub faucet. If water continues to flow, double-check the supply valves or consider shutting off the main water supply valve to the entire house. If shutting off the main supply, inform household members beforehand.
Once the water is shut off, protect the bathtub surface and surrounding areas from scratches and potential damage. Spread towels, drop cloths, or cardboard around the work area to prevent tools from scratching the tub’s finish or damaging the flooring. Proper protection minimizes the risk of costly repairs due to accidental damage during the installation process.
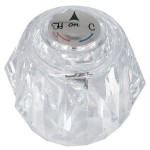
Next, gather the new Pfister bathtub faucet and carefully inspect all components. Ensure all parts are present, including the faucet body, handles, spout, escutcheons (if applicable), and any necessary mounting hardware. Review the manufacturer's instructions included with the new faucet, paying close attention to diagrams and specific installation guidelines. Familiarizing oneself with the new faucet's components and installation requirements before starting the removal process helps avoid confusion and potential errors later.
Finally, clear the area underneath the bathtub, if applicable. Accessing the plumbing connections for some types of faucets may require removing an access panel or working in a confined space. Remove any obstructions that may hinder access to the water supply lines and drain connections. Adequate workspace facilitates the removal and installation processes, reducing the risk of strained muscles or accidental damage.
Key Point 2: Removing the Existing Bathtub Faucet
Removing the old faucet is a delicate process that requires care to avoid damaging the existing plumbing. The procedure varies slightly depending on the type of faucet being replaced (e.g., two-handle, single-handle, or Roman tub faucet).
Before attempting to loosen any connections, allow any remaining water in the supply lines to drain by opening the existing faucet. Place a bucket or towels beneath the faucet and supply lines to catch any residual water and prevent water damage. This step prevents messy spills and ensures a drier, more comfortable working environment.
Next, disconnect the water supply lines from the old faucet. Use an adjustable wrench or basin wrench to loosen the connections at the point where the supply lines connect to the faucet body. If the connections are corroded or difficult to loosen, apply penetrating oil to the threads and allow it to sit for several minutes before attempting to loosen them again. It is crucial to apply counter-pressure with another wrench to prevent the pipe from twisting and potentially damaging the wall plumbing.
After disconnecting the water supply lines, remove any mounting hardware securing the faucet to the bathtub or wall. This may involve loosening screws, nuts, or clips depending on the faucet’s design. Carefully examine the faucet to identify all points of attachment and use the appropriate screwdriver or wrench to remove the fasteners. Avoid applying excessive force, which could damage the faucet or surrounding surfaces.
Once all connections and mounting hardware are removed, carefully detach the old faucet from the bathtub or wall. Gently wiggle the faucet and pull it away from its mounting point. Be prepared for any remaining water that may be trapped inside the faucet body. Dispose of the old faucet responsibly. Check local regulations for proper disposal methods.
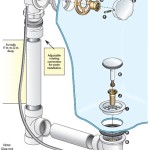
Inspect the exposed plumbing connections for any signs of corrosion or damage. Clean the pipe threads with a wire brush to remove any debris or old plumber's tape. If the pipes are corroded or damaged, consider consulting a professional plumber to repair or replace them before installing the new faucet. Ensuring the integrity of the existing plumbing is essential for a leak-free installation.
Key Point 3: Installing the New Pfister Bathtub Faucet
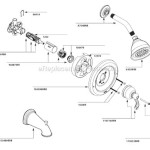
Installing the new Pfister bathtub faucet requires careful adherence to the manufacturer's instructions and attention to detail. Proper installation ensures a secure, leak-free connection and optimal faucet performance.
Begin by applying plumber's tape (Teflon tape) to the threads of the water supply lines. Wrap the tape clockwise around the threads, overlapping each layer slightly. Apply two to three layers of tape to create a watertight seal. Plumber's tape prevents leaks by filling in any imperfections in the threads and creating a tighter connection.
If the new faucet includes escutcheons (decorative plates that cover the mounting holes), install them at this stage. Slide the escutcheons over the water supply lines and position them against the bathtub or wall. Secure them in place using the provided screws or mounting hardware. Ensure the escutcheons are properly aligned and flush against the surface for a clean, professional appearance.
Carefully position the new faucet body over the mounting holes and connect the water supply lines. Tighten the connections using an adjustable wrench, ensuring a snug but not overly tight fit. Avoid overtightening, which could damage the faucet or the supply lines. Use two wrenches – one to hold the faucet body and the other to tighten the supply line – to prevent twisting the pipes within the wall.
If the faucet includes a diverter for switching between the tub spout and showerhead, ensure it is properly connected according to the manufacturer's instructions. The diverter typically connects to a separate water supply line that runs to the showerhead. Tighten the connection securely to prevent leaks.
After connecting all water supply lines and the diverter (if applicable), turn the water supply valves back on slowly. Check for any leaks at the connections. If leaks are detected, tighten the connections slightly or reapply plumber's tape. If the leaks persist, consult a professional plumber.
Once the water supply is restored and all connections are leak-free, test the faucet's functionality. Turn the faucet handles on and off to ensure proper water flow and temperature control. Test the diverter to verify that it switches smoothly between the tub spout and showerhead. Observe the faucet for any unusual noises or vibrations. If any issues are detected, consult the manufacturer's troubleshooting guide or contact a professional plumber.
Finally, clean the area around the faucet and remove any debris or tools. Wipe down the faucet and escutcheons with a soft cloth to remove any fingerprints or water spots. Inspect the installation one last time to ensure everything is secure and properly aligned.
Installing a Pfister bathtub faucet is a manageable project for many homeowners with the right tools and preparation. Following these detailed steps can lead to a successful and satisfying bathroom upgrade.

Troubleshooting Issues About Your Faucet Pfister Faucets

Learn How To Remove And Install Various Tub Spouts

Brushed Nickel Pfister 015 250k Tub Spout Faucets

Brushed Nickel Genuine Replacement Part 920 524j Tub Spout Pfister Faucets

Brushed Nickel Brea 8p8 Ws2 Brsk 1 Handle Tub Shower Trim With Valve Pfister Faucets

Spot Defense Brushed Nickel Rancho 8p8 Ws2 Rchsgs 1 Handle Tub Shower Trim With Valve Pfister Faucets

Pfister Venturi Single Handle 1 Spray Tub And Shower Faucet In Spot Defense Brushed Nickel Valve Included 8p8 Ws2vnsgs The Home Depot

Polished Chrome Pfister J15 020c Tub Spout Faucets

Pfister Venturi Single Handle 1 Spray Tub And Shower Faucet In Matte Black Valve Included 8p8 Ws2 Vnsb The Home Depot

Learn How To Remove And Install Various Tub Spouts